Plumbing / Sinks Faucets
Assembly Instructions for The Home Depot Dining Table, Chair, and Bench
A comprehensive assembly guide for The Home Depot dining furniture set, including step-by-step instructions for the dining table (N717P419329), dining chair (N717P419330), and dining bench (N717P419330).
Table of contents
Manual images
Click an image to enlargeQuick Guide from the Manual
Before beginning assembly, please read these instructions fully. It is recommended to have two people for the assembly process. Assemble the furniture on a clean, smooth surface, such as a rug or carpet, to prevent scratching the parts. Do not fully tighten all screws and bolts until the item is completely assembled. Ensure all protective plastic supports are removed from the metal inserts of the legs before assembly.
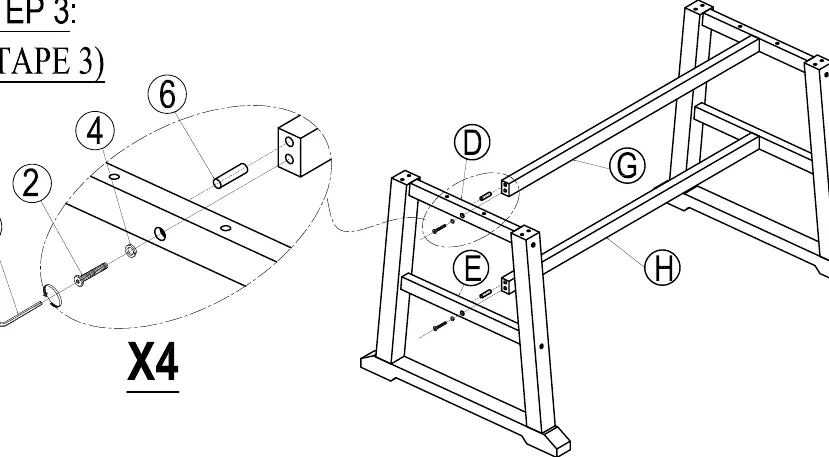
Dining Table Assembly (N717P419329)
Parts: Table Top (A), Panel Top (B), Leg Left (C), Short Top Stretcher (D), Short Between Stretcher (E), Top Stretcher (F), Long Top Stretcher (G), Long Bottom Stretcher (H).
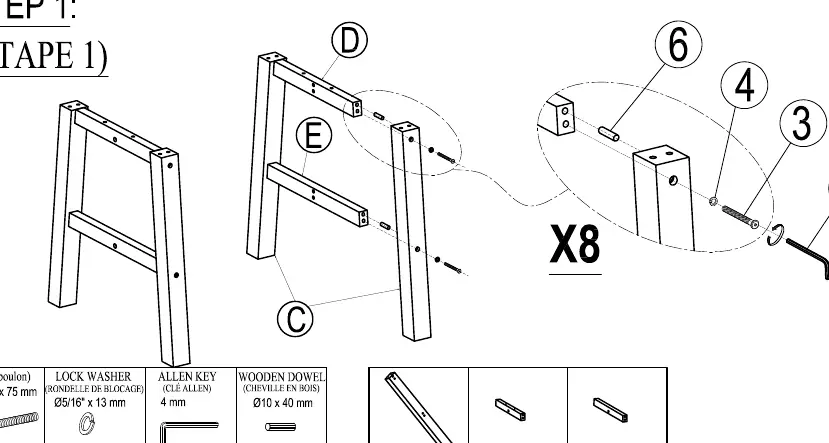
- Step 1: Attach the Short Top Stretcher (D), Short Between Stretcher (E), and Leg Left (C) using bolts (3), lock washers (4), and wooden dowels (6).
- Step 2: Attach the Top Stretcher (F) to the leg assembly using bolts (3), lock washers (4), and wooden dowels (6).
- Step 3: Connect the two leg assemblies using the Long Top Stretcher (G) and Long Bottom Stretcher (H) with bolts (2), lock washers (4), and wooden dowels (6).
- Step 4: Attach the Panel Top (B) to the leg assemblies using bolts (1) and lock washers (4).
- Step 5: Finally, attach the Table Top (A) to the assembled base using bolts (1) and lock washers (4). Adjust the levelers on the feet if necessary.
Dining Chair Assembly (N717P419330)
Parts: Seat Frame (A), Back Frame (B), Leg (C).
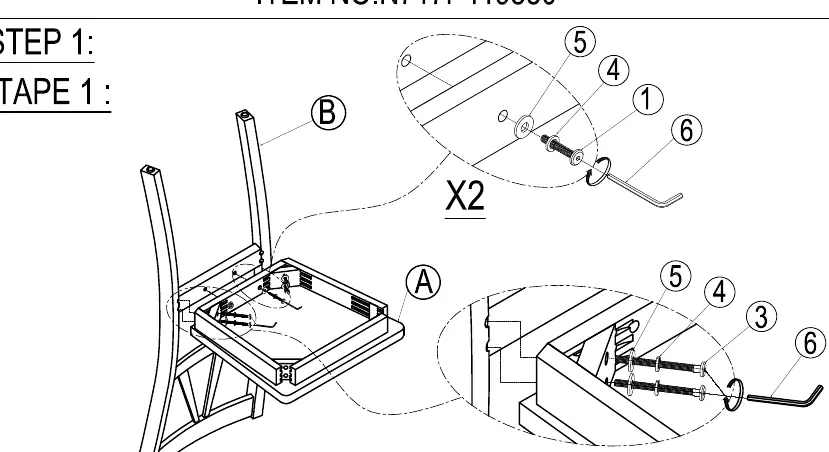
- Step 1: Attach the Seat Frame (A) to the Back Frame (B) using bolts (1, 3), lock washers (4), and flat washers (5).
- Step 2: Attach the front legs (C) to the Seat Frame (A) using bolts (2), lock washers (4), and flat washers (5).
Dining Bench Assembly (N717P419330)
Parts: Seat Frame (A), Left Leg (B), Right Leg (C), Short Top Stretcher (D), Top Stretcher (E), Long Stretcher (F).
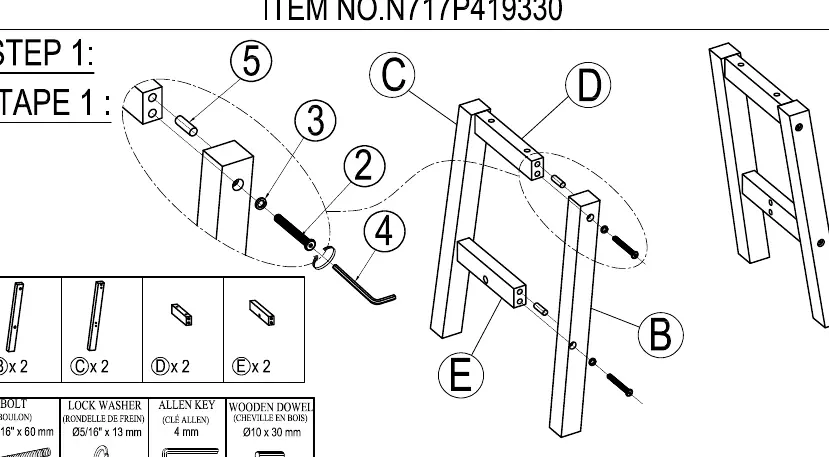
- Step 1: Assemble the leg frames by connecting the Left Leg (B) and Right Leg (C) with the Short Top Stretcher (D) and Top Stretcher (E) using bolts (2), lock washers (3), and wooden dowels (5).
- Step 2: Connect the two leg frames using the Long Stretcher (F) with bolts (1), lock washers (3), and wooden dowels (5).
- Step 3: Attach the Seat Frame (A) to the leg assembly using bolts (2) and lock washers (3).
Care and Maintenance
Clean the furniture only using a damp cloth and mild detergent. Do not use bleach or abrasive cleaners.
Manufacturer information
The Home Depot
Practical help
Common problems
Furniture is wobbling
Adjust the levelers located at the bottom of the legs.
Difficulty aligning parts
Do not tighten bolts fully until the entire unit is assembled to allow for minor adjustments.
Before use
- Clear a clean, smooth area (rug or carpet) for assembly.
- Verify all parts are present according to the Part List.
- Remove protective plastic supports from metal leg inserts.
- Have a second person available to assist with assembly.
- Ensure you have the provided 4mm Allen Key.
Images and diagrams
- The manual uses alphabetical labels (A, B, C...) for wooden parts and numerical labels (1, 2, 3...) for hardware.
- Exploded views show the exact placement of bolts, washers, and dowels for each step.

Manual page author
Michael Turner
Technical manual editor
Reviews PDF manuals for structure, safety notes, and practical product details so readers can find the right information quickly.