Furniture / Home Furnishing
Installation Guide for The Home Depot 057818O French Basket Crystal Chandelier
Step-by-step installation guide for the The Home Depot 057818O French Basket Crystal Chandelier. Includes wiring diagrams, safety precautions, and technical specifications for proper setup.
Table of contents
Manual images
Jump to the sectionQuick guide from the manual
This document provides essential installation instructions for the The Home Depot 057818O French Basket Crystal Chandelier. The most critical requirement is that installation must be carried out by a qualified licensed electrician in accordance with the National Electrical Code. Before beginning, ensure the power supply is turned off at the circuit breaker to prevent electrical shock. The fixture is rated for 110-130V/60Hz with a maximum bulb wattage of 100W.
Safety Precautions
- Always disconnect the power supply before installing, cleaning, or replacing the lighting.
- Wear gloves during installation to avoid damage to the surface of the lighting and wire.
- Keep the lighting away from acid, alkali, and other corrosive chemicals.
- Clean the fixture only with a clean, soft cloth.
- Never cover the lighting when the power is connected.
- Ensure the outlet box is directly supported by the building structure.
Installation Steps
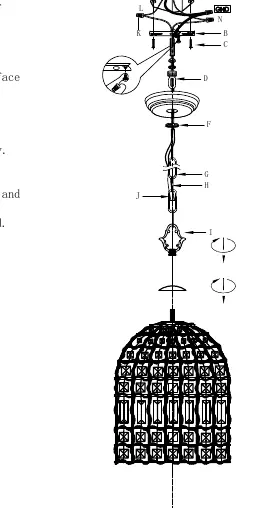
- Preparation: Gather necessary tools, including a blade screwdriver, adjustable wrench, step ladder, and wire cutter. Verify all parts (A-K) are present.
- Crossbar Installation: Attach the crossbar (B) to the existing electrical box (A) using the crossbar screws (C).
- Canopy Assembly: Slide the canopy loop nut lock (F) over the canopy loop (D). Pass the canopy loop (D) through the canopy (E) and connect it to the threaded pipe on the underside of the crossbar.
- Wiring: Pass the main wire (J) and ground wire (H) through the loop (I), chain (G), canopy loop nut lock (F), canopy (E), canopy loop (D), and crossbar (B) until the end of the main wire reaches the electrical box (A).
- Connections: Make appropriate connections using electrician-approved junction caps (K). Stow excess wire in the electrical box (A).
- Final Mounting: Raise the canopy (E) and canopy loop nut lock (F), attach the canopy to the ceiling, and slide the canopy loop nut lock (F) over the canopy loop (D) to secure the fixture.
Wiring Connection
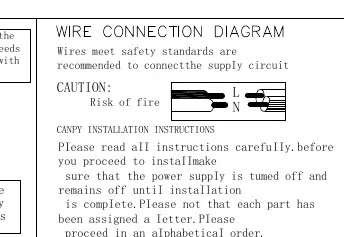
The wiring must be connected to the supply circuit according to safety standards. The main line (Smooth/Rough) must be connected to the power cord/cable. Ensure the end of the main line is tied with a UL knot for strain relief.
Technical Specifications
- Voltage: 110-130V/60Hz
- Maximum Wattage: 100W
Manufacturer information
The Home Depot
Practical help
Common problems
Risk of fire
Ensure wiring meets safety standards and do not exceed the 100W maximum bulb rating.
Electrical shock
Disconnect power at the circuit breaker before starting any installation or maintenance.
Surface damage
Wear gloves during installation and avoid contact with corrosive chemicals.
Before use
- Ensure power is turned off at the main circuit breaker.
- Verify the outlet box is directly supported by the building structure.
- Prepare tools: Blade screwdriver, adjustable wrench, step ladder, wire cutter.
- Check that all parts (A-K) are present.
- Ensure a qualified licensed electrician is available for installation.
Specs in practice
- Bulb Wattage
- 100W maximum
Images and diagrams
- The wiring diagram illustrates the connection of the main line (Smooth/Rough) to the power cord/cable.
- The assembly diagram shows the sequence of parts (A-K) from the electrical box to the canopy and chain.
Model compatibility
- Requires a qualified licensed electrician for installation.
- Outlet box must be directly supported by the building structure.

Manual page author
Emily Carter
User documentation editor
Prepares concise manual descriptions and highlights the most useful setup, operation, and maintenance information for readers.