Furniture / Bedroom Furniture
Assembly Instructions for The Home Depot Furniture Collection
Comprehensive assembly guide for The Home Depot furniture collection, including the Queen Bed, Nightstand with USB, and Dresser with Mirror. Includes tools required, pre-assembly tips, step-by-step assembly instructions, and wall mounting...
Quick answers from the manual
Quick answer
- This manual provides assembly instructions for The Home Depot furniture collection, including a Queen Bed, Nightstand, and Dresser. It covers tools required, pre-assembly tips, step-by-step assembly, and maintenance. p. 1, 13, 20
Key actions
- Tighten all hardware after two weeks and every six months thereafter. p. 4, 16, 23
- Always use two people for assembly and moving. p. 3, 15, 22
Problems and fixes
Furniture is wobbly
Check and tighten all bolts and screws.
p. 12, 19, 30Maintenance and reset
- Perform a yearly check on wall anchors and screws. p. 31
Where to find it in the PDF
- Queen Bed Assembly p. 1, 12
- Nightstand Assembly p. 13, 19
- Dresser & Mirror Assembly p. 20, 30
- Wall Mounting p. 31
Table of contents
Manual images
Click an image to enlargeQuick guide from the manual
This document provides assembly instructions for various furniture items from The Home Depot. Before starting, ensure you have the necessary tools and space.
- Tools Required: Screwdriver (not included), Allen Wrench (included).
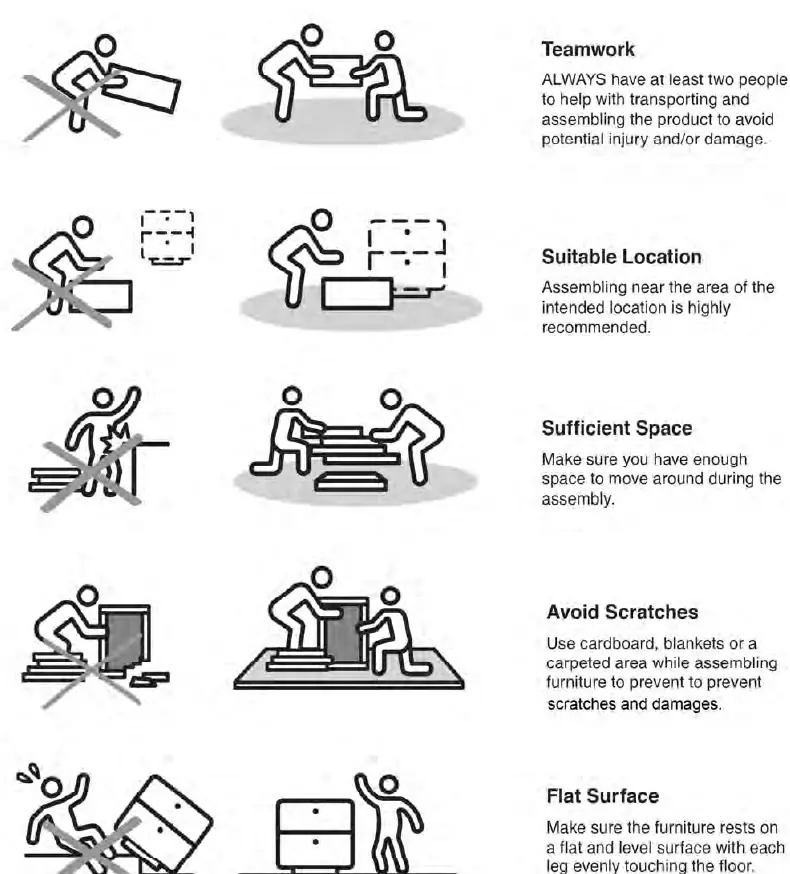
- Teamwork: Always have at least two people to help with transporting and assembling the product to avoid injury or damage.
- Preparation: Check all parts and hardware against the lists provided. Review all diagrams before beginning.
- Workspace: Assemble in the intended location on a flat, level surface. Use cardboard or blankets to protect the floor and furniture from scratches.
Assembly and Care Advice


- Position each part correctly before inserting screws or bolts.
- Turn clockwise to tighten. Only tighten fully when the step is completed or instructed.
- Use appropriate hand tools or power tools carefully to avoid damage.
- Maintenance: After two weeks, check and tighten any loose hardware. Repeat this process every six months.
- Moving: Always lift the product; do not drag it to avoid damage.
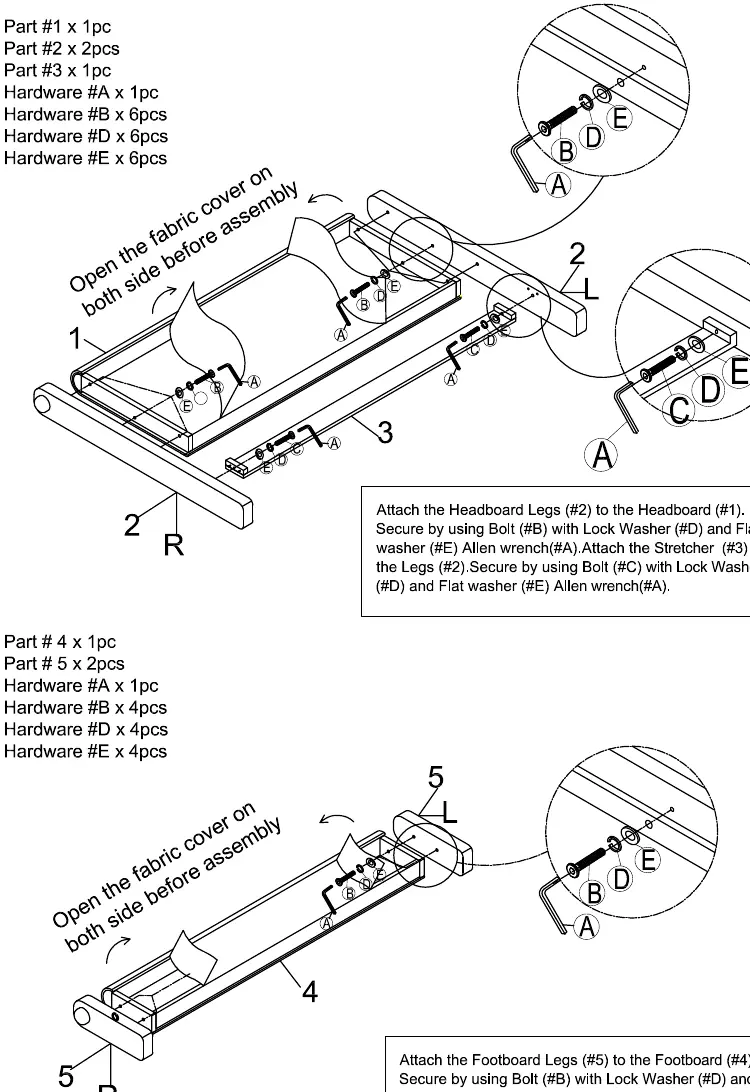
Queen Bed Assembly
The assembly involves attaching the headboard legs to the headboard, connecting the footboard legs to the footboard, and then assembling the side rails and slats. Ensure all bolts and washers are secured as shown in the exploded view diagrams.
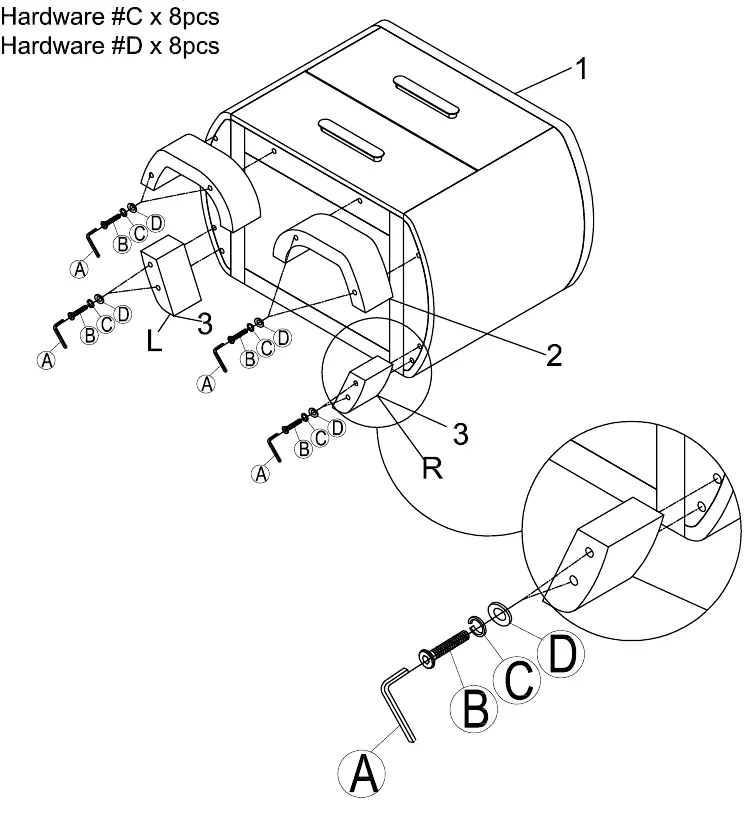
Nightstand Assembly
The nightstand assembly requires attaching the front and back legs to the bottom of the nightstand unit using the provided bolts and washers. Ensure the unit is secured to the wall using the included anti-tip kit.
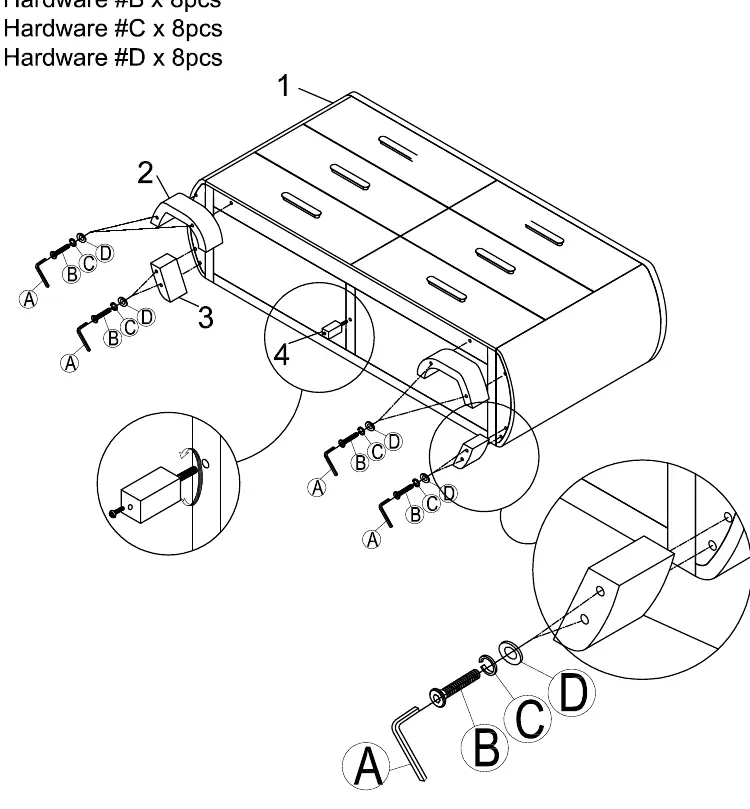
Dresser and Mirror Assembly
The dresser assembly involves attaching the legs to the base. The mirror is attached to the dresser using the provided support rails, bolts, and washers. Always use the anti-tip kit to secure the dresser to the wall.
Wall Mounting and Fixing
When using wall anchors for anti-tip prevention:
- Provided anchors are suitable for masonry walls (drywall, plaster, concrete).
- Check for wires or pipes before drilling.
- Use a stud finder to locate a stud for better support.
- Drill horizontally and ensure the anchor fits tightly.
- Never use wall anchors in ceilings.
Manufacturer information
The Home Depot
Practical help
Common problems
Furniture feels wobbly or unstable
Check all bolts and screws. Tighten any loose hardware. Ensure the furniture is on a flat, level surface.
Missing parts or hardware
Double-check all packaging. If parts are missing or damaged, contact customer support for replacements.
Before use
- Verify all parts and hardware are accounted for.
- Ensure you have at least two people for assembly.
- Clear sufficient space for assembly.
- Protect the floor with cardboard or blankets.
- Ensure the assembly area is flat and level.
- Have a screwdriver ready (not included).
Images and diagrams
- Exploded views show the correct orientation of parts and hardware.
- Step-by-step diagrams indicate which bolts and washers to use for each connection.
- Wall mounting diagrams illustrate proper drilling and anchor installation.
Model compatibility
- Wall anchors provided are only for masonry walls (drywall, plaster, concrete).
- Do not use wall anchors in ceilings.

Manual page author
Michael Turner
Technical manual editor
Reviews PDF manuals for structure, safety notes, and practical product details so readers can find the right information quickly.