Furniture / Storage Cabinets
Installation Guide for Toshiba Window Air Conditioner
A comprehensive installation guide for Toshiba window air conditioners. Learn how to prepare your window, assemble the unit, install accordion panels, secure the air conditioner, and apply weather stripping for optimal performance.
Table of contents
Important Installation Information
This guide covers the installation of Toshiba window air conditioners. Proper installation is the responsibility of the installer. Failure to follow these instructions may void the warranty. We strongly recommend that two people perform the installation to ensure safety and proper alignment.
- Window Requirements: Designed for standard double-hung windows with an opening width of 23" to 36" (584mm to 914mm).
- Safety Warning: Do not cut or remove the third (ground) prong from the power cord.
- Condensate Drainage: The unit must be tilted back 3° to 4° toward the outside to ensure proper drainage.
Tools Required
Before beginning, ensure you have the following tools:
- Phillips screwdriver
- Level
- Flathead screwdriver
- Pencil
- Ruler or tape measure
- Scissors or knife
Window Preparation
The lower sash must open sufficiently to allow a clear vertical opening. Ensure the side louvers and the rear of the AC have clear air space to allow enough airflow through the condenser for heat removal. The rear of the unit must be outdoors, not inside a building or garage.
Preparing the Air Conditioner
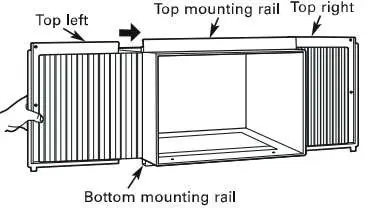
Before installing the unit, the top rail must be assembled on the unit for some models with a capacity of less than 10000 BTU/h.
- Remove the air conditioner from the carton and place it on a flat surface.
- Remove the top rail from the packaging material.
- Align the holes in the top rail with those in the top of the unit.
- Secure the top rail to the unit using the provided 3/8" screws. Ensure all four screws are securely fastened.
Installing Accordion Panels
- Place the unit on the floor, a bench, or a table.
- Hold the accordion panel in one hand and gently pull back the center to free the open end.
- Slide the free end "I" section of the panel directly into the cabinet. Slide the panel down, ensuring the top and bottom of the frame fit into the rails on the cabinet.
- Once installed, make slight adjustments to ensure it sits securely inside the frame channel.
- Repeat the process for the other side.
Installing the Air Conditioner
- Keep a firm grip on the air conditioner and carefully place the unit into the window opening.
- Ensure the bottom of the air conditioner frame is against the window sill.
- Carefully close the window behind the top rail of the unit.
- Verify the unit is tilted back 3° to 4° toward the outside. This is critical for proper condensate management.
- Extend the side panels out against the window frame.
Securing the Unit
- Place the frame lock between the frame extensions and the window sill.
- Drive the locking screws through the frame lock and into the sill.
- For wooden windows, drill 1/8" pilot holes before driving screws into the window sash to prevent splitting.
- Secure the lower sash in place by attaching the sash lock with screws.
- Cut the window sash seal foam and insert it into the space between the upper and lower sashes.
Weather Stripping and Storm Windows
For 8-15K models, trim the weather stripping to the proper length, peel off the backing, and plug any gaps between the air conditioner and the window opening to minimize air leaks. If the AC is blocked by a storm window, add wood to the sill to create a level surface or remove the storm window before installation.
Removing the AC from the Window
- Turn the unit off and disconnect the power cord.
- Remove the sash seal from between the windows and unscrew the sash lock.
- Remove the screws installed through the top rail and side panel frames.
- Slide the accordion panels into the rails to close.
- While holding the unit firmly, raise the sash and carefully remove the unit. Be careful not to spill any condensate while lifting.
Manufacturer information
The Home Depot
Practical help
Common problems
Condensate not draining properly
Ensure the unit is tilted back 3° to 4° toward the outside.
Window sash splitting during screw installation
Drill 1/8" pilot holes before driving screws into the window sill.
Air leaks around the unit
Trim and apply the provided weather stripping to seal gaps between the AC and the window opening.
Before use
- Verify window opening width is between 23" and 36"
- Ensure two people are available for installation
- Confirm window type is double-hung
- Gather required tools (Phillips screwdriver, level, pencil, etc.)
- Check that the rear of the unit will be outdoors
Images and diagrams
- Accordion panels must be inserted into the top and bottom rails of the cabinet.
- The top rail must be secured with 4 screws before placing the unit in the window.
Model compatibility
- Designed for standard double-hung windows.
- Weather stripping is specific to WK08/10/12/15 models.

Manual page author
Michael Turner
Technical manual editor
Reviews PDF manuals for structure, safety notes, and practical product details so readers can find the right information quickly.