Furniture / Chairs & Seating
Installation Guide for The Home Depot Piaza 1200mm Fluted Wall Hung Vanity
Step-by-step installation guide for the Piaza 1200mm Fluted Wall Hung Vanity. This manual covers the necessary tools, packing list, wall mounting procedures, bracket installation, and vanity top assembly.
Table of contents
Manual images
Click an image to enlargeQuick Guide from the Manual
This document provides instructions for installing the Piaza 1200mm Fluted Wall Hung Vanity. Professional installation is recommended. Before beginning, verify all parts against the packing list. Ensure the vanity is mounted to wood studs, as dry wall alone cannot support the weight. Protect all surfaces from sharp objects, high heat, direct sunlight, and chemical hazards.
Tools Required

- Drill and drill bits (including masonry bit for tile)
- Screw driver
- Level
- Knife
- Gloves
- Measuring tape
- Soft head hammer
- Pencil
- Safety glasses
- Silicone sealant
Packing List Overview
Ensure you have the following components before starting:
- Main Vanity (A)
- Top (B)
- Wood Cleat (C)
- Metal Brackets (D)
- Wood Screws (E, F)
- Wall Anchors (G)
- Metal Washers (H)
- Handles (I)
Installation Steps
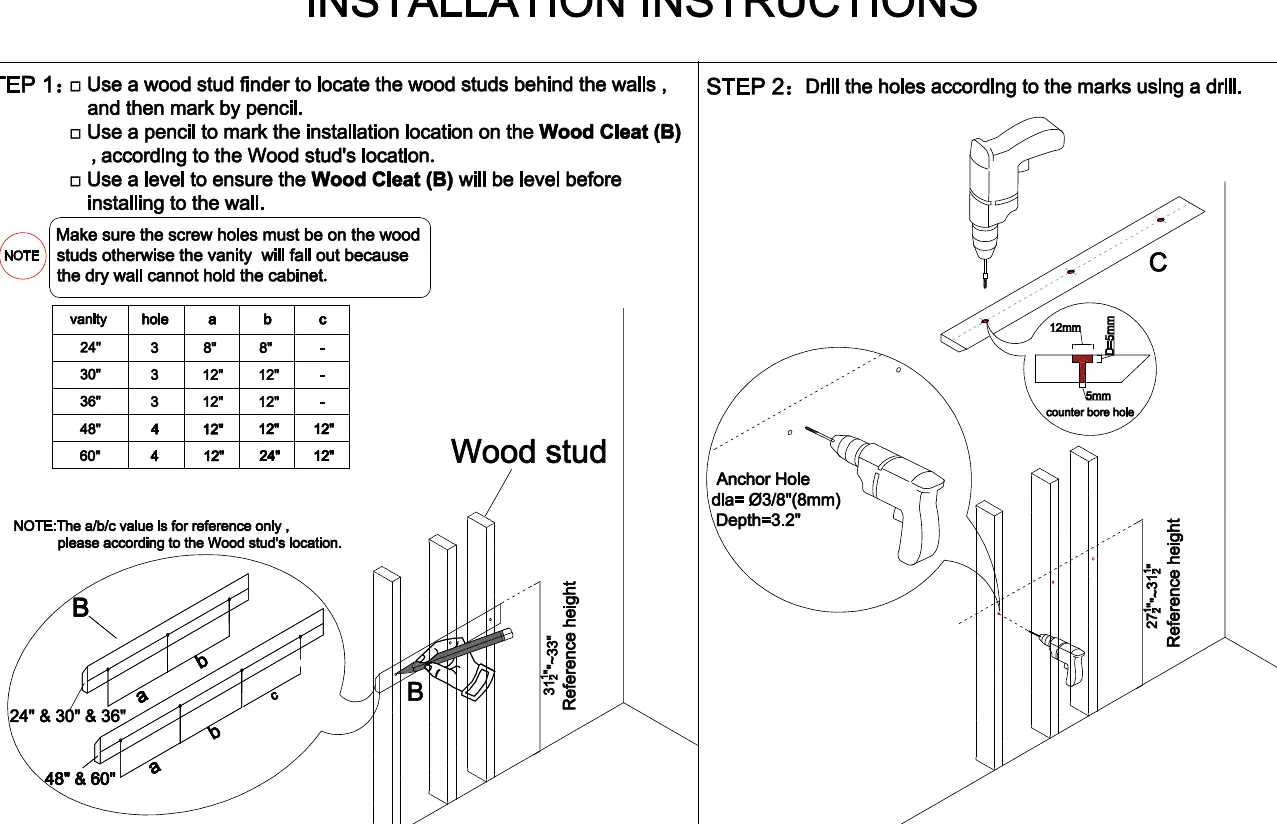
Step 1-2: Preparation and Marking
Use a stud finder to locate wood studs behind the wall. Mark the installation location for the Wood Cleat (B) on the wall, ensuring it aligns with the studs. Use a level to ensure the cleat is perfectly horizontal. Drill holes according to the marks.
Step 3-4: Installing the Wood Cleat
Install the provided Wall Anchors (G) into the wall using a hammer. Secure the Wood Cleat (B) to the wood studs using the provided screws (E).
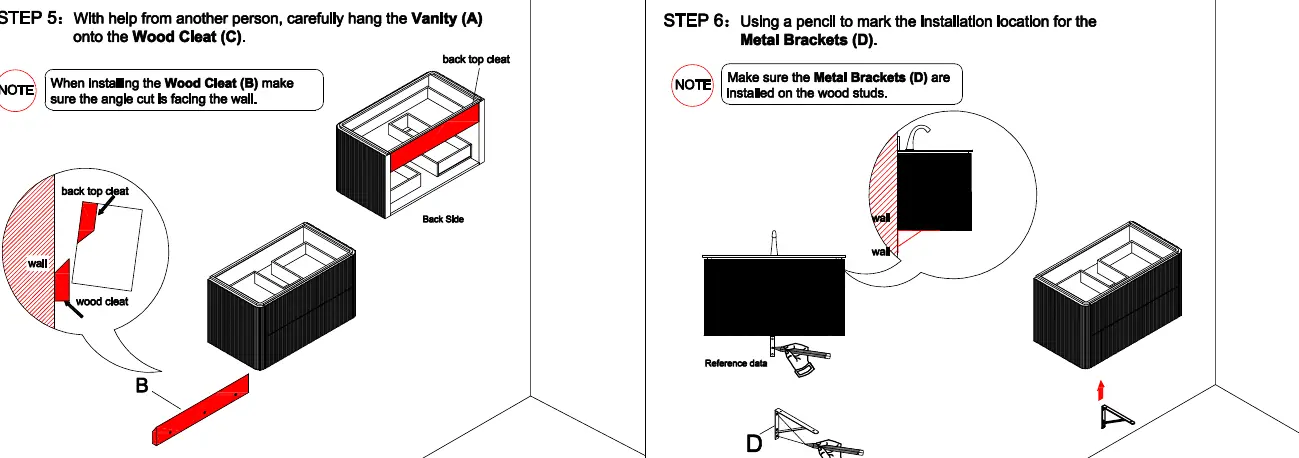
Step 5-6: Hanging the Vanity
With the help of another person, carefully hang the Vanity (A) onto the Wood Cleat (B). Ensure the angle cut of the cleat is facing the wall. Use a pencil to mark the installation location for the Metal Brackets (D) on the wall, ensuring they are positioned on the wood studs.
Step 7-10: Securing the Vanity
Remove the vanity. Drill the anchor holes for the brackets. Install the wall anchors (G) and secure the Metal Brackets (D) to the wood studs using screws (F). Hang the vanity back onto the wall and connect it to the Wood Cleat (C).
Step 11-12: Final Assembly
Connect the Metal Brackets (D) to the vanity using screws (E). Install the handles (I) onto the vanity drawers.
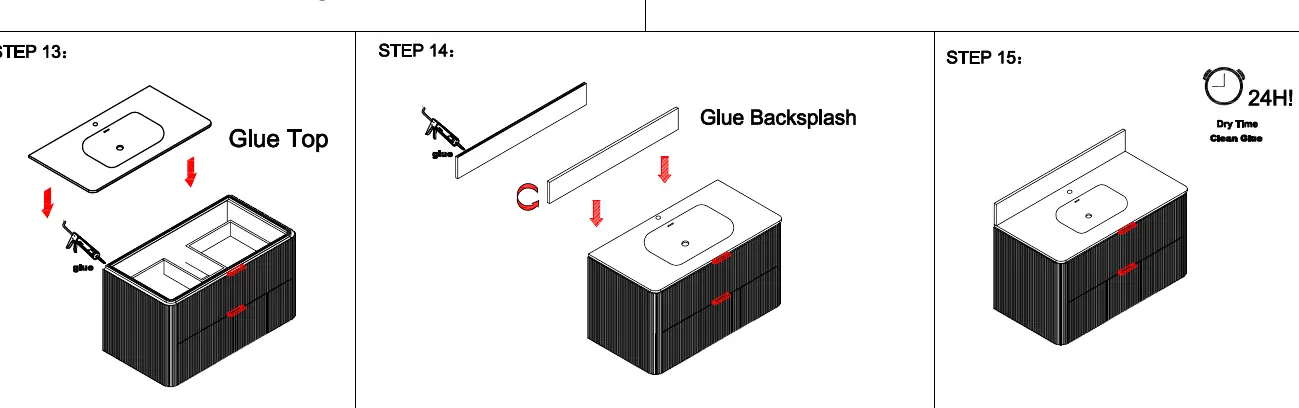
Step 13-15: Finishing
Apply silicone glue to the top of the vanity and place the Top (B). Apply glue to the backsplash and attach it. Allow 24 hours for the glue to dry completely before use.
Manufacturer information
The Home Depot
Practical help
Common problems
Vanity feels unstable or pulls away from the wall
Ensure the Wood Cleat and Metal Brackets are screwed directly into wood studs. Dry wall cannot support the weight of the vanity.
Vanity is not level
Use a level during Step 1 to ensure the Wood Cleat is perfectly horizontal before securing it to the wall.
Before use
- Verify all parts against the Packing List.
- Locate wood studs using a stud finder.
- Ensure you have a level, drill, and appropriate drill bits.
- Have a second person available to assist with lifting the vanity.
- Allow 24 hours for glue to dry after installing the top and backsplash.
Specs in practice
- 24H Dry Time
- The minimum time required for the silicone glue on the top and backsplash to cure before the vanity can be used.
Images and diagrams
- Step 1-2: Illustrates marking stud locations and drilling the wood cleat.
- Step 5-6: Shows the hanging process and marking bracket locations.
- Step 13-15: Demonstrates the application of glue for the top and backsplash.
Model compatibility
- Professional installation is recommended.
- Must be anchored to wood studs; dry wall is not sufficient for support.

Manual page author
David Miller
Documentation analyst
Organizes user manual content into clear summaries, with attention to model details, product context, and everyday usability.