Lighting / Fixtures
Installation Guide for The Home Depot LED Vanity Fixture
Quick installation guide for The Home Depot LED Vanity Fixture. Includes step-by-step wiring instructions, mounting procedures, and safety precautions for 120VAC fixtures.
Table of contents
Important Safety Information
Before beginning installation, ensure the main power is turned off at the circuit breaker to prevent electric shock. All electrical connections must comply with local and National Electrical Code (N.E.C.) standards. If you are not familiar with electrical wiring, please consult a qualified electrician.
Installation Steps
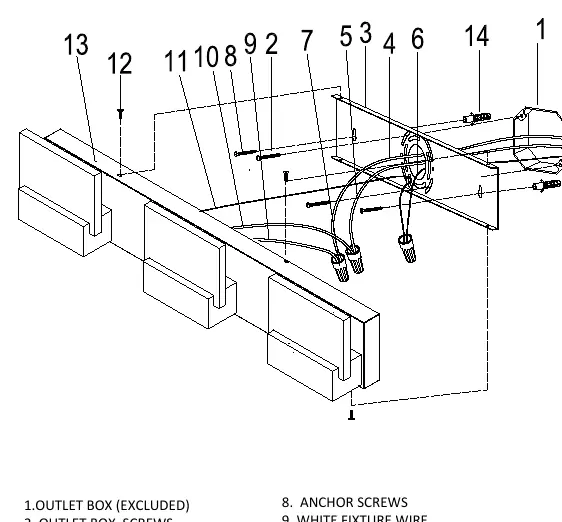
- Remove the fixture and mounting package from the box and verify all parts are present.
- Place the mounting wall plate (3) over the outlet box (1). Align the mounting slots with the outlet box holes and use a level to ensure the plate is straight.
- Mark the location of the keyhole slots on the wall. Drill 1/4 inch holes at the marked locations and insert wall anchors.
- Secure the mounting wall plate (3) to the wall by feeding anchor screws (8) through the keyhole slots into the anchors until flush. Additionally, fasten the plate to the outlet box using two outlet box screws.
- Pull the supply wires (4 & 5) and house ground wire (6) out from the outlet box.
- Connect the fixture wires to the supply wires using wire nuts (7): connect black fixture wire (10) to black supply wire (5), white fixture wire (9) to white supply wire (4), and fixture ground wire (11) to house ground wire (6). Wrap all connections with electrical tape.
- Place the fixture base (13) over the mounting wall plate (3) and secure it using four fixture screws (12).
- Restore power at the circuit breaker and turn on the light switch.
Maintenance
Use a dry and clean cloth to wipe the surface of the fixture. This LED product contains no user-replaceable bulbs.
Manufacturer information
The Home Depot
Practical help
Common problems
Fixture does not turn on after installation
Verify that the circuit breaker is turned on and check that all wire connections (black-to-black, white-to-white, ground-to-ground) are secure and properly wrapped with electrical tape.
Wall plate is not straight
Use a level when aligning the mounting wall plate with the outlet box before marking the keyhole slot locations on the wall.
Fixture base feels loose
Ensure the mounting wall plate is flush against the wall and that all four fixture screws are tightened securely.
Before use
- Turn off main power at the circuit breaker.
- Verify compatibility with 120VAC power supply.
- Ensure you have a drill, level, screwdriver, and electrical tape.
- Check that all parts (mounting plate, screws, wire nuts) are included in the package.
- Confirm local electrical code compliance.
Images and diagrams
- The diagram illustrates the assembly of the fixture base (13) to the mounting wall plate (3).
- It highlights the wiring connections using wire nuts (7) to join supply wires (4, 5, 6) with fixture wires (9, 10, 11).
- It shows the placement of the outlet box (1) and the use of anchor screws (8) for wall mounting.
Model compatibility
- This fixture is designed for 120VAC input.
- The product is dimmable.
- No bulb replacement is required for this LED product.

Manual page author
Michael Turner
Technical manual editor
Reviews PDF manuals for structure, safety notes, and practical product details so readers can find the right information quickly.