Furniture / Chairs & Seating
Assembly Instructions for The Home Depot 1146BE Accent Chair
Step-by-step assembly guide for the The Home Depot 1146BE Accent Chair. Includes parts list, hardware identification, and detailed assembly steps to ensure correct construction.
Table of contents
Manual images
Click an image to enlargeImportant Information
Before beginning assembly, ensure you have a clean, smooth surface to work on to prevent scratching the furniture. Verify that all parts and hardware listed are present. If any parts appear to be missing, check the packing materials thoroughly before contacting your dealer.
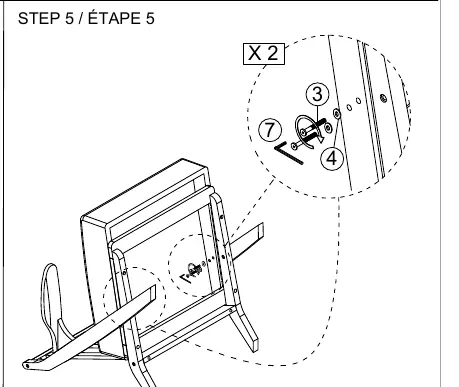
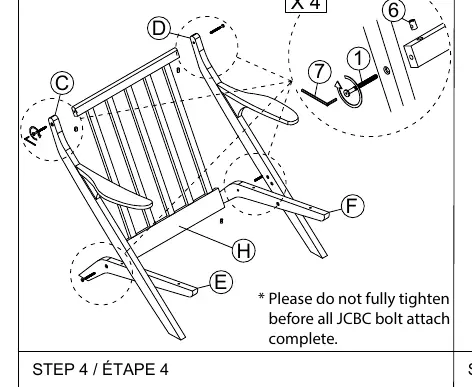
Note: Do not fully tighten any bolts until the entire assembly is complete to ensure proper alignment.
Parts and Hardware
The following parts are included in the package:
- A: Back Cushion
- B: Seat Cushion
- C: LSF Arm
- D: RSF Arm
- E: LSF Rear leg
- F: RSF Rear leg
- G: Seat Frame
- H: Back Rest
Hardware included:
- 1: JCBC Bolt M6 x 70mm (4 pcs)
- 2: JCBC Bolt M6 x 50mm (6 pcs)
- 3: JCBC Bolt M6 x 40mm (4 pcs)
- 4: Flat Washer M6 x 19mm (4 pcs)
- 5: Wood Dowel M10 x 30mm (4 pcs)
- 6: Barrel Nut M6 x 13mm (4 pcs)
- 7: Allen Key M4 (1 pc)
Assembly Steps
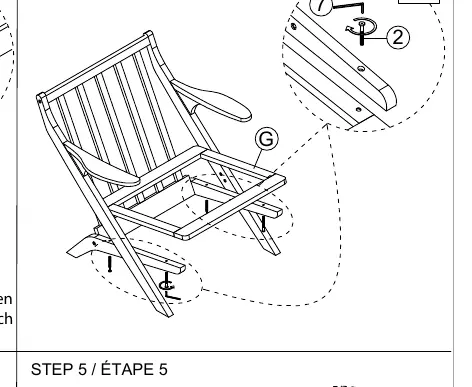
- Step 1: Attach the LSF Rear leg (E) and RSF Rear leg (F) to the arms (C, D) using bolts (2, 7) and wood dowels (5).
- Step 2: Connect the Back Rest (H) to the arm assembly using bolts (1, 6). Ensure the orientation matches the diagram.
- Step 3: Attach the Seat Frame (G) to the existing structure using bolts (2, 7).
- Step 4: Place the Seat Cushion (B) onto the frame.
- Step 5: Secure the seat frame components using bolts (3, 4, 7). Important: Fully tighten all JCBC bolts at this stage.
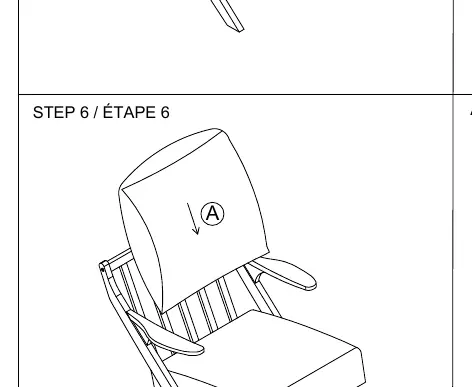
- Step 6: Place the Back Cushion (A) onto the back rest.
Care and Maintenance
It is recommended to install protective pads under all legs to avoid damage or scratches when placing the furniture on wood floors or other hard surfaces. This also helps limit indentation and prevents discoloration if placing the chair on carpet. Periodically check all connections to ensure they remain tight; re-tighten if necessary.
Manufacturer information
The Home Depot
Practical help
Common problems
Hardware loosening over time
Periodically check all connections and re-tighten bolts if necessary.
Missing parts
Check all packing materials thoroughly. If parts are still missing, contact your dealer for replacements.
Before use
- Assemble on a smooth surface to prevent scratches.
- Verify all parts (A-H) are present.
- Verify all hardware (1-7) is present.
- Do not fully tighten bolts until assembly is complete.
Specs in practice
- M6 x 70mm Bolt
- Longest bolt used in the assembly process.
- M6 x 50mm Bolt
- Medium length bolt used for leg and frame assembly.
- M6 x 40mm Bolt
- Shortest bolt used for final frame securing.
Images and diagrams
- The diagrams illustrate the specific orientation of the LSF (Left Side Facing) and RSF (Right Side Facing) parts.
- Steps 2 and 3 highlight the importance of alignment before tightening.
Model compatibility
- Recommended to use protective pads on legs when placing on wood floors or hard surfaces.

Manual page author
Emily Carter
User documentation editor
Prepares concise manual descriptions and highlights the most useful setup, operation, and maintenance information for readers.