Tools / Air Tools Painting
Titan RX-Pro Airless Spray Gun User Manual
Comprehensive user guide for the Titan RX-Pro airless spray gun. Includes setup, operation, maintenance, cleaning, and safety instructions.
Table of contents
Manual images
Click an image to enlargeQuick guide from the manual
The Titan RX-Pro is a high-pressure airless spray gun designed for atomizing liquid coating materials. Before operating, ensure you have read all safety precautions. Always relieve pressure from the system before performing any maintenance, cleaning, or changing tips. The maximum operating pressure is 25 MPa (3600 PSI).
Safety Precautions
Injection Injury Hazard: A high-pressure stream can pierce the skin, leading to serious injury or amputation. Never aim the gun at any part of the body. Always lock the trigger when not in use.
Explosion Hazard: Do not use materials containing bleach or chlorine. Avoid halogenated hydrocarbon solvents (e.g., methylene chloride, 1,1,1-trichloroethane) as they are incompatible with aluminum.
Technical Data
- Max. operating pressure: 25 MPa (3600 PSI)
- Operating temperature range: 5°C to 40°C (40°F to 104°F)
- Weight: 663 g (1.4 lb.)
- Wetted parts material: High-grade steel, aluminum, PTFE, hard metal
Setup
- Set up the sprayer according to the sprayer's owner's manual.
- Attach a grounded, airless spray hose to the material inlet on the gun and tighten securely with two wrenches.
- Flush and prepare the spray system. Inspect all fittings for leaks.
- Perform the "Pressure Relief Procedure" described in the sprayer's owner's manual.
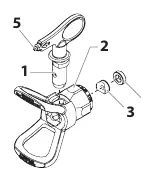
- Insert the tip seal and seal into the back of the tip guard.
- Insert the spray tip into the tip guard slot.
- Thread the tip guard onto the gun and tighten securely.
Operation
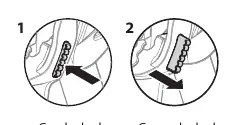
Trigger Lock: Always engage the trigger lock when the gun is not in use. Push the lock from left to right (looking from the rear) to lock, and right to left to unlock.
Spraying: Ensure the arrow on the tip handle points forward. Adjust fluid pressure until the spray is completely atomized. Use the lowest pressure necessary for the desired result.
Clearing a Clogged Tip: Rotate the tip 180° so the arrow points opposite the spray direction. Trigger the gun once to blow out the clog. Repeat if necessary.
Maintenance
Seal Assembly: If the gun leaks or spits at the tip, replace the ball valve in the packing seal assembly and reverse the seat in the diffuser. Always perform the "Pressure Relief Procedure" before maintenance.

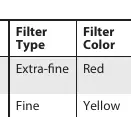
Filter Replacement: The gun filter should be cleaned after every use. Unclip the trigger guard, use it as a wrench to remove the handle assembly, pull out the old filter, and insert a new one with the tapered end first.
Cleanup
Flush the gun after each use and store in a dry location. Do not leave the gun or parts in water or solvents. When using flammable solvents, flush outside, at least one hose length from the pump, and hold the gun firmly against a metal container to prevent static electricity buildup.
Practical help
Common problems
Gun leaks or spits at the tip when trigger is released.
Replace the ball valve in the packing seal assembly and reverse the seat located in the diffuser.
Clogged spray tip.
Rotate the tip 180 degrees, trigger the gun once to blow out the clog, then rotate back to the forward position.
Before use
- Check all hoses for cuts, leaks, abrasion, or bulging.
- Ensure the spray gun has a trigger lock and trigger guard in place and in good working order.
- Verify all accessories are rated for the maximum operating pressure (25 MPa / 3600 PSI).
- Ensure the objects being sprayed are earthed.
- Wear appropriate respiratory equipment and protective clothing.
Specs in practice
- Max. operating pressure
- 25 MPa (3600 PSI) - Do not exceed this pressure.
- Operating temperature range
- 5°C to 40°C (40°F to 104°F) - Ambient temperature limits for operation.
Images and diagrams
- Trigger lock: Push from left to right to lock, right to left to unlock.
- Seal assembly: Shows the end cap, packing spring, packing seal assembly, and retractor pins.
Model compatibility
- Do not use materials containing bleach or chlorine.
- Do not use halogenated hydrocarbon solvents (e.g., methylene chloride, 1,1,1-trichloroethane) as they are incompatible with aluminum.

Manual page author
Emily Carter
User documentation editor
Prepares concise manual descriptions and highlights the most useful setup, operation, and maintenance information for readers.