Tools / Woodworking Tools
Tolsen 79610 Vacuum Cleaner Instruction Manual
Quick guide for the Tolsen 79610 industrial vacuum cleaner. Includes assembly instructions, filter maintenance, safety precautions, and technical specifications.
Quick answers from the manual
Quick answer
- The Tolsen 79610 is a 3000W industrial vacuum cleaner with an 80L tank capacity, suitable for both dry and wet vacuuming (with filter removed for wet). p. 1, 4
Key actions
- Assembly of the vacuum cleaner p. 6
- Cleaning the filter p. 7
First start
- Ensure the filter is installed for dry vacuuming or removed for wet vacuuming, then secure the power head with clips. p. 6
Show 4 more answers Show less
Problems and fixes
Abnormal noise or vibration
Stop using the equipment and have it corrected by a qualified technician.
p. 7Maintenance and reset
- Regularly clean the filter by tapping, shaking, or flushing with water (dry for 24h). p. 7
Technical specifications
| Parameter | Value | Meaning | Pages |
|---|---|---|---|
| Input power | 3000W | Power consumption | p. 4 |
| Tank Capacity | 80L | Maximum volume | p. 4 |
Where to find it in the PDF
- Safety Instructions p. 2, 3
- Specifications & Setup p. 4, 5, 6
- Maintenance p. 7
- Parts List p. 8
Table of contents
Manual images
Click an image to enlargeQuick guide from the manual
The Tolsen 79610 is an industrial vacuum cleaner designed for heavy-duty use. Before operating, ensure you have read all safety instructions. The unit features a 3000W motor and an 80L tank capacity. Always turn the power switch off and unplug the appliance before performing any maintenance or assembly procedures.
Components and controls
The vacuum cleaner consists of the following main parts:
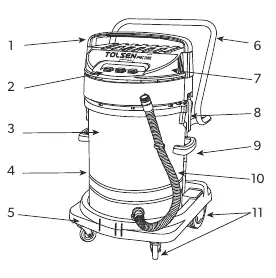
- Engine cover handle
- Start/Stop Switches
- Entry suction tube
- Bidone waste/liquid collection tank
- Base with pivoting and big wheels
- Emptying hose
- Filter and accessories (Hose, Metal Tube, Brushes, Nozzles)
Assembly
Follow these steps to prepare the vacuum for use:
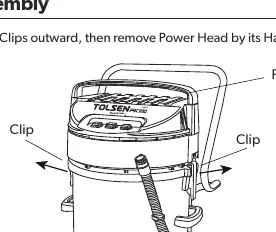
- Remove Power Head: Pull the clips outward and lift the power head by its handle.
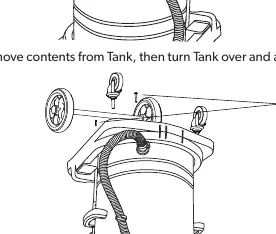
- Prepare Tank: Remove contents from the tank, turn it over, and attach the swivel casters using the provided screws.
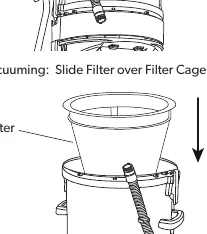
- Filter Setup: For dry vacuuming, slide the filter over the filter cage. For wet vacuuming, remove the filter entirely.
- Final Assembly: Replace the power head with the power switch facing forward and secure it with the clips.
- Connections: Push the end of the hose into the vacuum port until it clicks. Attach the extension wand and desired nozzle.
Maintenance and servicing
Regular maintenance ensures the longevity of your vacuum cleaner:
- Pre-use Inspection: Check for loose hardware, air leaks at connections, cracked parts, or damaged wiring.
- Cleaning the Filter: Remove the filter, tap or shake it into a waste can. If necessary, flush with plain water from the inside. Allow the filter to dry for at least 24 hours before reinstalling. Warning: Never install a wet filter as it increases the risk of electric shock.
- Storage: Wipe external surfaces with a clean cloth and store in a dry indoor area.
Safety instructions
This appliance is double-insulated. Do not attempt to add grounding. Key safety rules include:
- Do not use to pick up flammable liquids or burning materials (cigarettes, hot ashes).
- Do not use without the dust bag or filter in place.
- Keep hair, loose clothing, and body parts away from openings.
- Do not use with damaged cords or plugs.
- Consult a physician before use if you have a pacemaker, due to electromagnetic fields.
Practical help
Common problems
Abnormal noise or vibration
Stop using the appliance immediately and have the problem corrected by a qualified technician.
Damaged supply cord
The cord must be replaced only by a qualified service technician.
Reduced suction
Check if the filter is clogged or if the tank is full of liquid.
Before use
- Inspect for loose hardware
- Check for air leakage on the Tank or Power Head connection
- Ensure the filter is installed for dry vacuuming
- Remove the filter for wet vacuuming
- Verify the power switch is off before plugging in
Show more Show less
Specs in practice
- Tank Capacity
- 80L volume
- Electrical Rating
- 220-240V~50/60Hz
Images and diagrams
- The assembly diagram shows the removal of the power head via clips.
- The parts list provides a breakdown of all components including screws, seals, and motor parts.
Model compatibility
- For household use only.
- Do not use to pick up water from containers like sinks or tubs.

Manual page author
David Miller
Documentation analyst