Tools / Impact Wrenches
User Manual for TOLSEN 87312 20V Li-Ion Flood Light
Quick guide for the TOLSEN 87312 20V Li-Ion Flood Light. Includes safety instructions, operating procedures, maintenance tips, and troubleshooting steps.
Quick answers from the manual
Quick answer
- The TOLSEN 87312 is a 20V cordless LED floodlight. It features two brightness levels (2000Lm and 900Lm), a 360-degree rotating head, and is powered by TOLSEN 20V batteries. p. 4, 13
Key actions
- Adjusting light direction p. 5, 14
- Installing the battery p. 5, 14
First start
- Ensure the battery is charged and the switch is in the 'O' position before installation. p. 5, 14
Problems and fixes
Product not working
Battery may have cut out due to overheating; allow to cool.
p. 7, 16Maintenance and reset
- Clean the lens regularly with a non-abrasive cleaner. Fully discharge and recharge the battery every 1-3 months. p. 6, 15
Technical specifications
| Parameter | Value | Meaning | Pages |
|---|---|---|---|
| Voltage | 20VDC | Rated voltage | p. 4, 13 |
| Brightness | 2000Lm / 900Lm | Lumen output | p. 4, 13 |
Where to find it in the PDF
- Safety Instructions p. 2, 3, 11, 12
- Operating Instructions p. 5, 14
- Maintenance p. 6, 15
Table of contents
Manual images
Click an image to enlargeQuick guide from the manual
The TOLSEN 87312 is a 20V cordless LED floodlight designed for workshop use. To operate, ensure the battery is charged and installed correctly. The light features three switch positions: I (2000 Lumens), II (900 Lumens), and O (Off). Always allow the unit to cool down after prolonged use before charging or storing.
Safety Information
Personal Safety:
- Do not look directly into the light source.
- Do not position the light where it can be stared into for prolonged periods at a distance of less than 2.9 meters.
- Never operate the product if it is damaged.
Electrical and Battery Safety:
- Use only TOLSEN-supplied batteries and chargers.
- Do not modify the charger.
- Charge the battery only indoors.
- Do not charge if the ambient temperature is below 5°C or above 40°C.
- Keep the battery away from metal objects (coins, keys, nails) to prevent short circuits.
- If battery fluid leaks, avoid contact. If contact occurs, wash immediately with soap and water. If it enters the eyes, flush with cold water for at least 10 minutes and seek medical attention.
Operating Instructions
Adjusting Light Direction
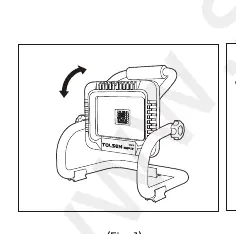
The floodlight head is mounted on a 360° rotating base with a pivoting head. Rotate the head to the desired position to direct the light beam.
Switch Operation
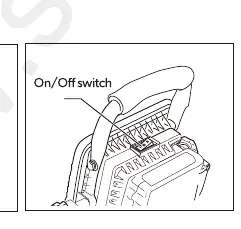
The switch is located on the back of the tool and has three positions:
- I: High brightness (2000 Lumens).
- II: Low brightness (900 Lumens).
- O: Off.
Battery Installation and Removal
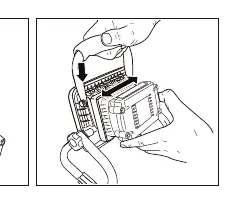
To install the battery, set the switch to the 'O' position. Align the battery with the groove on the tool and push it in the direction of the arrow until it is secured. To remove, press the release button and slide the battery out.
Maintenance
The product requires minimal maintenance. Clean the lens regularly with a non-abrasive cleaner. It is recommended to fully discharge and recharge the floodlight every month (or every three months if stored for long periods). Store in a dry, frost-free place where the ambient temperature does not exceed 40°C.
Practical help
Common problems
Product not working
The battery may have cut out due to excessive use to prevent overheating. Allow the product to cool down before reusing.
Battery heats up during use
This is normal. Allow the battery to cool down regularly to prevent damage.
Battery and charger heat up during charging
This is normal. It is advisable to remove the battery from the charger once it is fully charged.
Before use
- Check the product for any signs of damage.
- Ensure you are using a TOLSEN-supplied battery and charger.
- Verify the ambient temperature is between 5°C and 40°C.
- Ensure the battery is fully charged before first use.
Specs in practice
- 2000Lm / 900Lm
- Brightness output levels for the two operating modes.
Images and diagrams
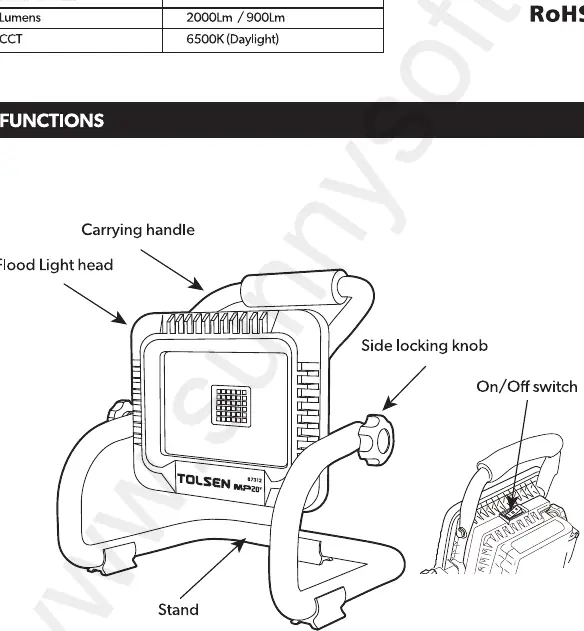
- The diagram shows the floodlight head, carrying handle, side locking knob, and switch location.
- Fig 1 illustrates the 360-degree rotation of the light head.
- Fig 2 shows the location of the On/Off switch.
- Fig 3 demonstrates the battery installation and removal process.
Model compatibility
- Use only TOLSEN-supplied batteries and chargers.
- Do not use the charger with any other product or attempt to charge this product with any other charger.

Manual page author
Emily Carter
User documentation editor
Prepares concise manual descriptions and highlights the most useful setup, operation, and maintenance information for readers.