Tools / Impact Wrenches
User Manual for Tolsen 79213 12V Li-Ion Cordless Drill
Quick guide for the Tolsen 79213 12V Li-Ion Cordless Drill. Includes setup, battery charging, drill bit installation, operation, maintenance, and troubleshooting.
Table of contents
Quick guide from the manual
This manual provides essential safety, operation, and maintenance instructions for the Tolsen 79213 12V Li-Ion Cordless Drill. Always read the full safety information before use. Key safety measures include wearing eye protection, keeping the work area clean, and ensuring the trigger is locked (direction switch in center) when not in use or during adjustments.
Product Overview
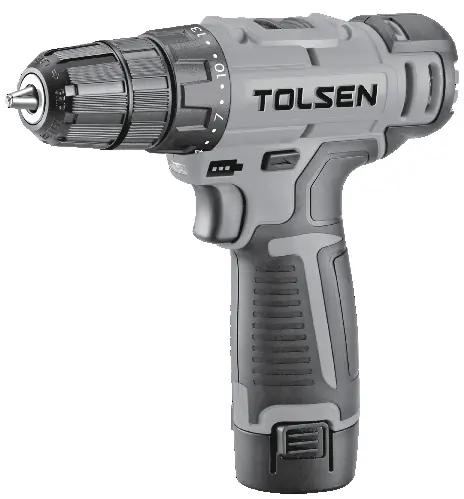
The drill features a chuck for holding bits, a clutch collar for torque adjustment, a gear switch, a direction switch (forward/reverse/lock), a trigger, a work light, and a removable battery pack.
Specifications
- Battery Rating: 12V / 1.5 Ah Li-ion
- No Load Speed: 0-400 / 0-1400 rpm
- Maximum Torque: 248 in.lbs
- Chuck Size: 3/8 inch
- Charger Input: 100-240VAC, 50-60Hz
Operation
Battery Charging
Charge the battery after unpacking and before first use. Place the battery on a dry, fireproof surface (50–104° F). Plug the charger into a 100-240VAC outlet. The red LED on the battery pack indicates charging; it will turn off when fully charged. A full charge takes approximately 3 to 5 hours.
Drill Bit Installation
- Lock the trigger by setting the direction switch to the center position.
- Hold the ring behind the chuck collar and rotate the chuck clockwise to open the jaws.
- Insert the desired bit.
- Rotate the chuck counterclockwise to secure the bit.
- Adjust the torque setting using the numbered ring (1-20 for driving screws, drill icon for drilling).
General Operation
Ensure the battery is securely clicked into the handle. Use the direction switch to select forward or reverse. Press the trigger to start the drill; the work light activates automatically. When finished, release the trigger, lock the switch, and remove the battery.
Maintenance and Servicing
Before each use, inspect the tool for damage, loose hardware, or binding parts. After use, wipe external surfaces with a clean cloth. Store the tool, battery, and charger in a dry, indoor area away from metal objects to prevent shorting.
Troubleshooting
If the tool fails to start, check the battery connection and charge level. If the tool operates slowly, avoid forcing it and check battery health. For overheating, allow the tool to work at its own rate and ensure motor vents are not blocked. If abnormal noise or vibration occurs, have the tool serviced by a qualified technician.
Official resources from the manual
Practical help
Common problems
Tool will not start
Check if the battery is properly connected and charged. Ensure the battery contacts are clean. If the issue persists, the battery may be worn out or the tool may require service.
Tool operates slowly
Do not force the tool to work too fast. Allow it to operate at its own rate. Check if the battery is wearing out.
Overheating
Ensure you are not forcing the tool. Check if motor housing vents are blocked and clean them with compressed air if necessary.
Before use
- Charge the battery fully before first use.
- Inspect the tool for any damage, loose hardware, or cracked parts.
- Ensure the work area is clean, well-lit, and free of hazards.
- Wear ANSI-approved safety goggles and appropriate protective gear.
- Ensure the trigger is in the off position before attaching the battery.
Specs in practice
- Battery Rating
- 12V / 1.5 Ah Li-ion battery provides the power for the drill.
- No Load Speed
- The rotational speed of the drill without a load, adjustable between 0-400 and 0-1400 rpm.
- Maximum Torque
- 248 in.lbs is the maximum twisting force the drill can apply.
Images and diagrams
- Chuck: The front part that holds the drill bit.
- Clutch collar: Rotating ring to adjust torque settings.
- Gear Switch: Located on top to change speed ranges.
- Direction switch: Located above the trigger to set forward, reverse, or lock.
- Trigger: Variable speed control that also activates the work light.
Model compatibility
- Accepts up to 3/8 inch standard drill bits.
- Use only the specified charger and battery pack provided by the manufacturer.
- Do not use larger drill bits than 3/8 inch to avoid gear or motor damage.

Manual page author
David Miller
Documentation analyst
Organizes user manual content into clear summaries, with attention to model details, product context, and everyday usability.