Garden / Lawn Mowers
Operator's Manual for Toro 21in 60V Lawn Mower 21611 / 21611T
Quick guide for the Toro 21in 60V lawn mower (models 21611 and 21611T). Includes setup, battery installation, operation, blade maintenance, and troubleshooting steps.
Quick answers from the manual
Quick answer
- This manual covers the Toro 21in 60V lawn mower (models 21611 and 21611T), including assembly, battery operation, maintenance, and troubleshooting. p. 1, 2
Key actions
- Unfolding the handle p. 9
- Installing the battery p. 11
- Replacing the blade p. 18
First start
- Charge the battery, unfold the handle, install the battery, and squeeze the blade-control bar while pressing the electric-start button. p. 8, 11, 13
Show 4 more answers Show less
Problems and fixes
Machine does not start
Check battery installation, charge, or damage.
p. 20
Machine does not reach full power
Charge battery or clean air vents.
p. 20Maintenance and reset
- Clean under the machine after each use. Replace blade yearly. p. 16, 18
Technical specifications
| Parameter | Value | Meaning | Pages |
|---|---|---|---|
| Battery Pack Model | 88640 | 4.0 Ah, 216 Wh | p. 10 |
| Battery Charger Model | 88610 | 120V AC Input, 60V Max DC Output | p. 10 |
Where to find it in the PDF
- Operation p. 11, 12, 13, 14
- Maintenance p. 16, 17, 18
- Troubleshooting p. 20, 21
Table of contents
Manual images
Click an image to enlargeQuick guide from the manual
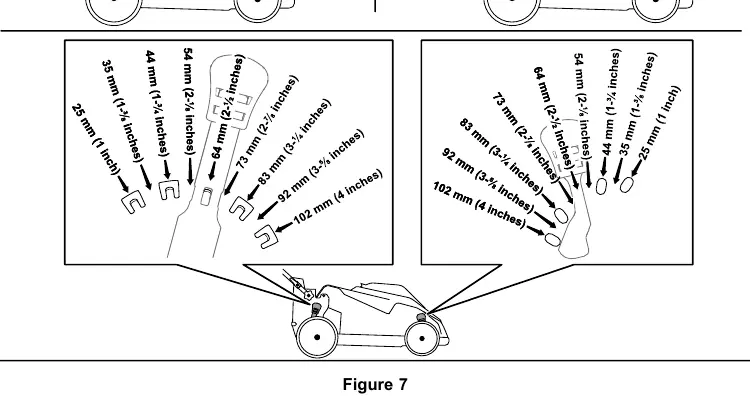
This manual provides essential instructions for operating and maintaining the Toro 21in 60V lawn mower (models 21611 and 21611T). Key procedures include unfolding the handle, installing the battery, adjusting cutting height, and performing blade maintenance. Always ensure the battery is charged and the machine is free of debris before operation.
Safety
Important: Read all instructions before use. The operator is responsible for accidents or hazards. Keep bystanders, children, and pets out of the operating area. Do not operate without all guards and safety devices in place. Remove the battery pack and electric-start button whenever leaving the machine unattended, before changing accessories, or before performing maintenance.
Setup
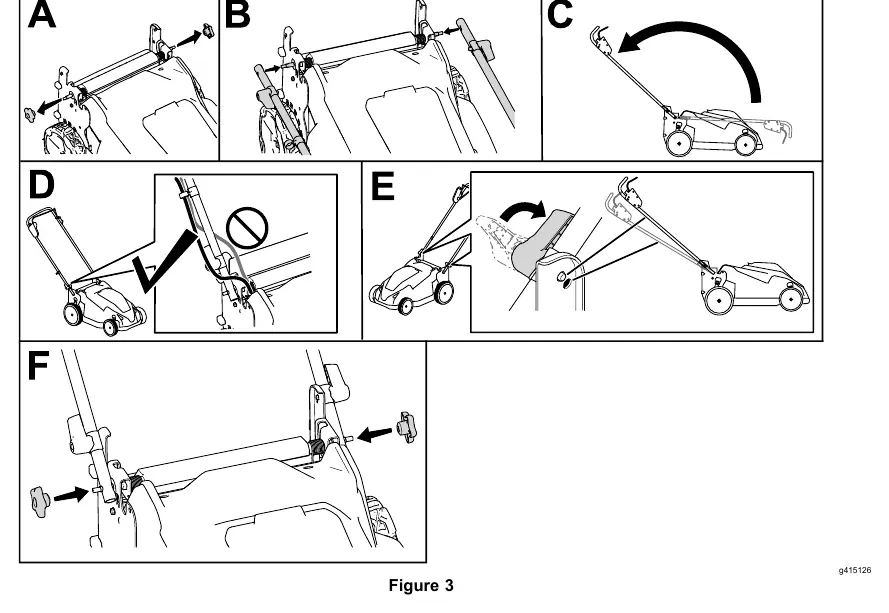
Unfolding the Handle: Remove the handle knobs, attach the handle to the machine using the holes at the ends, move the handle to the operating position, ensure cables are routed in front of the handle, engage the handle locks until they click, and secure the knobs.
Operation
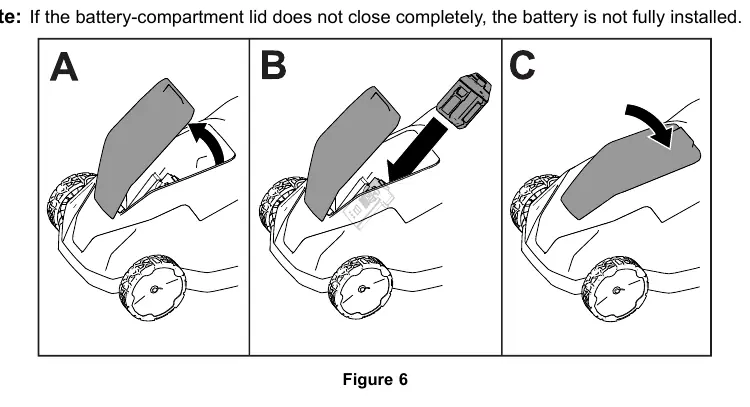
Installing the Battery Pack: Ensure vents are clear, lift the battery-compartment lid, align the battery cavity with the tongue on the machine, and slide the battery in until it locks. Close the lid.
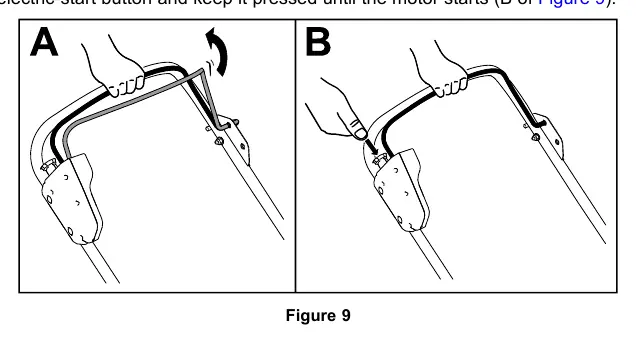
Starting the Machine: Ensure the battery is installed. Squeeze the blade-control bar to the handle and press the electric-start button until the motor starts.
Adjusting Blade Speed: The machine features two settings: AUTO (automatic adjustment for efficiency) and MAX (highest speed at all times). Use the blade-speed button on the electric-start housing to toggle settings.
Maintenance
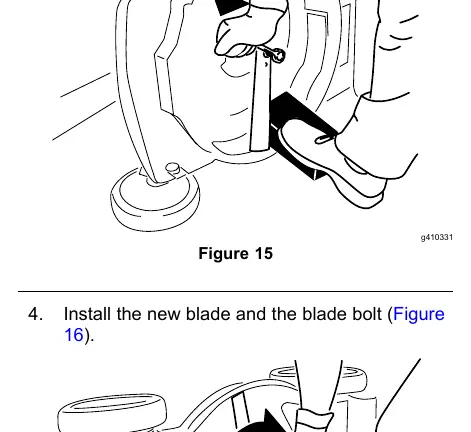
Replacing the Blade: Yearly maintenance is recommended. You will need a torque wrench. Remove the battery, use a block of wood to hold the blade steady, remove the blade bolt and blade, install the new blade with curved ends facing the housing, and tighten the bolt to 82 N-m (60 ft-lb).
Cleaning: Clean under the machine after each use. Use a brush or broom to remove debris. Do not use water, as it may damage electrical components.
Storage
Store the machine, battery, and charger in an enclosed, clean, dry area. For off-season storage, charge the battery until 2 or 3 LED indicators turn green. Do not store a fully charged or fully depleted battery.
Practical help
Common problems
The machine does not start
Check if the battery is fully installed and latched, ensure it is charged, or replace the battery if damaged.
The machine does not reach full power
Remove the battery pack and fully charge it, or clean the air vents.
The machine is vibrating
Inspect the blade for damage or bending; replace if necessary.
The LED indicator on the battery charger is blinking red
Unplug the charger, wait 10 seconds, and plug it back in. If it persists, the battery may be weak or faulty.
Before use
- Ensure the battery pack is fully charged.
- Check that all guards and safety devices are in place.
- Inspect the mowing area and remove debris.
- Verify the blade and blade bolt are not worn or damaged.
- Ensure the handle is properly locked in the operating position.
Show more Show less
Specs in practice
- Battery Pack (88640)
- 4.0 Ah, 216 Wh, 60V Max (54V nominal).
- Battery Charger (88610)
- 120V AC input, 60V Max DC output.
- Blade Speed Settings
- AUTO (adjusts automatically) and MAX (constant high speed).
Images and diagrams
- Handle assembly: Remove knobs, attach handle, move to operating position, route cables, lock pins, and secure knobs.
- Battery installation: Align cavity with tongue, slide in until locked, and close lid.
- Blade replacement: Use a block of wood to hold the blade, remove bolt, install new blade with curved ends up, and torque to 82 N-m.
Model compatibility
- Use only Toro 60V lithium-ion battery packs.
- Use only Toro 60V lithium-ion battery chargers.
- Use only genuine Toro replacement parts.

Manual page author
Emily Carter
User documentation editor