General / Other Manuals
Towelrads 002-DOUBLE Ascot Vertical Double Panel Radiator Installation Guide
Professional installation guide for the Towelrads 002-DOUBLE Ascot vertical double panel radiator, including required tools, mounting steps, and technical specifications.
Table of contents
Quick guide from the manual
This document provides essential installation instructions for the Towelrads 002-DOUBLE Ascot vertical double panel radiator. Important: This product must be fitted only by a fully qualified installer to ensure safety and proper operation.
Required tools and components
Before beginning the installation, ensure you have the following tools and materials:
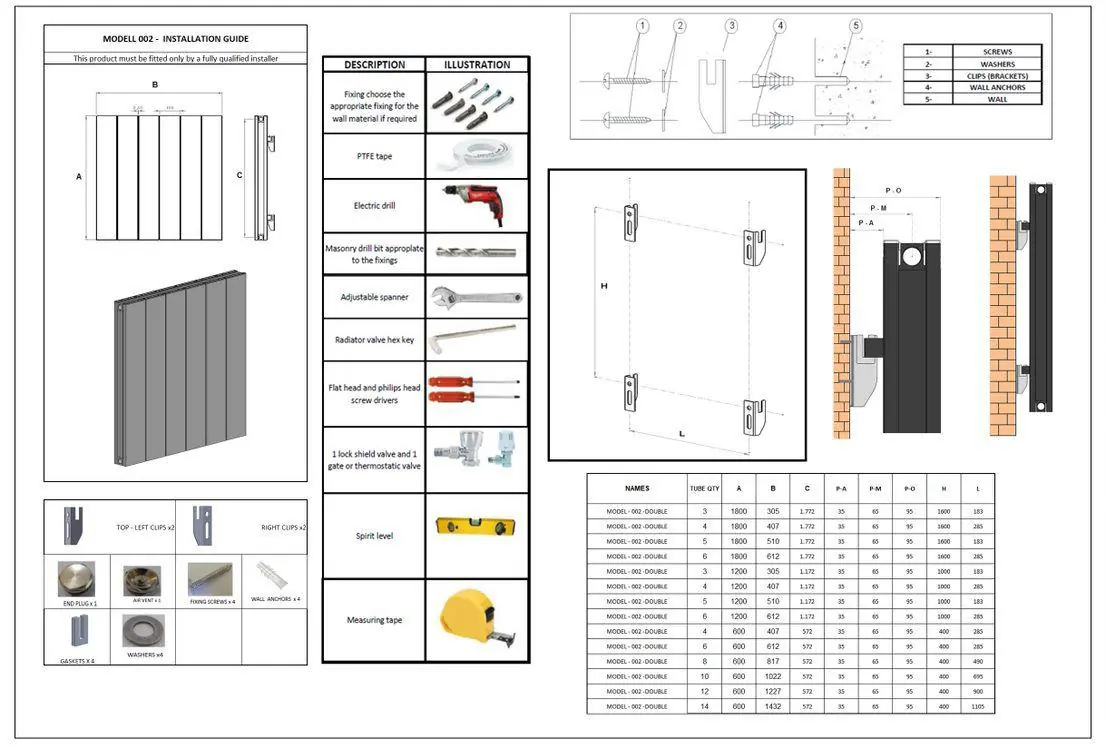
- Electric drill with appropriate masonry drill bit
- Adjustable spanner
- Radiator valve hex key
- Flat head and Phillips head screwdrivers
- Spirit level
- Measuring tape
- PTFE tape
- Lock shield valve and gate or thermostatic valve
- Fixings appropriate for the wall material
Installation procedure
The installation involves securing the radiator brackets to the wall and mounting the radiator unit. Ensure the wall is capable of supporting the weight of the radiator. Use the provided wall anchors, screws, and clips to mount the unit securely. The radiator should be leveled using a spirit level during the mounting process to ensure proper water flow and aesthetic alignment.
Technical specifications
The 002-DOUBLE series comes in various sizes. Key dimensions (A, B, C, P-A, P-M, P-O, H, L) vary based on the number of tubes. Refer to the technical table in the manual to identify the specific measurements for your model variant, including tube quantity and mounting hole spacing.
Practical help
Common problems
Unstable mounting
Ensure the wall type is suitable for the provided wall anchors and that the drill bit used is appropriate for the wall material.
Leaking valves
Ensure all connections are properly sealed using PTFE tape during the installation of the lock shield and thermostatic valves.
Before use
- Verify the wall structure can support the radiator weight.
- Ensure all required tools (drill, spanner, hex key) are available.
- Check that the correct valves (lock shield/thermostatic) are ready for installation.
- Confirm the specific model dimensions (A, B, C) from the technical table.
- Use a spirit level to ensure the radiator is perfectly vertical.
Images and diagrams
- The diagram illustrates the assembly sequence: 1. Screw, 2. Washer, 3. Bracket Clip, 4. Wall Anchor, 5. Wall.
- The side view shows the clearance distance between the wall and the radiator panel.
Model compatibility
- Installation must be performed by a fully qualified professional.
- Fixings must be chosen based on the specific wall material (e.g., brick, concrete, stud).

Manual page author
Emily Carter
User documentation editor
Prepares concise manual descriptions and highlights the most useful setup, operation, and maintenance information for readers.