Power / Batteries & Chargers
Utilitech 12-inch Plug-in LED Undercabinet Light
Quick guide for the Utilitech 12-inch Plug-in LED Undercabinet Light (Model MXW1003-LED6K9027). Includes installation steps, wiring instructions for linking multiple units, safety warnings, and troubleshooting.
Table of contents
Quick Guide
This guide provides essential instructions for installing and operating the Utilitech 12-inch Plug-in LED Undercabinet Light. The fixture is designed for surface mounting and can be linked with up to 8 units (maximum 50 Watts total). Ensure all parts are present before beginning assembly. Estimated assembly time is 20 minutes.
Safety Information
Important: Read and understand the entire manual before assembly. Failure to follow these instructions may result in fire, electric shock, or injury.
- Electrical Safety: This fixture has a polarized plug. Do not alter the plug. If it does not fit, contact a qualified electrician.
- Installation Restrictions: Not intended for recessed installation in ceilings or soffits. Do not run cords behind walls, ceilings, or cabinets where they cannot be inspected.
- Dimmer Compatibility: This product CANNOT be used with a dimmer switch.
- Wiring: Ensure electricity is shut off at the circuit breaker or fuse box before working on wires.
Installation
The fixture includes metal clips (CC) and screws (AA) for mounting. If the installation surface is wood or a soft material, do not use the plastic expansion anchors (BB).
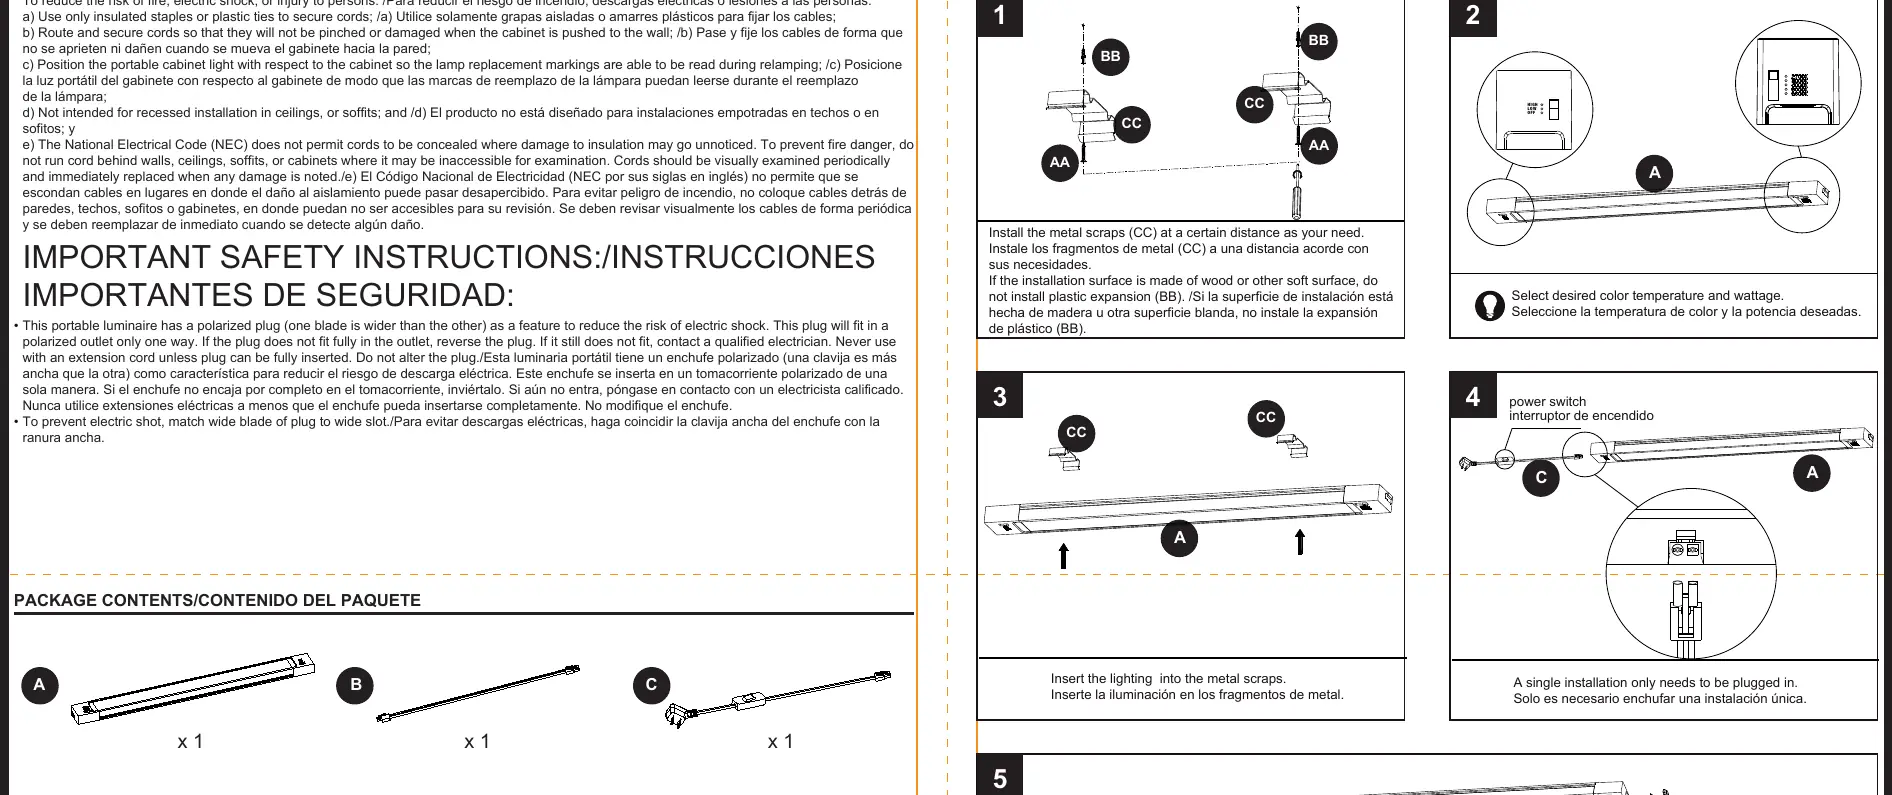
- Determine the desired location for the fixture.
- Install the metal clips (CC) at the required distance.
- Insert the lighting fixture into the metal clips.
- If installing in a series, remove the silicone stopper next to the switch.
- Use the hard-linked headers (DD) to connect additional units.
Operation and Linking
The fixture features a power switch for operation. When linking multiple units, you can connect up to 8 units total, provided the combined wattage does not exceed 50 Watts. Use the provided rubber cap to cover the end of the final fixture in a series.
Care and Maintenance
Ensure the power is off before cleaning. Clean the fixture using a mild glass cleaner applied to a soft cloth. Do not spray cleaner directly onto the fixture. Do not attempt to replace the LED bulbs.
Troubleshooting
If the fixture does not light, check the following:
- Ensure the power is on at the circuit breaker or wall switch.
- Verify that wire connections are secure and correct.
- If the wall switch is defective, it may need to be replaced.
Manufacturer information
Utilitech
Practical help
Common problems
Fixture does not light
Check circuit breaker or wall switch, inspect wire splices for loose connections, or replace the wall switch if defective.
Before use
- Ensure power is off at the circuit breaker before starting installation.
- Verify all parts are present (clips, screws, expansion anchors).
- Check if the installation surface is wood or soft (do not use plastic expansion anchors if so).
- Ensure the outlet is polarized.
- Confirm the total wattage of linked units does not exceed 50 Watts.
Specs in practice
- Linking Capacity
- Up to 8 units can be linked together (max 50 Watts total).
Images and diagrams
- Installation: Shows mounting clips (CC) and screws (AA) for surface attachment.
- Linking: Illustrates the use of hard-linked headers (DD) to connect multiple fixtures in a series.
Model compatibility
- Not for recessed installation in ceilings or soffits.
- Cannot be used with a dimmer switch.
- Requires a polarized outlet.

Manual page author
Michael Turner
Technical manual editor
Reviews PDF manuals for structure, safety notes, and practical product details so readers can find the right information quickly.