Automotive / Parts & Accessories
VEVOR Auto Exhaust Silencer System User Manual
Quick guide for the VEVOR Auto Exhaust Silencer System. Learn how to install, wire, and operate your exhaust cutout valve for custom sound control.
Table of contents
Manual images
Click an image to enlargeQuick Guide
The VEVOR Auto Exhaust Silencer System allows you to control your vehicle's exhaust sound using a remote-controlled valve. This system requires professional installation, including welding and electrical wiring. Always ensure the vehicle is off and the exhaust system is cool before beginning any work.
Safety Precautions
- Cool Down: Ensure the vehicle is completely turned off and the exhaust pipe has cooled to room temperature to prevent scalding.
- Battery Safety: Disconnect the negative terminal of the vehicle battery before starting installation to prevent short circuits.
- Wiring: Use waterproof and high-temperature-resistant wire harnesses. Secure all wiring in a safe position to prevent abrasion.
- Maintenance: Do not use corrosive cleaning agents on the valve. Regularly inspect the fixation, electrical connections, and sealing performance.
Installation Steps

- Select Location: Choose the installation position based on desired sound. Position A (closer to the catalytic converter) provides a louder sound, while Position B (further back) provides a softer sound. Ensure there is sufficient space for welding and operation.
- Welding: Use the welding method to connect the pipe fittings of the exhaust silencing system to the vehicle's original exhaust pipe. Ensure the weld is firm and the seal is airtight to prevent leaks.
- Testing: After installation, perform a power-on test to ensure the valve operates smoothly without jamming.
Wiring Instructions
You have two options for powering the system:

- Option A: Use the provided cigarette lighter plug directly.
- Option B: Cut off the cigarette lighter plug and connect the wires to a 12V power source. Connect the red wire to the positive (+) terminal and the black wire to the negative (-) terminal.
Remote Control Operation
Use the remote control to adjust the exhaust sound:
- ON: Opens all valves for maximum exhaust roar.
- OFF: Closes all valves to restore a low-pitched sound.
- AUTO: Partially opens the valve for a gentle exhaust sound.
Product Parameters
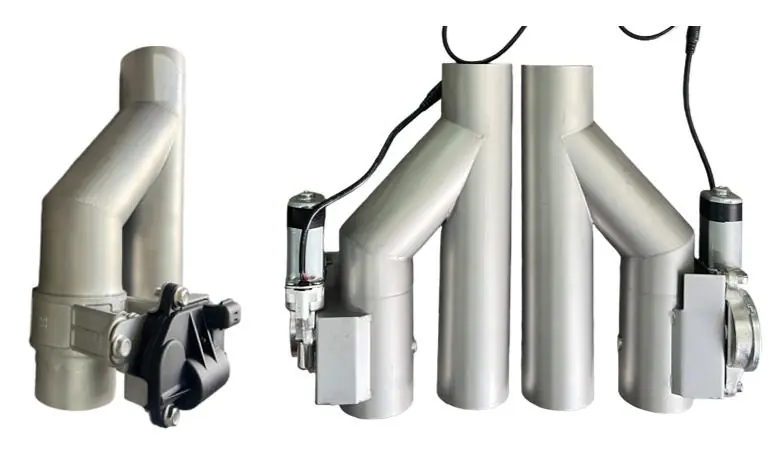
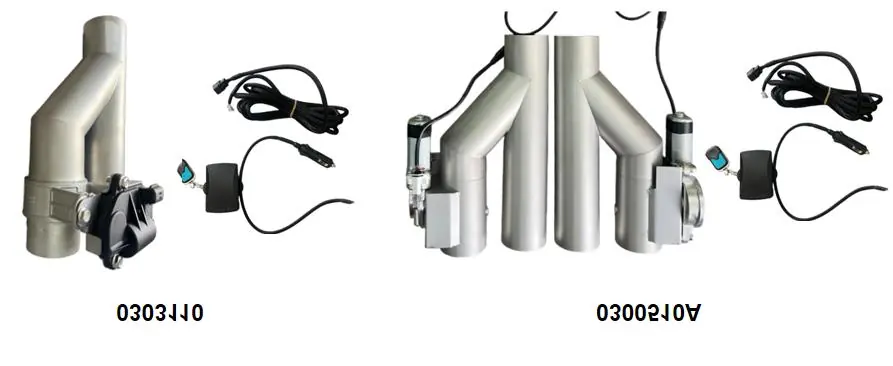
- Model 0303110: 2.5 inch specification, 290x150x140mm dimensions.
- Model 0300510A: 5 inch specification, 290x190x90mm dimensions.
Manufacturer information
VEVOR
Practical help
Common problems
Valve jamming or sticking
Inspect the fixation of the cut-off valve and ensure it is not obstructed by debris or improper mounting.
Air leakage at the connection point
Check the welding and sealing performance. Re-weld if necessary to ensure an airtight seal.
Electrical malfunction
Disconnect power, check all wiring connections for loose contacts, and ensure the control box is kept dry.
Before use
- Ensure the vehicle is completely turned off.
- Allow the exhaust pipe to cool to room temperature.
- Disconnect the negative terminal of the vehicle battery.
- Verify pipe diameter and interface type compatibility.
- Ensure sufficient installation space is available.
Images and diagrams
- The installation diagram illustrates two positions: A (louder, near catalytic converter) and B (softer, near rear muffler).
- The wiring diagram shows two options: using the cigarette lighter plug or hardwiring to a 12V source (Red to +, Black to -).
Model compatibility
- Carefully check the compatibility between the electric exhaust cut-off valve and the vehicle's exhaust system, including pipe diameter and interface type, to avoid mismatched models.

Manual page author
Michael Turner
Technical manual editor
Reviews PDF manuals for structure, safety notes, and practical product details so readers can find the right information quickly.