Automotive / Motorcycle Accessories
User Manual for VEVOR Shutter Exhaust Fan
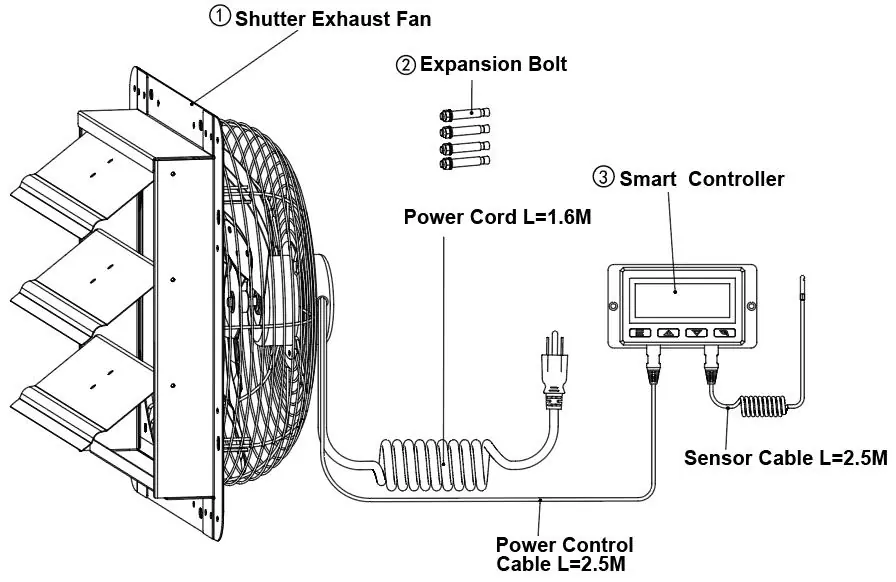
Quick guide for the VEVOR Shutter Exhaust Fan. Includes installation steps, wiring instructions, and programming guide for the smart controller.
Table of contents
Manual images
Click an image to enlargeQuick guide from the manual
This manual provides instructions for the VEVOR Shutter Exhaust Fan, which includes a smart controller for temperature and humidity management. Ensure you read all safety warnings before operation. The product is designed for ventilation and should be installed 3-5 meters above the ground.
Safety Precautions
- Disconnect the fan when moving it to a new location.
- Do not use a power supply that does not meet the rated voltage.
- If the machine emits smoke, odor, or abnormal noise, stop using it immediately.
- Do not disassemble or repair the machine during use.
- Do not use the fan in a window where it may be exposed to rain.
- Ensure the connection socket is installed with a leakage protection switch.
- Keep fingers and objects away from the guard while the fan is running.
Product Description
The system consists of a shutter exhaust fan and a smart controller. Technical parameters vary by model (BT-WL10A/12A/14A/16A and EF-10/12/14/16-ECG), with voltages of AC 120V or 220-240V and frequencies of 50/60Hz.
Installation
- Prepare tools: small wrench and hammer.
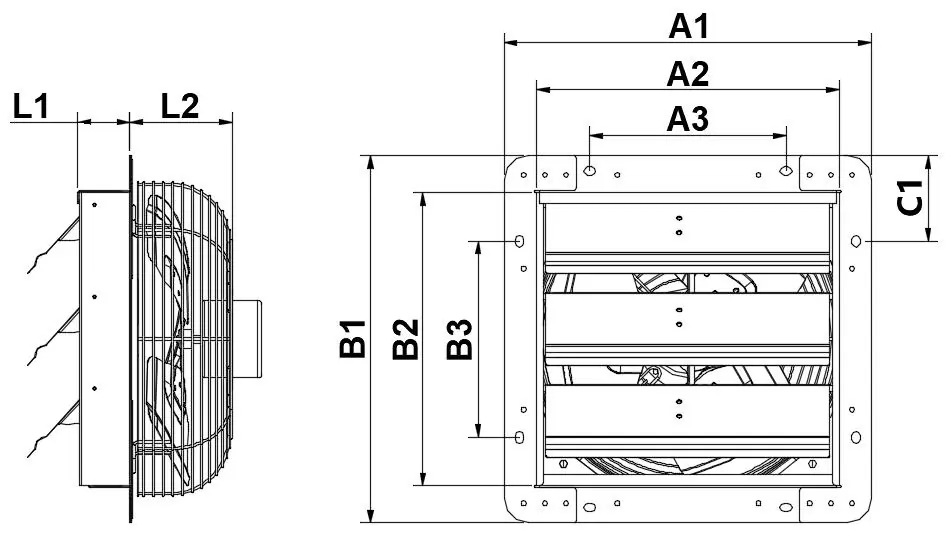
- Make a hole in the wall with the size of A2xB2.
- Punch four holes in the wall using the A3 or B3 dimensions from the chart.
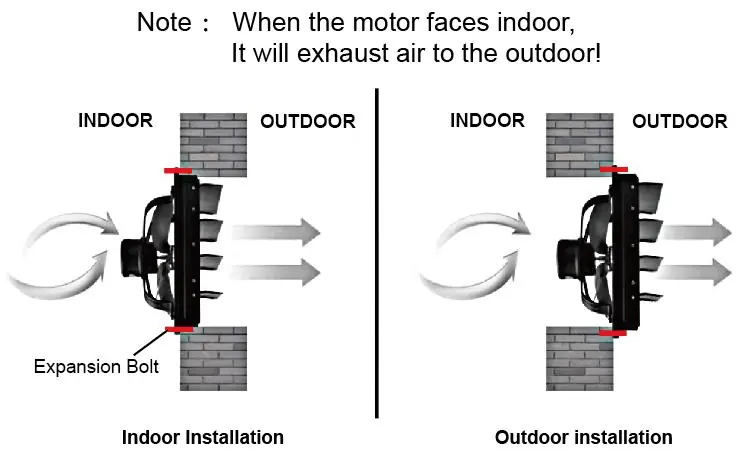
- Install the four expansion bolts (indoor or outdoor installation is possible).
- Mount the product and secure it with nuts.
- Connect the wiring according to the wiring diagram. Ensure the product is firm before powering on.
Powering and Setup
Step 1: Plug the fan's 3-pin connector into the controller's 'out 1' or 'out 2' port. Plug the sensor's 4-pin connector into the controller's 'sensor' port.
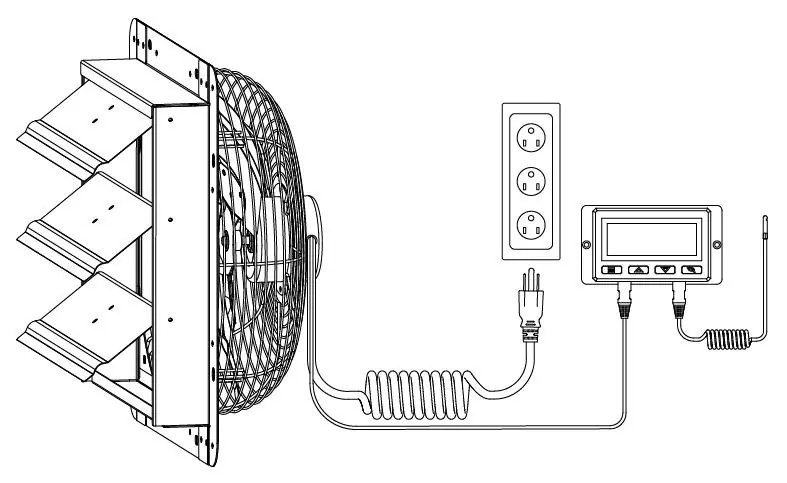
Step 2: Plug the fan's power cord into an AC power outlet to power both the fan and the controller.
Programming
The smart controller features several modes:
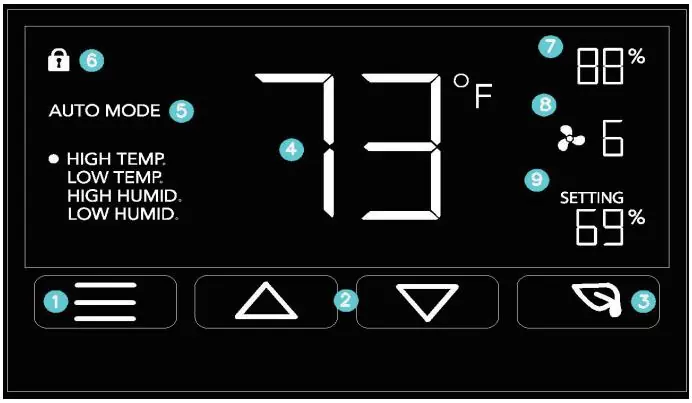
- ON Mode: Fan runs continuously; set max speed (0-10).
- OFF Mode: Fan is off; adjust display brightness (1/2/3/A3) or switch between Fahrenheit/Celsius.
- TIMER Mode: Set a timer for the fan to run.
- AUTO Mode: Set triggers for High/Low Temperature and High/Low Humidity.
- ALARM Settings: Set alarms for temperature or humidity thresholds.
Controller Lock: Hold the LEAF button for 3+ seconds to lock/unlock the display.
ECO Mode: Press the LEAF button to turn off the screen while programs run in the background.
Cleaning and Maintenance
- Always unplug the device before cleaning.
- Clean plastic parts with mild soap and a damp cloth or sponge.
- Do not allow water or liquid to enter the motor.
Troubleshooting and Alerts
The controller displays alert icons for:
- Humidity Alarm: High or low humidity threshold triggered.
- Temperature Alarm: High or low temperature threshold triggered.
- Check Fan Alert: Fan probe senses interference. If the fan is not heating/running, check the warranty page for replacement information.
Manufacturer information
VEVOR
Practical help
Common problems
Fan not heating or running
Check the 'Check Fan Alert' icon. If the fan is not functioning, consult the warranty page for replacement information.
Display is locked
Hold the LEAF button for 3 or more seconds to unlock the controller.
Fan not responding to triggers
Ensure you are in the correct AUTO mode and that the trigger is not turned OFF.
Before use
- Verify the wall hole size matches the A2xB2 dimensions.
- Ensure the installation height is at least 3-5 meters above the ground.
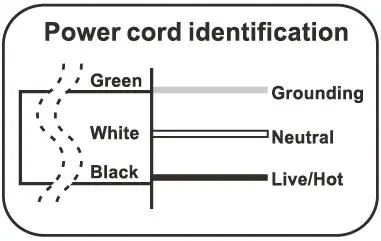
- Check that the wiring matches the diagram (Green=Ground, White=Neutral, Black=Live/Hot).
- Ensure the controller is connected to the fan and sensor correctly.
- Make sure the product is firmly secured to the wall.
Specs in practice
- Frequency (Hz)
- 50/60Hz operating frequency.
Images and diagrams
- Fig. 1: Mounting dimensions and hole layout.
- Fig. 2: Airflow direction for indoor vs. outdoor installation.
- Fig. 3: Controller connection ports for fan and sensor.
- Wiring Diagram: Identification of Green (Ground), White (Neutral), and Black (Live/Hot) wires.
Model compatibility
- Smart controller supports two fans of any size.
- EC-motor fans must be plugged into an outlet to power both the fans and the controller.

Manual page author
Emily Carter
User documentation editor
Prepares concise manual descriptions and highlights the most useful setup, operation, and maintenance information for readers.