HVAC / Ventilation Systems
User Manual for Manrose 150mm Inline Extraction Fan Kit
Quick guide for the Manrose 150mm Inline Extraction Fan Kit. Includes installation steps, wiring diagrams for standard and timer models, safety precautions, and technical specifications.
Table of contents
Manual images
Click an image to enlargeQuick guide from the manual
This manual provides installation and wiring instructions for the Manrose 150mm Inline Extraction Fan Kit. Important: All electrical work must be carried out by a registered electrician in accordance with AS/NZS3000. Ensure the main electricity supply is turned off before starting installation. The fan must be installed at least 2.1m above the floor.
Product Description
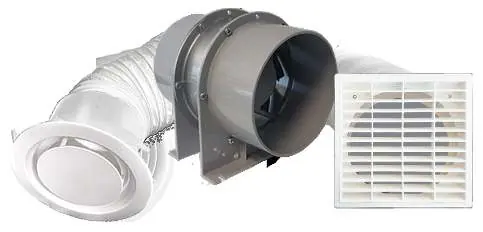
The Manrose inline extraction fan kit is designed for ventilation within a shower cubicle. It includes a high-performance fan, flexible ducting, and interior/exterior grilles. Two models are available: Standard Switching (FAN0101) and Timer (FAN0102).
Specifications
- Duct Size: 150mm
- Fan Type: EC Axial
- Supply: 220-240V AC, 50Hz
- Cut-out Size (Internal): 195mm (+/- 5mm)
- Cut-out Size (External): 160mm
- Timer Model: FAN2444 (Do not use old FAN2444 or FAN0372)
Installation

Interior Grille (EasyFit DCT1550)
- Cut a 195mm hole in the ceiling.
- Wing mounting (for 10mm ceilings): Fold wings in, push base into the hole.
- Clamp mounting (for 13-26mm ceilings): Undo 3 screws until the clamp is slightly thicker than the ceiling, fold clamps/wings, insert into hole, and tighten screws until secure.
- Fascia mounting: Align 3 clips on the fascia with slots on the base and push until it clicks.
Ducting and Exterior Grille
- Select a position for the exterior grille on a soffit or outside wall. Cut a 160mm hole.
- Attach one end of the flexible duct to the spigot with duct tape.
- Feed the duct through the hole from the outside until the grille is flush. Screw the grille to the surface.
- Connect the other end of the duct to the fan discharge spigot using duct tape.
- Connect the remaining duct piece to the ceiling grille and the fan. Keep the duct as straight as possible for optimal performance.
Electrical Connection
All wiring must be fixed securely and comply with current regulations. The cable to the fan should be a minimum of 1mm² in section.
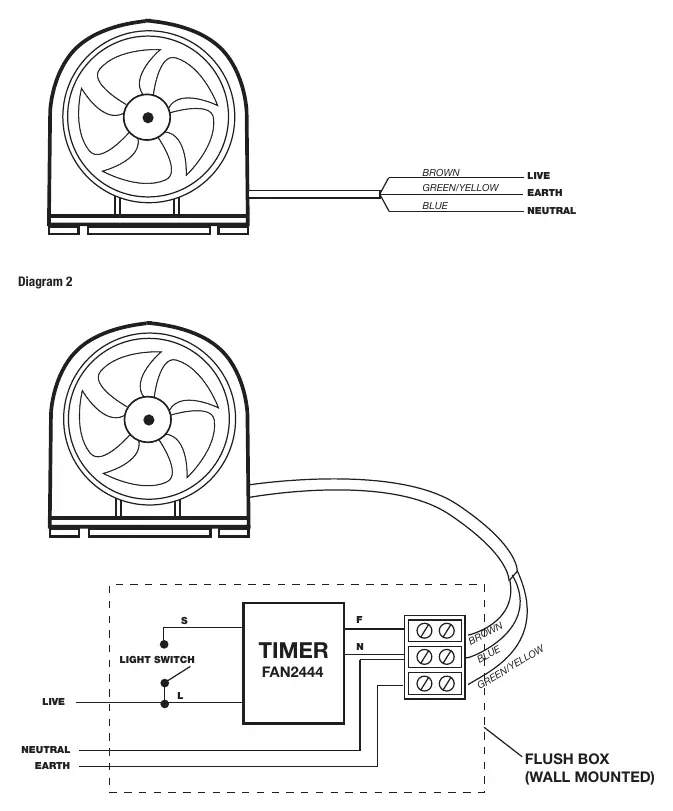
- Standard Switching (FAN0101): Connect to a light switch or dedicated fan switch.
- Timer Switching (FAN0102): Connect to a light switch or dedicated fan switch. The timer is adjustable for 0-20 minutes run-on time and 0-5 minutes delay time.
Safety and Maintenance
- Do not touch hot surfaces during operation.
- Keep air inlets and outlets clean and free of blockages.
- Do not use near flammable liquids or in areas with high heat.
- Ensure the fan is not accessible to persons using the shower or bath.
Practical help
Common problems
Fan does not start
Check electrical connections, ensure the light switch or dedicated fan switch is on, and verify the timer settings.
Ducting is too short
Do not cut the flexible duct until the grille has been screwed to the outside surface to avoid cutting it too short.
Fascia does not click into place
Back the fascia out, rotate it slightly clockwise, and push it back in to hear the click.
Before use
- Ensure the main electricity supply is turned off.
- Verify that the supply voltage matches the product rating label.
- Confirm the area above the installation site is free from obstruction.
- Ensure a registered electrician is available for installation.
- Check that the correct timer model (FAN2444) is being used.
Specs in practice
- Cut-out Size (Internal)
- 195mm diameter hole required for the ceiling grille.
- Cut-out Size (External)
- 160mm diameter hole required for the exterior grille.
Images and diagrams
- Diagram 1: Wiring schematic for the Standard Switching model (FAN0101).
- Diagram 2: Wiring schematic for the Timer model (FAN0102) using the FAN2444 timer.
Model compatibility
- Use only the FAN2444 fan timer model.
- Do not use old model FAN2444 (with resistor) or FAN0372 fan timers.

Manual page author
Michael Turner
Technical manual editor
Reviews PDF manuals for structure, safety notes, and practical product details so readers can find the right information quickly.