HVAC / Heat Pumps
Installation and Assembly Guide for Ximax Designer Radiators
A comprehensive installation and assembly guide for Ximax designer radiators. Includes connection options, mounting diagrams, filling and venting procedures, and troubleshooting tips for various models.
Quick answers from the manual
Quick answer
- This manual provides installation, connection, and maintenance instructions for Ximax designer radiators, including specific dimension tables for various models. p. 1, 4, 5, 6
Key actions
- Drill 4 holes (60mm deep, 8mm diameter) for mounting. p. 4
- Fill and vent the radiator slowly. p. 4
First start
- Open air vent, fill slowly, close vent, run for 2 hours, vent again. p. 4
Show 4 more answers Show less
Problems and fixes
Cold pipes
Vent the radiator.
p. 4
Patchy heat
Check if installed upside down.
p. 4Maintenance and reset
- Clean with soft, damp cloth; add inhibitor to system. p. 4
Technical specifications
| Parameter | Value | Meaning | Pages |
|---|---|---|---|
| Max. Operating pressure | 4-10 bar | Maximum pressure allowed for the radiator | p. 5, 6 |
Where to find it in the PDF
- Assembly Instructions p. 1, 4
- Connection Options p. 2
- Installation Dimension Tables p. 5, 6
Table of contents
Manual images
Click an image to enlargeQuick Guide
This manual provides essential instructions for the installation and maintenance of Ximax designer radiators. Before starting, ensure you have a qualified plumber or specialist to perform the installation. Always check the packaging for completeness and ensure the wall type is suitable for the supplied fixings (solid masonry only). The radiator must be installed at least 150 mm from the floor to ensure efficient heating and ventilation.
Scope of Delivery
The standard packaging includes:
- 1 pc. Radiator
- 1 pc. Air vent (A)
- 1 pc. Blanking plug (B)
- 4 pcs. Masonry wall plugs (C)
- 4 pcs. Screws (D)
- 4 pcs. Washers (E)
- 4 pcs. Wall brackets
Assembly Instructions
Follow these steps for a secure installation:
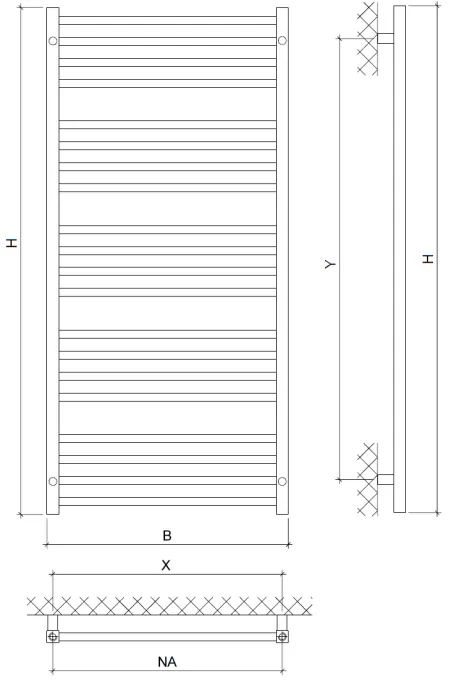
- Drill 4 holes with a depth of approx. 60 mm and a diameter of 8 mm using the dimensions specified in the installation dimension table.
- Insert the wall plugs (C) into the holes (only for solid walls).
- Attach the screw (D) and washer (E) to the bracket. Do not overtighten.
- Check for a baffle inside the horizontal tubes. If present, it must be at the bottom.
- Hang the radiator on the brackets.
- Install the air vent (A) and blanking plug (B) in the upper threaded openings.
- Connect the flow and return pipes using appropriate radiator valves (not included). Use PTFE tape or similar sealing product to ensure watertight connections.
Connection Options
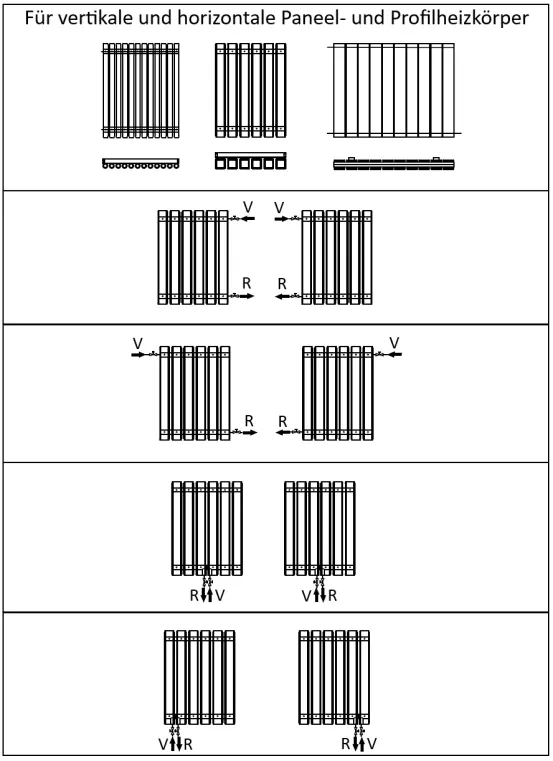
Radiators support various connection types depending on the model, including standard, center, and side connections. Refer to the connection diagrams to identify the correct configuration for your specific radiator model.
Filling and Venting
To properly fill and vent the system:
- Open the air vent.
- Slightly open the inlet valve (approx. 10%) while keeping the outlet valve closed.
- Allow the system to fill slowly.
- Close the air vent once the radiator is full.
- Open both valves fully and run the heating system for about 2 hours.
- Close both valves, open the air vent, and release any remaining air.
Care and Maintenance
After installation, rinse the system thoroughly to remove debris. Add a suitable inhibitor to the central heating system to prevent internal rust and limescale. Clean the radiator using only a soft, damp cloth; avoid scouring pads, scouring agents, or chemical cleaning agents.
Troubleshooting
If pipes are not warm, vent the radiator again. If the radiator provides patchy heat, it may be installed upside down; check the baffle position. For electric radiators, a small amount of water discharge upon first use is normal; if the radiator does not heat, it may require topping up with water.
Practical help
Common problems
Pipes are not warm
Check and vent the radiator using the air vent.
Patchy heat or slow to heat
The radiator may be fitted upside down. Check the baffle position inside the tube.
Water discharge from electric radiator
This is normal upon first use. If it does not heat up, it may need to be topped up with water.
Before use
- Check packaging for completeness
- Ensure appropriate connection fitting is available
- Check for hidden water, electric, or gas lines behind the wall
- Verify wall type is suitable for supplied plugs (solid masonry)
- Prepare tools: Phillips screwdriver, flat screwdriver, tape measure, wrench, drill
Show more Show less
Specs in practice
- Max. Operating pressure
- Maximum pressure in bar
Images and diagrams
- Connection diagrams illustrate standard, center, and side connection configurations.
- Assembly diagrams show bracket positioning relative to cross tubes, manifolds, or fixed pins.
Model compatibility
- Designed for closed central heating systems.
- Supplied wall plugs are only suitable for solid masonry.

Manual page author
Emily Carter
User documentation editor