HVAC / Heat Pumps
Quick Start Guide for ACiQ Next Gen Heat Pump Condenser
Quick start guide for the ACiQ Next Gen Heat Pump Condenser. Includes installation requirements, refrigerant connection guidelines, wiring diagrams, and thermostat configuration for dual fuel systems.
Quick answers from the manual
Quick answer
- This guide covers the installation and setup of the ACiQ Next Gen Heat Pump Condenser in a dual fuel application, including refrigerant line requirements, wiring, and thermostat configuration. p. 1, 2, 3
Key actions
- Purge with nitrogen during brazing to avoid voiding the warranty. p. 2
- Retorque flare adaptors while the unit is hot in heating mode. p. 2
First start
- Startup the unit in heating mode to ensure no leaks are present. p. 2
Show 2 more answers Show less
Technical specifications
| Parameter | Value | Meaning | Pages |
|---|---|---|---|
| Liquid Line Size | 3/8 inch | Required refrigerant line size. | p. 2 |
| Suction Line Size | 3/4 inch | Required refrigerant line size. | p. 2 |
| Lockout Temperature (Max Comfort) | 35 °F | Setting for maximum comfort. | p. 3 |
| Lockout Temperature (Max Efficiency) | -10 °F | Setting for maximum efficiency. | p. 3 |
Where to find it in the PDF
- Quick Start Guide p. 1
- Requirements and Connections p. 2
- Thermostat Wiring p. 3
Table of contents
Manual images
Click an image to enlargeQuick guide from the manual
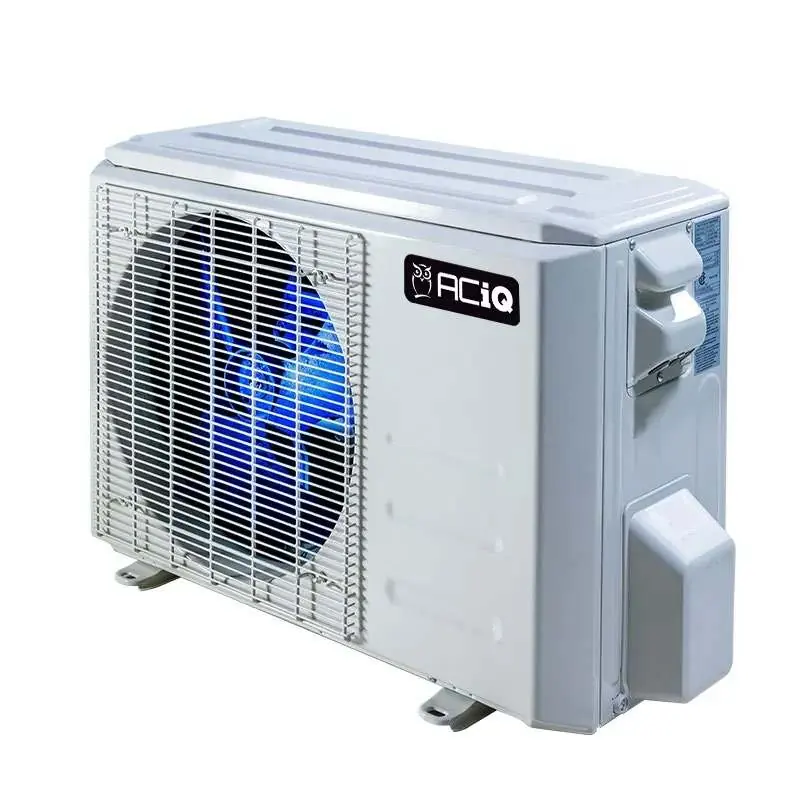
This document provides essential installation and setup guidelines for the ACiQ Next Gen Heat Pump Condenser in a dual fuel application. This system is designed to work with a 3rd party furnace and coil to provide efficient heating and cooling. Installation must be performed by a licensed and certified HVAC professional.
Installation requirements
Before beginning the installation, ensure the following requirements are met:
- Indoor Coil: Must have a heat pump compatible Thermostatic Expansion Valve (TXV) and be sized to match the nominal BTU capacity of the outdoor unit (oversizing by up to 1 ton is permissible).
- Thermostat: A 24-volt heat pump thermostat with a minimum of 2 stages of heating and 2 stages of cooling (2H, 2C) is required. Standard heat/cool only thermostats will not work.
- Outdoor Temperature Sensing: The thermostat must support wired, wireless, or internet-based outdoor temperature sensing.
Refrigerant connections
Proper refrigerant connection is critical for system longevity:
- Line Set Size: Use 3/8 inch for the liquid line and 3/4 inch for the suction line.
- Brazing: You must purge with nitrogen during brazing. Failure to do so will cause oxidative buildup, which shortens compressor life and voids the warranty.
- Leak Testing: Startup the unit in heating mode to check for leaks. While the unit is hot, retorque the flare adaptors using a digital torque wrench.
- Adaptors: The system includes copper adaptors that thread onto the outdoor unit, providing a female sweat connection for the line set.
Wiring and DIP switches
The outdoor unit circuit board includes terminals for power and communication. Ensure the ground wire is connected to the outdoor disconnect. The terminal block connections are as follows:
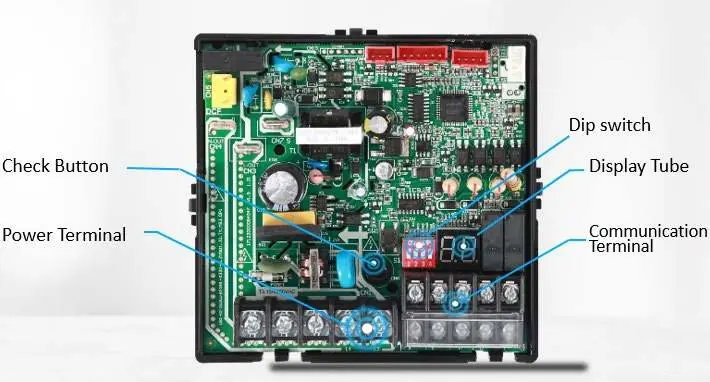
- L1/L2: Line voltage power.
- R: 24 Volt Hot (Power).
- C: 24 Volt Common.
- Y1: Heat/Cool Stage 1.
- Y2: Heat/Cool Stage 2 (High Demand).
- B: Reversing Valve (Energized in Heating).
- D, L, W: Ignore/Do not use.
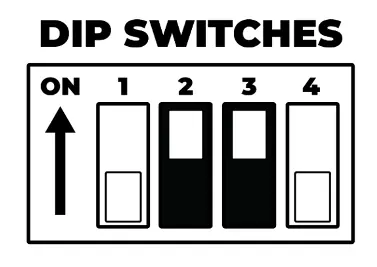
Refer to the provided DIP switch diagram to ensure correct configuration on the circuit board.
Thermostat wiring
When configuring the thermostat for a dual fuel setup, follow these general guidelines:
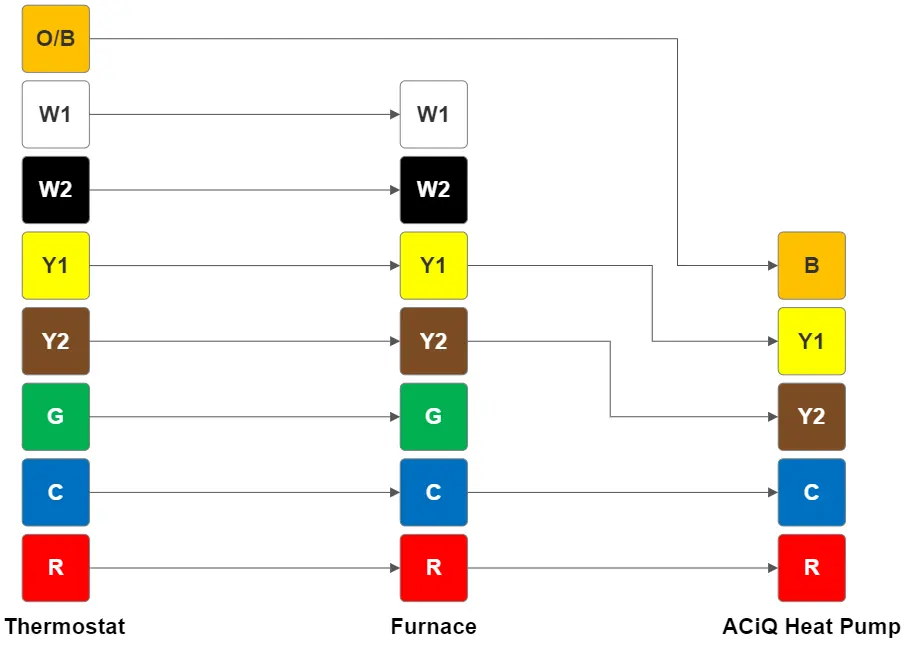
- System Type: Set to Dual Fuel.
- Reversing Valve (O/B): Set to Energized in Heating Mode.
- Backup Heat Type: Set to Gas/Oil Furnace.
- Lockout/Switchover Temperature: This varies based on preference. The recommended setting is 0 degrees Fahrenheit. Maximum comfort is 35 degrees Fahrenheit, and maximum efficiency is -10 degrees Fahrenheit.
Important: The heat pump and the furnace should never run at the same time. Most heat pump thermostats are configured to prevent this.
Manufacturer information
ACiQ
Practical help
Common problems
Compressor failure or shortened lifespan
Ensure you purge with nitrogen during brazing to prevent oxidative buildup.
Refrigerant leaks
Startup the unit in heating mode and retorque the flare adaptors while the unit is hot.
Before use
- Verify indoor coil has a heat pump compatible TXV.
- Ensure thermostat is 24V, 2H/2C compatible.
- Confirm line set sizes are 3/8 inch (liquid) and 3/4 inch (suction).
- Verify technician is section 608-certified.
- Check that the thermostat supports outdoor temperature sensing.
Show more Show less
Specs in practice
- Line Set Size
- 3/8 inch Liquid Line & 3/4 inch Suction Line.
- Lockout Temperature (Recommended)
- 0 degrees Fahrenheit for balanced efficiency and comfort.
- Thermostat Requirement
- Minimum 2 stages of heating and 2 stages of cooling (2H, 2C).
Images and diagrams
- The wiring diagram illustrates the connection path between the Thermostat, Furnace, and ACiQ Heat Pump.
- DIP switch settings are shown to configure the outdoor unit circuit board.
Model compatibility
- Requires a 3rd party furnace and coil.
- Standard heat/cool only thermostats are not compatible.

Manual page author
Emily Carter
User documentation editor