Automotive / Parts Accessories
Sim-Lab XP-1 Pedals User Guide
Comprehensive user guide for Sim-Lab XP-1 Pedals. Learn how to install, configure, calibrate, and maintain your sim-racing pedal set for optimal performance.
Table of contents
Manual images
Jump to the sectionQuick guide from the manual
The Sim-Lab XP-1 Pedals are a high-performance sim-racing pedal set featuring a 200KG loadcell brake, Hall sensor throttle and clutch, and 16-bit resolution input. This manual provides instructions for mounting, adjusting pedal feel, software setup, and maintenance.
Installation
The pedals are compatible with profile-based pedal decks (e.g., P1-X) and universal baseplates. Use the 6mm slots on the bottom of the pedal base to bolt the set down securely.
Control Box Installation: The control box can be mounted using the provided tabs (80x40 pattern). Connect all pedals to the labeled ports on the control box. Plug in the USB cable last to ensure correct calibration on the first connection.
Configuration and Adjustments
Pedal Base: You can adjust the angle of the pedal arm by loosening the four bolts: two (P) at the pivot and two (A) in the arcs. Rotate the pedal to your preferred position and tighten all bolts securely.
Pedal Face: Adjust the position and angle of the pedal face by loosening the bolts (F). For angle adjustments, loosen the top (T) bolts and remove the bottom (B) bolts to rotate the bracket, then re-secure.
Throttle and Brake: The throttle spring stiffness and travel are adjustable via the blue knobs (A for adjustment, L for locking). The brake pedal allows for changing elastomers (Soft 50A, Medium 60A, Hard 70A) and preload springs. Always check travel manually to ensure no parts collide.
Software Setup
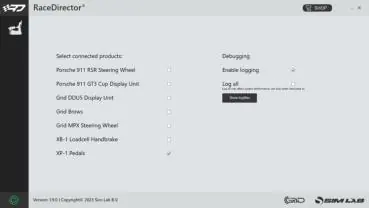
Download and install the latest version of RaceDirector from www.sim-lab.eu/srd-setup. Activate the XP-1 Pedals in the 'Settings' page. Use the device page to calibrate pedals, adjust input curves, and set deadzones. Always check for firmware updates using the firmware updater tool available at www.sim-lab.eu/firmware-updater.

Maintenance
Regular cleaning and lubrication are recommended to maintain performance. Use WD-40 Specialist White Lithium Grease on moving parts and the spring bolt bushing.
Official resources from the manual
Practical help
Common problems
Pedal calibration issues
Unplug the USB cable from the control box, wait a few seconds, and plug it back in to reset the device.
Mechanical travel interference
Check travel manually by hand to ensure the clevis fork does not collide with the pedal arm flange. Reduce maximum travel if necessary.
Parts collision during adjustment
Make adjustments in small increments to ensure no parts collide, which could cause damage.
Before use
- Download and install the latest version of RaceDirector.
- Check for firmware updates using the firmware updater tool.
- Ensure the control box is securely mounted.
- Connect all pedals to the labeled ports on the control box.
- Plug in the USB cable last to ensure correct calibration.
Specs in practice
- 16-Bit resolution
- High-precision input for accurate pedal control.
Images and diagrams
- Pedal Base Adjustment: Loosen bolts (P) at the pivot and (A) in the arcs to rotate the pedal arm angle.
- Brake Stack: Shows the order of the locking knob, adjustment knob, elastomer, bushing, washer, and pre-load spring.
Model compatibility
- Compatible with profile-based pedal decks (e.g., P1-X) and universal baseplates.
- Control box mounting tabs are suited to an 80x40 pattern.

Manual page author
David Miller
Documentation analyst
Organizes user manual content into clear summaries, with attention to model details, product context, and everyday usability.