General / Other Manuals
ACROMA 10552AZ Agen 12-Light Farmhouse Chandelier Installation Guide
Comprehensive installation and safety instructions for the ACROMA 10552AZ Agen 12-Light Black Farmhouse LED Chandelier. Learn how to safely assemble, wire, and mount your fixture.
Table of contents
Manual images
Jump to the sectionProduct Overview
The ACROMA 10552AZ Agen is a 12-light farmhouse-style chandelier designed for indoor use. This fixture features a robust construction and requires 12 candelabra base bulbs. It is essential to read all instructions thoroughly before beginning the installation process to ensure safety and proper functionality.
Safety Information
Safety is the highest priority during the installation of any electrical fixture. Always turn off the main power at the circuit breaker before starting. If you are unsure about any part of the electrical installation, consult a qualified electrician. Ensure your hands are dry when handling electrical components and use tools with insulated handles. Never attempt to modify the fixture or use it in a way not specified in these instructions.
Pre-Installation Requirements
Before beginning, ensure you have all the necessary tools, including a Phillips screwdriver, wire strippers, pliers, safety goggles, and electrical tape. Prepare a clean, soft surface, such as a carpet or cardboard, to lay out the parts and prevent damage to the finish during assembly. Verify that all hardware listed in the assembly guide is present.
Assembly and Installation
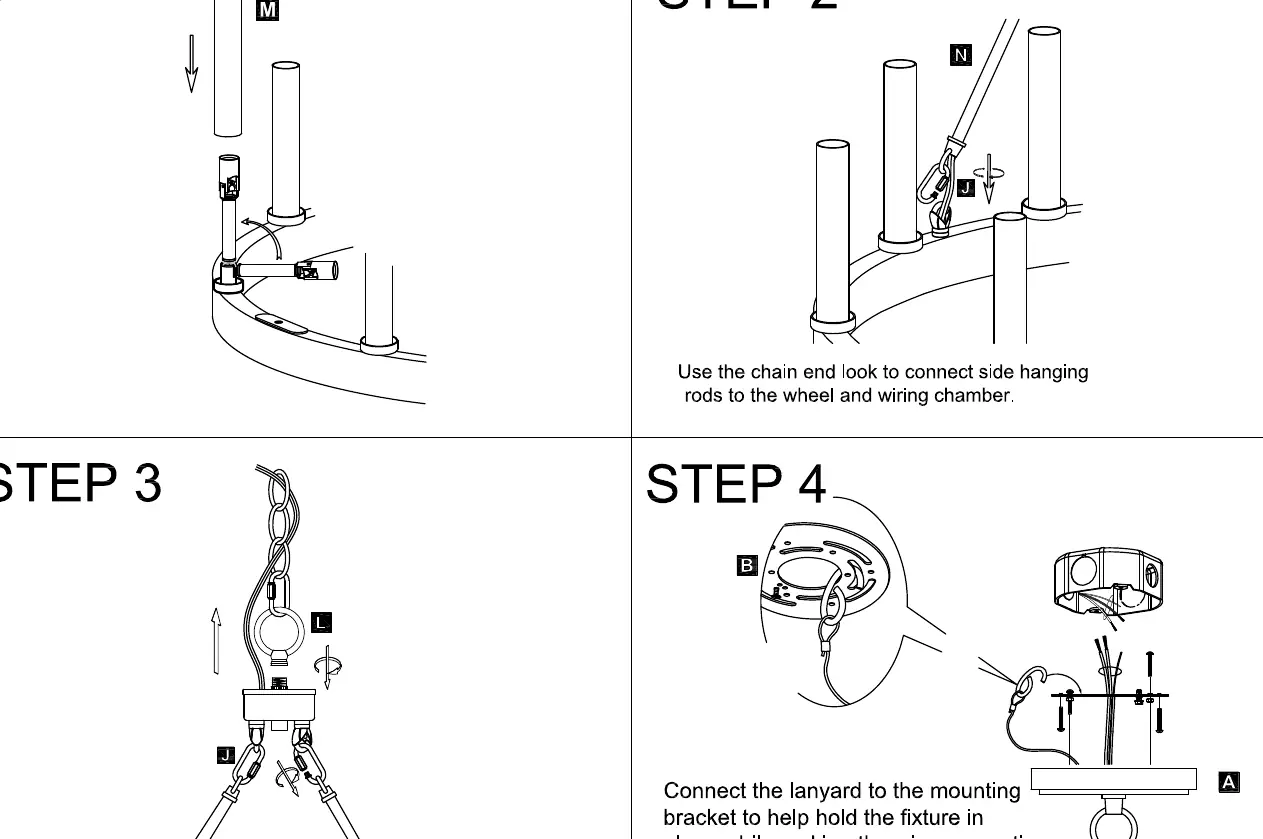
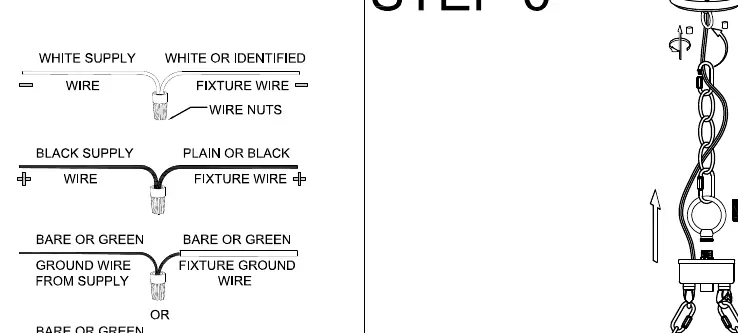
The assembly process involves several key steps. First, prepare the fixture body by installing the socket sleeves. Next, attach the side hanging rods to the main frame using the provided chain end loops. Once the frame is prepared, assemble the central chain and connector ring. Secure the mounting bracket to the junction box in your ceiling. Use the provided safety lanyard to hold the fixture in place while you perform the electrical wiring. Connect the fixture wires to the supply wires using wire nuts, ensuring that white connects to white, black to black, and ground wires are properly secured to the green ground screw or the supply ground wire. Finally, tuck the wires into the junction box, secure the canopy to the ceiling using the provided screws and finials, and install the bulbs.
Maintenance and Care
To keep your chandelier looking its best, clean it periodically with a soft, dry cloth. Avoid using abrasive cleaners or chemicals that could damage the finish. Regularly check that all connections remain tight and secure. If you notice any flickering or electrical issues, turn off the power immediately and inspect the wiring connections.
Practical help
Common problems
Fixture does not light up
Check if the bulbs are properly screwed in and ensure the circuit breaker is turned on.
Loose connections
Ensure all wire nuts are tightened securely and that no bare wires are exposed.
Before use
- Turn off main power at the circuit breaker
- Verify all parts are present according to the hardware list
- Ensure you have a Phillips screwdriver, wire strippers, and pliers
- Prepare a soft surface for assembly
- Check that the junction box is securely mounted
- Ensure hands are dry before handling electrical components
Images and diagrams
- Step 1: Installing socket sleeves onto the fixture base
- Step 2: Connecting side hanging rods to the frame
- Step 3: Assembling the central chain and connector ring
- Step 4: Using the safety lanyard for hands-free wiring
- Step 5: Wiring diagram showing connections for supply and fixture wires
Model compatibility
- Designed for dry locations only
- Must be installed by a qualified electrician if unsure about wiring

Manual page author
Michael Turner
Technical manual editor
Reviews PDF manuals for structure, safety notes, and practical product details so readers can find the right information quickly.