Home / Weather Stations & Thermometers
AcuRite 09150-QSG Internet Bridge Setup Guide
Quick setup guide for the AcuRite 09150-QSG Internet Bridge. Learn how to connect your bridge, register the device, interpret status lights, and troubleshoot common connection issues.
Table of contents
Manual images
Click an image to enlargeQuick Setup Guide
Follow these steps to install and configure your AcuLink Internet Bridge:
- Prepare: Ensure you have an Acu-Link compatible sensor, a network router with an available Ethernet port, and an always-on internet connection.
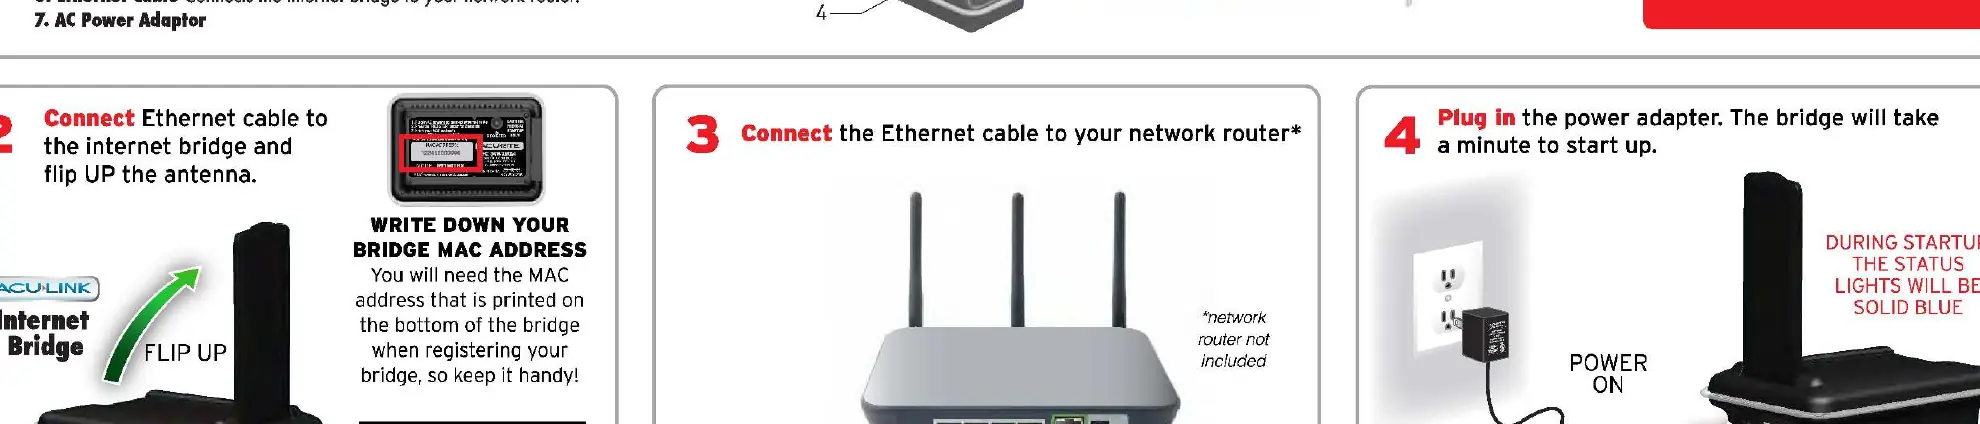
- Connect: Plug the Ethernet cable into the bridge and your network router.
- Power: Connect the AC power adapter. The bridge will take about a minute to start up. During startup, the status lights will be solid blue.
- Update: The bridge may need up to 30 minutes to automatically download the latest software. Do not unplug cables during this time.
- Register: Once both status lights begin flashing, press and hold the REGISTER button on the bottom of the bridge for 4 to 6 seconds.
- Finalize: It may take up to 10 minutes for the bridge to send the signal to the Acu-Link servers. Complete the registration at www.Acu-Link.com.
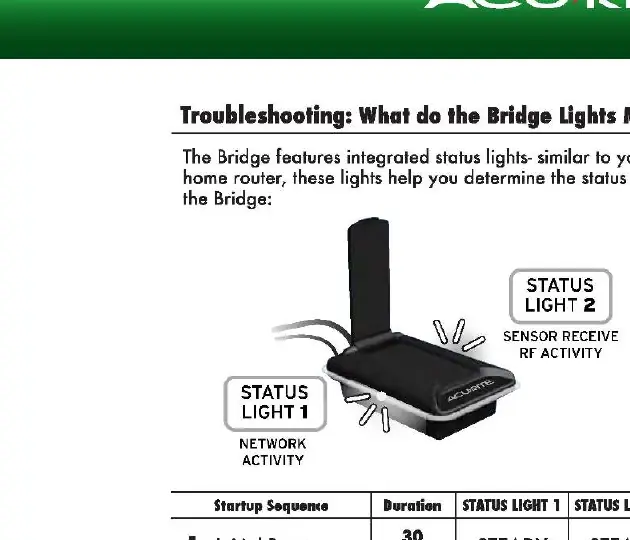
Understanding Status Lights
The bridge features integrated status lights to indicate its current state:
- Initial Boot: Status Light 1 and 2 are steady.
- Downloading Firmware: Status Light 1 is blinking rapidly; Status Light 2 is steady (very dim). This takes 5 to 30 minutes.
- Re-Booting: Status Light 1 and 2 are steady.
- Ready for Use: Both status lights are blinking rapidly, indicating normal operation.
Troubleshooting
If you encounter issues, try the following solutions:
- No Power: Ensure the power adapter and cable are firmly connected and that power is being provided to the outlet.
- Cannot Activate Online: Wait a few minutes before attempting to register. Ensure you pressed the REGISTER button for 4 to 6 seconds.
- Reset: Unplug the power adapter for at least 2 minutes, then try pressing the register button again for 4 to 6 seconds.
- Network Settings: Ensure DHCP is enabled on your router. If MAC address filtering is enabled, your router may be blocking the bridge. Temporarily disable security to test activation.
Compatible Sensors
You can monitor conditions remotely using Acu-Link compatible sensors. Visit www.AcuRite.com for a complete list of compatible products, including indoor/outdoor temperature, humidity, wind speed, wind direction, rainfall, and water temperature sensors.
Official resources from the manual
Manufacturer information
AcuRite
Practical help
Common problems
Bridge will not activate online
Ensure DHCP is enabled on your router, check for MAC address filtering, and wait at least 10 minutes after pressing the register button.
No power to the bridge
Verify the power adapter is firmly connected to both the bridge and a working power outlet.
Status lights not changing during registration
Ensure you are holding the 'REGISTER' button on the bottom of the unit for a full 4 to 6 seconds.
Before use
- Acu-Link compatible sensor
- Network router with an available Ethernet port
- Always-on internet connection
- Write down the MAC address from the bottom of the bridge
Specs in practice
- Status Light 1 (Network Activity)
- Indicates network traffic; flashing means normal upload traffic.
- Status Light 2 (RF Activity)
- Indicates radio frequency reception; flashing means normal reception.
Images and diagrams
- The setup diagram illustrates connecting the Ethernet cable to the router and the power adapter to the wall outlet.
- The status light table provides a breakdown of light behavior during the boot, download, and ready sequences.
Model compatibility
- Requires an Acu-Link compatible sensor.
- Requires an always-on internet connection.
- Compatible with standard routers with DHCP enabled.

Manual page author
Emily Carter
User documentation editor
Prepares concise manual descriptions and highlights the most useful setup, operation, and maintenance information for readers.