Power / Power Supplies
User Manual for Ajax 12V PSU for NVR
Quick guide for installing and configuring the Ajax 12V PSU for NVR. Learn how to replace the standard power supply, set operating modes, and connect the unit safely.
Table of contents
Manual images
Click an image to enlargeQuick guide from the manual
The 12V PSU for NVR is an alternative power supply unit designed to connect an Ajax NVR video recorder to an 8–16 V⎓ power supply. It is an electronic board installed directly into the video recorder enclosure, replacing the standard 110/230 V~ power supply unit. Installation should only be performed by qualified specialists.
Functional elements
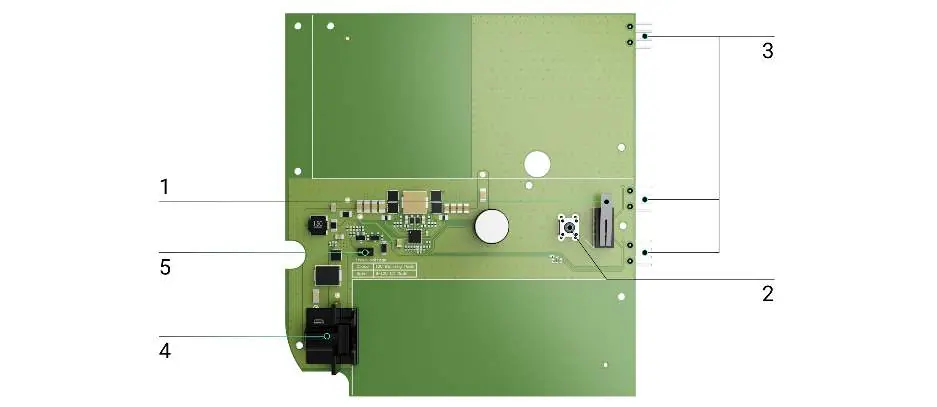
- Tamper button: Triggered when the enclosure lid of the NVR is removed.
- Reset button: Used for resetting the device.
- Connectors: Used for connecting the PSU board to the video recorder board.
- Terminal adapter connector: Used for installing a terminal adapter.
- Jumper: Used to select the operating mode.
Security requirements
Before installation, ensure the video recorder is disconnected from the electrical network. Follow all electrical safety rules and regulations. Do not allow moisture to enter the boards during the installation process.
How to install 12V PSU for NVR


- Remove the SmartBracket mounting panel from the video recorder.
- Switch off the power supply.
- Disconnect external power and Ethernet cables.
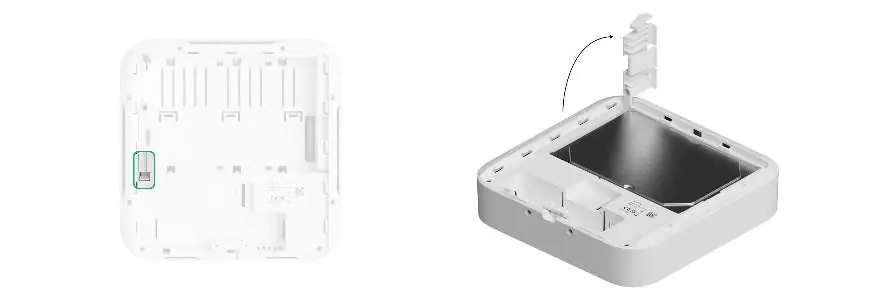
- Unscrew the bundled screw securing the hard drive, lift the latch, and remove the hard drive.
- Remove all screws from the back lid and take it off.
- Slide the latches and carefully remove both boards, keeping them in the same plane.
- Disconnect the power supply unit (the larger board) from the main board.
- Install or remove the jumper based on your required operating mode.
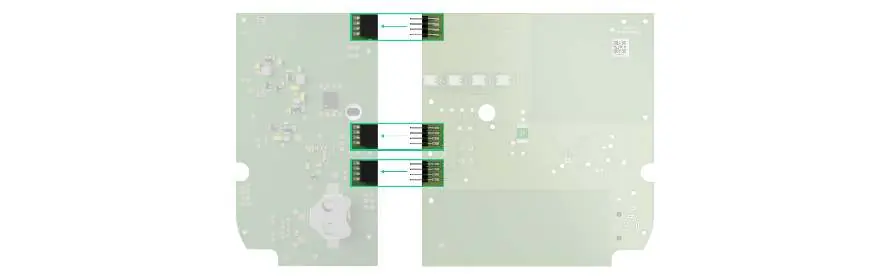
- Connect the new 12V PSU for NVR to the main board using the three four-pin connectors. Ensure board contacts are plugged into the bottom row (closest to the board).
- Reassemble the enclosure in reverse order and tighten the screws.
- Reinstall the hard drive, lower the latch, and secure it with the screw.
- Connect external power and Ethernet cables, apply power, and switch on the device.
- Insert the video recorder into the SmartBracket.
Operating modes
The PSU provides two operating modes based on the jumper position:
- 8–16 V⎓: The jumper should not be installed. The NVR operates in the 8–16 V⎓ range.
- 10.35–16 V⎓: The jumper must be installed. The NVR operates on voltage exceeding 12 V⎓. The NVR will switch off if voltage drops below 12 V⎓ to avoid full discharge of the power supply.
Maintenance
The device does not require maintenance.
Warranty
The warranty for Ajax Systems Manufacturing products is valid for 2 years after purchase. If the device does not operate properly, contact the support service first, as most technical issues can be resolved remotely.
Practical help
Common problems
No power after installation
Check the external power supply state in the Ajax app. If using a terminal adapter, check the polarity of the connected wires.
Hard drive damage during replacement
Wait 10 seconds after disconnecting the device from the power source before removing the hard drive to allow the platters to stop spinning.
Before use
- Ensure the video recorder is disconnected from the electrical network.
- Verify you are a qualified specialist.
- Ensure no moisture enters the boards during installation.
- Check the input voltage requirements before connecting power.
Images and diagrams
- The board includes a tamper button, reset button, connectors for the main board, a terminal adapter connector, and a jumper for mode selection.
Model compatibility
- Designed specifically for Ajax NVR video recorders.

Manual page author
Michael Turner
Technical manual editor
Reviews PDF manuals for structure, safety notes, and practical product details so readers can find the right information quickly.