Furniture / Storage Shelving
Installation Guide for Allen + Roth 24-Inch Floating Shelf LOWE24WMS-N
Quick installation guide for the Allen + Roth 24-Inch Floating Shelf (LOWE24WMS-N). Includes step-by-step mounting instructions, weight capacity limits, and maintenance tips.
Quick answers from the manual
Quick answer
- The Allen + Roth 24-Inch Floating Shelf (LOWE24WMS-N) is a wall-mounted shelf with a maximum weight capacity of 20 lbs (9.07 kg). It requires a drill, level, and screwdriver for installation. p. 1
Key actions
- Install the mounting backplate using a level, ensuring the arrow points up. p. 2
- Secure the shelf to the backplate using the provided screws. p. 2
Problems and fixes
Shelf is tilting
Ensure the mounting backplate is installed at the same level.
p. 1Show 3 more answers Show less
Maintenance and reset
- Periodically check components for damage and proper positioning. Clean with a soft, dry cloth; do not use water. p. 1
Technical specifications
| Parameter | Value | Meaning | Pages |
|---|---|---|---|
| Weight Capacity | 20 lbs / 9.07 kg | Maximum load limit | p. 1 |
Where to find it in the PDF
- Preparation, Safety, and Troubleshooting p. 1
- Installation Steps p. 2
Table of contents
Manual images
Click an image to enlargeQuick Guide from the Manual
This document provides installation instructions for the Allen + Roth 24-Inch Floating Shelf (Model LOWE24WMS-N). The shelf is designed for wall mounting, with a recommended installation into wall studs for optimal stability and weight capacity. The maximum weight capacity for this shelf is 20 lbs (9.07 kg).
Preparation and Tools
Before beginning assembly, ensure all parts are present by comparing them with the package contents list. If any parts are missing or damaged, do not attempt to assemble the product. Estimated assembly time is 15 minutes.
Required Tools (not included):
- Phillips screwdriver
- Level
- Variable Speed Drill
- Pencil
- 3/32 in Drill Bit (for stud installation)
- 5/16 in Drill Bit (for drywall installation)
Helpful Tools:
- Stud Finder
Installation Steps
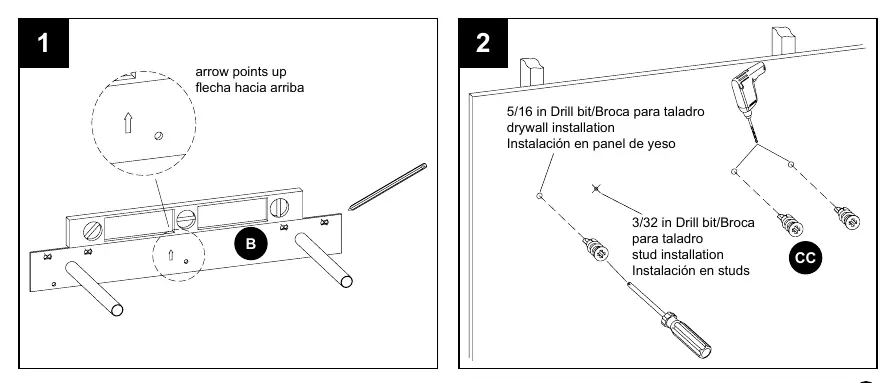

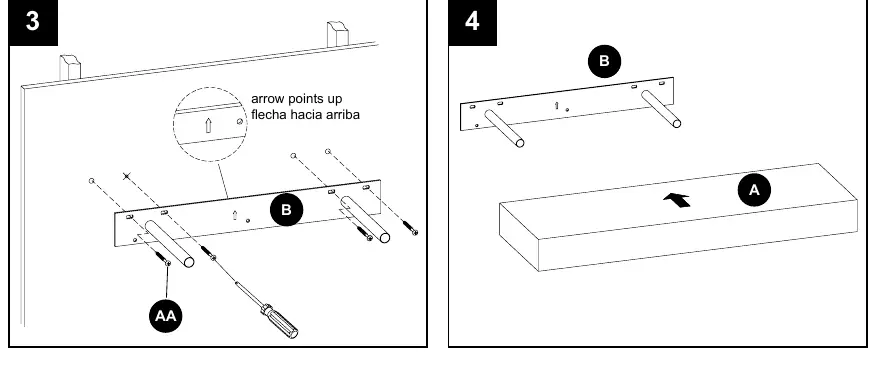
- Leveling: Place the mounting backplate (B) against the wall. Use a level to ensure it is straight. Ensure the arrow on the backplate points up. Mark the screw hole locations with a pencil.
- Drilling: Drill pilot holes at the marked locations. Use a 3/32 in drill bit for stud installation or a 5/16 in drill bit for drywall installation.
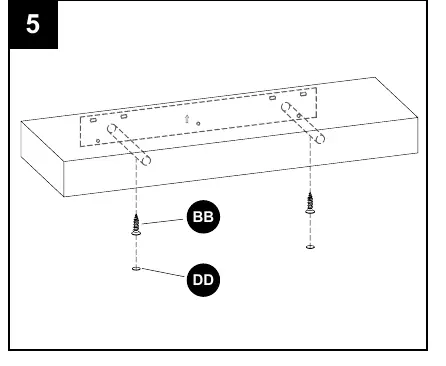
- Mounting Backplate: Secure the mounting backplate (B) to the wall using the provided hardware (AA). Ensure the arrow points up.
- Attaching Shelf: Slide the shelf (A) onto the mounting backplate (B).
- Securing: Secure the shelf to the backplate using the provided screws (BB) and caps (DD).
Care and Maintenance
- Periodically check to ensure all components are properly positioned, free from damage, and firmly connected.
- Use a soft, clean cloth that will not scratch the surface when dusting.
- Never use water to clean the furniture, as it may damage the finish.
Troubleshooting
If the shelf is tilting, the mounting backplate is likely not installed at the same level. Use a quality level to ensure the mounting backplate is perfectly level during installation.
Manufacturer information
Allen + Roth
Practical help
Common problems
Shelf is tilting
The mounting backplate is not installed at the same level. Use a quality level to ensure the backplate is perfectly level.
Before use
- Verify all parts are present against the contents list
- Use a stud finder to locate wall studs
- Ensure you have the correct drill bit size (3/32 in for studs, 5/16 in for drywall)
- Check that the mounting backplate arrow points up
Show more Show less
Specs in practice
- Weight Capacity
- The shelf supports a maximum of 20 lbs (9.07 kg).
- Assembly Time
- Estimated 15 minutes.
Model compatibility
- Recommended to be installed into wall studs for stability.
- Failure to install in wood studs will affect weight loading stability and capacity.

Manual page author
David Miller
Documentation analyst