Furniture / Storage Shelving
Installation Guide for Allen + Roth 24-Inch Wall Cabinet
Comprehensive installation and maintenance guide for the Allen + Roth 24-Inch Wall Cabinet. Includes step-by-step mounting instructions, shelf placement, door hinge adjustments, and care tips.
Quick answers from the manual
Quick answer
- This manual provides installation and adjustment instructions for the Allen + Roth 24-Inch Wall Cabinet (Models 1412WC-24-201 and 1412WC-24-242). p. 1
Key actions
- Mount the wall bracket to wall studs. p. 4
- Adjust cabinet doors using hinge screws. p. 5
First start
- Ensure all parts are present and use two adults for assembly. p. 3, 4
Show 3 more answers Show less
Problems and fixes
Door alignment issues
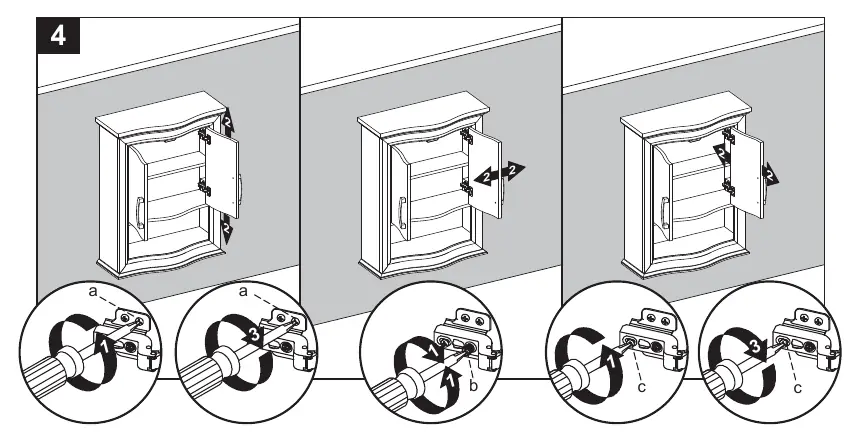
Use hinge screws (a) for up/down, (b) for left/right, (c) for in/out.
p. 5Maintenance and reset
- Dust regularly, clean with non-abrasive cleaner, and dry immediately. p. 6
Where to find it in the PDF
- Installation Instructions p. 4, 5
- Replacement Parts p. 7, 8
Table of contents
Manual images
Click an image to enlargeImportant Information from the Manual
This guide provides instructions for the Allen + Roth 24-Inch Wall Cabinet (Models 1412WC-24-201 and 1412WC-24-242). The estimated installation time is 20 minutes. Important: Several assembly steps, including unpacking, require two adults. Ensure you have a secure connection to the wall before proceeding.
Preparation and Tools
Before beginning, verify all parts are present against the package contents list. If any parts are missing or damaged, do not attempt assembly.
Required Tools (not included):
- Phillips screwdriver
- Utility knife or scissors
- Power drill with drill bit
Helpful Tools (not included):
- Measuring tape
- Level
Installation Instructions
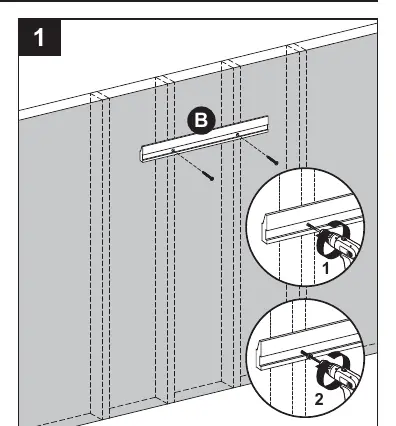
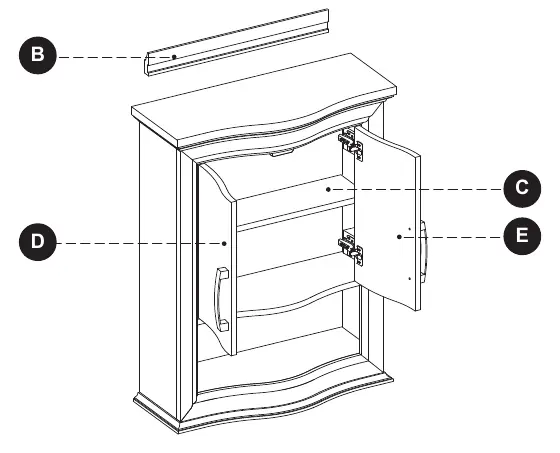
- Wall Bracket Installation: Locate and mark wall stud locations. Center the wall bracket (B) at the desired height and ensure it is level. Secure the bracket to the wall using appropriate hardware (not included) into at least two wall studs. Ensure the bracket is level and centered.
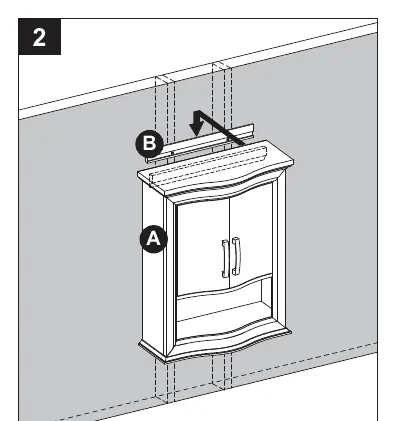
- Cabinet Mounting: With the help of another adult, carefully lower the cabinet (A) onto the wall bracket (B). Ensure the cabinet is securely attached to the wall before releasing it.
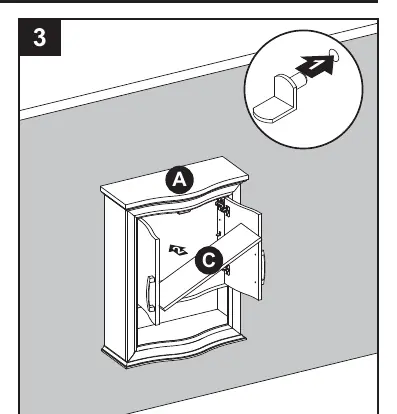
- Shelf Installation: Insert shelf pins at the desired height from the front of the assembly. Ensure they are level, then place the shelf (C) on top of the pins.
Door Adjustments
If the doors require alignment, use the adjustment screws on the hinges:
- Up or Down: Loosen screws (a) on both hinges, adjust the door, and retighten.
- Left or Right: Turn screws (b) on both hinges to move the door in or out.
- In or Out: Loosen screws (c) on both hinges, adjust the door, and retighten.
Care and Maintenance
- Dust the cabinet regularly with a soft, non-lint cloth or household dusting product.
- Clean with a gentle, non-abrasive household cleaner.
- Dry the wood immediately with a soft cloth or towel.
- For scratches, use the included touch-up pen (AA). Stroke in the direction of the scratch and rub off excess colorant promptly.
Warranty and Support
The manufacturer provides a one-year warranty against defects in materials and workmanship from the date of purchase. For questions, missing parts, or replacement parts, contact customer service at 866-439-9800 (8 a.m. - 8 p.m., EST, Monday - Sunday) or email [email protected].
Manufacturer information
Allen + Roth
Practical help
Common problems
Cabinet is not level after mounting
Ensure the wall bracket is perfectly level and centered on the wall studs before hanging the cabinet.
Doors are misaligned
Use the hinge adjustment screws: (a) for vertical adjustment, (b) for horizontal (left/right) adjustment, and (c) for depth (in/out) adjustment.
Before use
- Verify all parts are present against the package contents list.
- Ensure you have a Phillips screwdriver, utility knife/scissors, and a power drill.
- Confirm you have another adult to assist with lifting the cabinet.
- Locate wall studs for secure mounting.
- Ensure the wall bracket is level before mounting the cabinet.
Show more Show less
Images and diagrams
- The wall bracket must be secured to wall studs for safety.
- Hinge screws allow for 3-way adjustment to ensure doors hang correctly.
Model compatibility
- Requires wall studs for secure installation.
- Not for use on hollow walls without appropriate hardware (not included).

Manual page author
Emily Carter
User documentation editor