Furniture / Storage Shelving
Assembly and Care Guide for Allen + Roth 2-Cube Storage Organizer
A comprehensive guide for the Allen + Roth 2-Cube Storage Organizer, including assembly instructions, safety precautions, maintenance tips, and load capacity limits.
Quick answers from the manual
Quick answer
- The Allen + Roth 2-Cube Storage Organizer requires assembly using the provided hardware. It has a maximum load capacity of 15 lbs per shelf and must be secured with an anti-tip device to prevent injury. p. 1, 2
Key actions
- Assemble the unit using the provided hardware and steps 1-4. p. 2
- Install the anti-tip device to prevent furniture tip-over. p. 1, 2
Maintenance and reset
- Periodically check and tighten all bolts and screws. p. 1
Technical specifications
| Parameter | Value | Meaning | Pages |
|---|---|---|---|
| Max Load | 15 lbs | Maximum weight capacity per shelf. | p. 1 |
Where to find it in the PDF
- Safety, Warranty, and Care p. 1
- Assembly Instructions p. 2
Table of contents
Manual images
Click an image to enlargeQuick guide from the manual
This document provides instructions for the assembly and safe use of the Allen + Roth 2-Cube Storage Organizer. The estimated assembly time is 15 minutes. Always ensure the unit is placed on a level surface and that all bolts are tightened periodically to maintain stability.
Assembly Instructions
Before beginning, verify that all parts are present by comparing them with the package contents list. Do not attempt to assemble if any parts are missing or damaged.
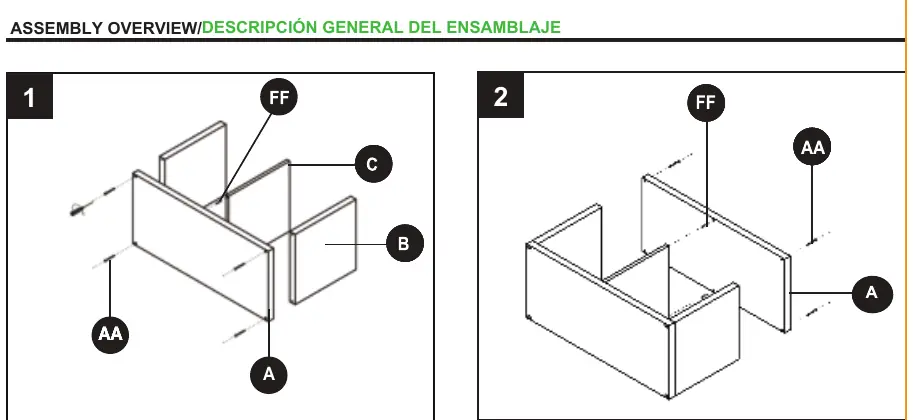
- Step 1: Connect the side panels and shelves using the provided hardware (AA, FF).
- Step 2: Secure the remaining panels to complete the frame structure.
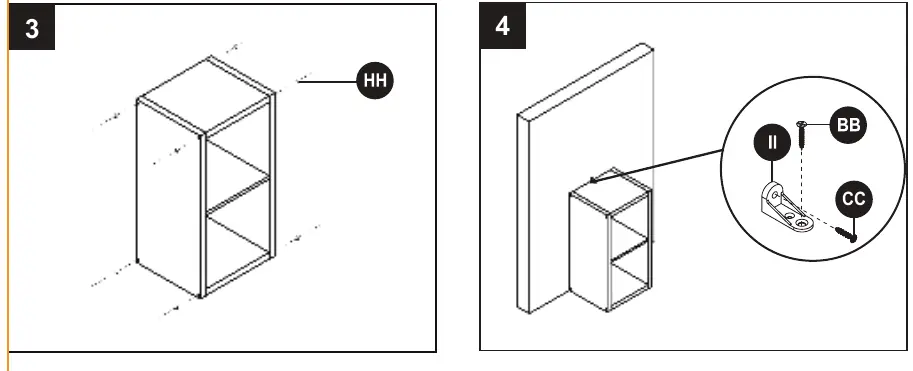
- Step 3: Ensure the unit is fully assembled and square.
- Step 4: Install the anti-tip device (II) using hardware (BB, CC) to secure the unit to the wall.
Safety Information
- Tip-over hazard: Serious or fatal crushing injuries can occur from furniture tip-over. Always use the included anti-tip device.
- Load limits: This unit is designed to support a maximum load of 15 lbs per shelf. Exceeding these limits can cause sagging, instability, or product collapse.
- Placement: Place the heaviest items on the lowest level. Do not allow children to climb or hang on drawers, doors, or shelves.
- Surface: Keep the product on level surfaces to prevent instability.
Care and Maintenance
- Use a soft, clean cloth for dusting.
- Do not use solvents, as they may damage the furniture surface.
- Never use water to clean the furniture, as it may damage the finish.
- Clean up liquid spills immediately.
- Periodically check and tighten all bolts and screws.
Warranty
This product includes a one-year limited warranty covering defects in materials and workmanship for normal commercial, personal, or household use. Proof of purchase is required. This warranty applies only to the U.S. and Canada.
Manufacturer information
Allen + Roth
Practical help
Common problems
Product instability or wobbling
Ensure the unit is placed on a level surface and that all bolts and screws are tightly fastened.
Risk of furniture tip-over
Always install the provided anti-tip device and do not allow children to climb on the unit.
Before use
- Verify all parts are present against the package contents list.
- Ensure you have the required tools for assembly.
- Check that all bolts and screws are tightly fastened before use.
- Confirm the floor surface is level.
Specs in practice
- Assembly Time
- Estimated 15 minutes for completion.
Images and diagrams
- The assembly overview illustrates the connection of panels A, B, and C using hardware AA and FF.
- Step 4 demonstrates the correct installation of the anti-tip bracket (II) to the wall using hardware BB and CC.
Model compatibility
- Warranty is valid only in the U.S. and Canada.

Manual page author
David Miller
Documentation analyst
Organizes user manual content into clear summaries, with attention to model details, product context, and everyday usability.