Furniture / Storage Cabinets
Installation and Care Guide for Allen + Roth 24-IN Vanity
Complete installation and maintenance guide for the Allen + Roth 24-IN Vanity. Includes assembly steps, weight limits, door adjustment, and care instructions.
Quick answers from the manual
Quick answer
- This manual provides assembly and installation instructions for the Allen + Roth 24-IN Vanity. It covers safety warnings, weight limits, shelf and door adjustments, and care instructions. p. 1, 3, 4, 5
Key actions
- Adjusting door alignment p. 6
- Installing the backsplash p. 5
Problems and fixes
Uneven floor
Adjust floor levelers at the bottom of the vanity by hand.
p. 5Show 3 more answers Show less
Maintenance and reset
- Clean stone top p. 7
Technical specifications
| Parameter | Value | Meaning | Pages |
|---|---|---|---|
| Base Load Limit | 200 lbs | Maximum weight capacity for the vanity base. | p. 3 |
| Shelf Load Limit | 30 lbs | Maximum weight capacity for the internal shelf. | p. 3 |
Where to find it in the PDF
- Assembly Instructions p. 4, 5, 6
Table of contents
Manual images
Click an image to enlargeQuick Guide
This manual provides instructions for the assembly and installation of the Allen + Roth 24-IN Vanity. The vanity includes a preassembled top, base, and backsplash. Please ensure all parts are present before beginning. The estimated assembly time is 30 minutes.
Safety Information
Warning: Do not stand on the vanity. Use the vanity only on level ground. Exceeding weight limits may cause structural failure.
- Base vanity maximum load: 200 lbs (90.71 kg)
- Shelf maximum load: 30 lbs (13.6 kg)
- Other components maximum load: 10 lbs (4.53 kg)
Caution: Do not hang from the vanity. Do not remove the vanity top. Clean all fluids from the stone surface immediately to prevent permanent staining.
Preparation and Tools
Before beginning, ensure all parts are present. If any part is missing or damaged, do not attempt to assemble the product.
Required Tools (not included):
- Silicone compound
- Phillips screwdriver
- Level
- Stud finder
- Pencil
- Variable speed drill
Assembly Instructions
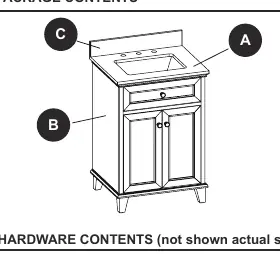
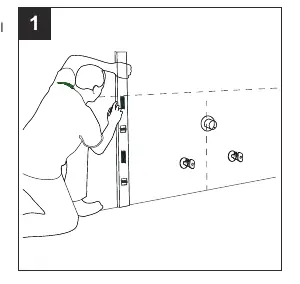
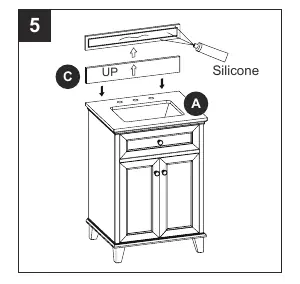
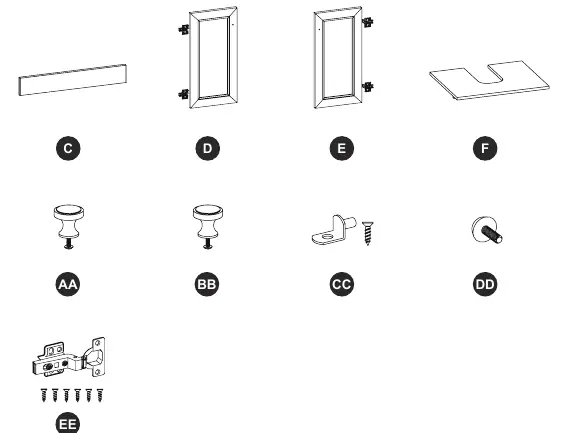
- Marking: Mark the wall for vanity placement and note the location of water supply lines and the drain on the back panel of the vanity.
- Placement: Move the vanity base (B) into the proper place against the wall.
- Plumbing: Install the faucet, drain, and supply lines (not included) to the vanity top (A) according to the instructions supplied with those items.
- Leveling: In case of uneven floors, use the floor levelers provided at the bottom of the vanity. Adjust by hand to correct tilting or level the doors.
- Backsplash: Apply a thin bead of silicone compound to the unpolished back side and bottom of the backsplash (C). Position the backsplash onto the vanity top (A) and against the wall. Clean excess silicone before it dries.
Adjustments
Shelf Adjustment
The adjustable shelf is pre-installed. To reposition:
- Locate the wood screws under the shelf holding it to the supports.
- Remove the screws with a Phillips screwdriver.
- Remove the shelf and reposition the shelf supports in the desired location. Ensure they are level.
- Replace the shelf and reinstall the screws.
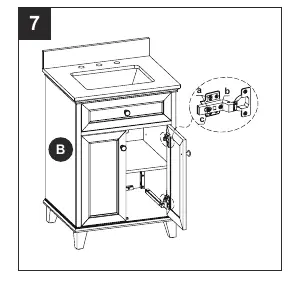
Door Adjustment
If doors require adjustment:
- Up or Down: Loosen screws (a), adjust the door, and tighten screws.
- Left or Right: Turn screw (b) in or out.
- In or Out: Loosen screw (c), adjust the door, and retighten the screw.
Care and Maintenance
- Dust the vanity regularly with a soft, non-lint cloth or household dusting product.
- Clean with a gentle, non-abrasive household cleaner. Dry wood immediately with a soft cloth.
- Clean the engineered stone top using standard engineered stone cleaning agents (sold separately).
- Keep away from direct sunlight to protect the finish.
- Clean red wine or soda stains within 30 minutes to prevent permanent staining.
Manufacturer information
Allen + Roth
Practical help
Common problems
Vanity is tilting or doors are uneven
Adjust the floor levelers located at the bottom of the vanity by hand.
Shelf is not at the desired height
Remove the wood screws under the shelf, move the shelf supports to the desired level, and reinstall the shelf.
Door is misaligned
Use the adjustment screws on the hinge: (a) for up/down, (b) for left/right, and (c) for in/out.
Before use
- Verify all parts (Vanity Top, Base, Backsplash) are present.
- Gather required tools: Silicone, Phillips screwdriver, Level, Stud finder, Pencil, Drill.
- Ensure the floor is level or prepare to use floor levelers.
- Check for missing or damaged parts before assembly.
Show more Show less
Specs in practice
- Base Weight Limit
- Maximum 200 lbs (90.71 kg) load capacity.
- Shelf Weight Limit
- Maximum 30 lbs (13.6 kg) load capacity.
- Component Weight Limit
- Maximum 10 lbs (4.53 kg) load capacity for other areas.
Images and diagrams
- The hinge adjustment diagram shows three screws: (a) for vertical adjustment, (b) for horizontal adjustment, and (c) for depth adjustment.
Model compatibility
- Faucet, drain, and supply lines are not included and must be installed according to their specific manufacturer instructions.

Manual page author
Emily Carter
User documentation editor