Lighting / Fixtures
Allen + Roth 12-Inch Outdoor Wall Lantern User Manual
Quick guide for the Allen + Roth 12-Inch Outdoor Wall Lantern. Includes installation steps, wiring diagrams, safety warnings, and troubleshooting tips.
Table of contents
Manual images
Click an image to enlargeQuick guide from the manual
This document provides essential installation and safety information for the Allen + Roth 12-Inch Outdoor Wall Lantern. The estimated assembly time is 10-15 minutes. Before beginning, ensure all parts are present and the main power supply is turned off at the circuit breaker or fuse box.
Safety Information
- Warning: Turn off electricity at the circuit junction box or main fuse box before starting installation.
- Warning: Do not damage or cut wire insulation during installation. Avoid contact with sharp edges.
- Requirement: All electrical connections must comply with local codes, ordinances, and the National Electric Code (NEC).
- Recommendation: Consult a qualified electrician if you are unsure about the installation process.
Installation Overview
- Preparation: Verify all parts (Fixture, Mounting Plate, Screws, Gasket, Wire Connectors) are included.
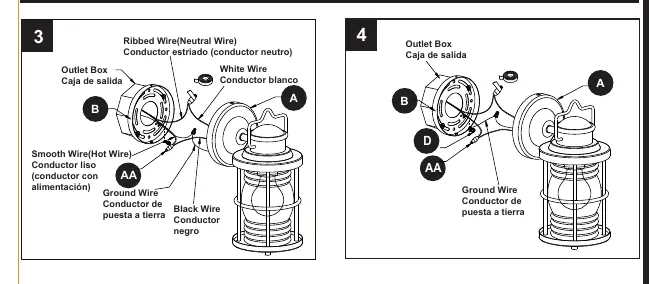
- Wiring: Connect the wires from the outlet box to the fixture wires using the provided wire connectors:
- Connect the Ribbed Wire (Neutral) to the White Wire.
- Connect the Smooth Wire (Hot) to the Black Wire.
- Connect the Ground Wire to the Ground Wire.
- Mounting: Secure the fixture to the outlet box using the provided screws.
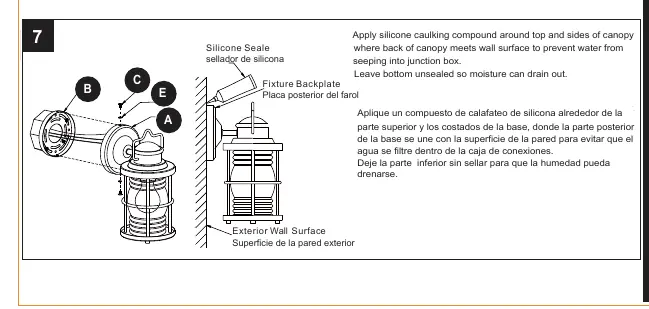
- Sealing: Apply silicone caulking compound around the top and sides of the canopy where it meets the wall surface to prevent water from seeping into the junction box. Leave the bottom unsealed to allow moisture to drain.
Troubleshooting
If the fixture does not light, check the following:
- Bulb: Ensure the bulb is not burned out.
- Power: Verify the power supply is turned on.
- Wiring: Check for faulty wire connections.
- Switch: Test or replace the wall switch.
Care and Maintenance
Wipe the fixture with a damp cloth or use window cleaner. Do not use abrasive cleaners.
Warranty
The manufacturer warrants this product against defects in materials and workmanship for three (3) years from the date of purchase. Proof of purchase (original sales receipt) is required for warranty claims.
Manufacturer information
Allen + Roth
Practical help
Common problems
The fixture does not light
Check if the bulb is burned out, ensure the power supply is on, inspect wiring connections, or test/replace the wall switch.
Before use
- Turn off main power supply at the circuit breaker or fuse box.
- Verify all parts are present against the package contents list.
- Ensure you have the necessary tools (not included).
- Consult a qualified electrician if you are not confident in the installation.
Specs in practice
- Estimated Assembly Time
- 10-15 minutes.
Images and diagrams
- Wiring: Connect Ribbed wire to Neutral (White), Smooth wire to Hot (Black), and Ground to Ground.
- Sealing: Apply silicone caulking to the top and sides of the canopy; leave the bottom open for drainage.
Model compatibility
- Must comply with local codes, ordinances, and the National Electric Code (NEC).

Manual page author
David Miller
Documentation analyst
Organizes user manual content into clear summaries, with attention to model details, product context, and everyday usability.