Lighting / Fixtures
Allen + Roth Mt Airy 1-Light Outdoor Coal Lantern Wall Mount
Quick guide for the Allen + Roth Mt Airy 1-Light Outdoor Coal Lantern Wall Mount (Model 81005). Includes installation steps, wiring instructions, troubleshooting, and maintenance tips.
Table of contents
Manual images
Click an image to enlargeQuick guide from the manual
This guide provides essential information for the Allen + Roth Mt Airy 1-Light Outdoor Coal Lantern Wall Mount. The estimated assembly time is 10-15 minutes. Before beginning, ensure all parts are present and the main power supply is turned off.
Safety Information
Warning: Before beginning installation, turn off electricity at the circuit junction box or the main fuse box. Be careful not to damage or cut the wire insulation during installation. Do not permit wires to contact any surface with a sharp edge, as this may cause serious injury or death from electric shock.
Caution: All electrical connections must be in agreement with local codes, ordinances, or the National Electric Code (NEC). Consult a qualified electrician before installation.
Preparation
Before beginning assembly, compare parts with the package contents list. If any part is missing or damaged, do not attempt to assemble the product.
Installation Overview
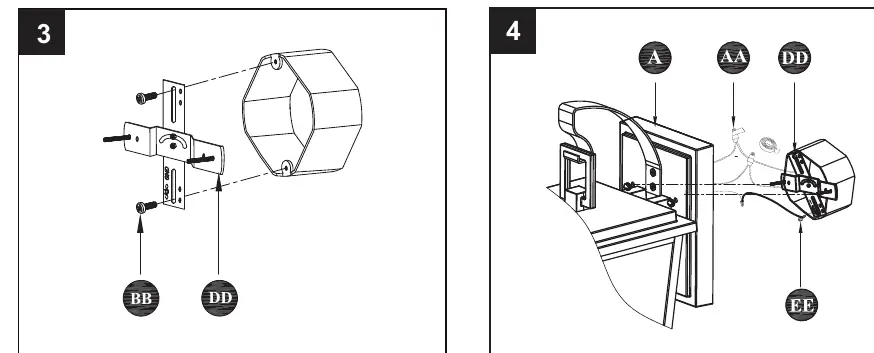
The installation involves assembling the fixture body, mounting the crossbar to the outlet box, connecting the wires, and securing the fixture to the wall.
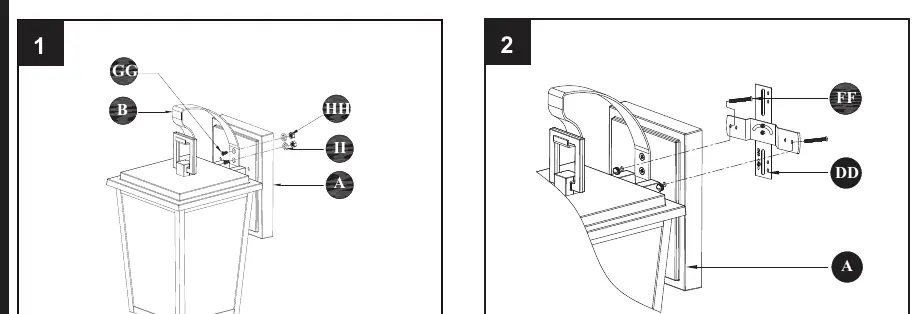

- Assembly: Attach the curve arm to the fixture body using the provided screws and hardware.
- Mounting: Install the crossbar to the outlet box using the outlet box screws.
- Wiring: Connect the fixture wires to the house supply wires using wire connectors. Ensure the ground wire is properly connected.
- Finalizing: Secure the fixture to the wall using the mounting screws and knurled knobs. Install the bulb.
Care and Maintenance
- Shut off the main power supply before performing any maintenance.
- Wipe the fixture with a damp cloth or use window cleaner.
- Do not use abrasive materials or cleaners.
Troubleshooting
If the fixture does not light, check the following:
- Bulb: The bulb may be burned out; replace it.
- Power: Ensure the power supply is turned on.
- Wiring: Check for faulty wire connections.
- Switch: Test or replace the wall switch.
Warranty
The manufacturer warrants this product against defects in materials and workmanship for three (3) years from the date of purchase. A copy of the original sales receipt is required as proof of purchase. The warranty does not cover fixtures becoming defective due to misuse, accidental damage, improper handling, or installation.
Manufacturer information
Allen + Roth
Practical help
Common problems
The fixture does not light
Replace the bulb, ensure the power supply is on, check wiring connections, or test/replace the wall switch.
Before use
- Turn off the main power supply at the circuit breaker or fuse box.
- Verify all parts are present against the package contents list.
- Ensure you have the necessary tools for installation.
- Consult a qualified electrician if you are unsure about local electrical codes.
Specs in practice
- Estimated Assembly Time
- 10-15 minutes.
Images and diagrams
- Steps 1-2: Assembly of the fixture body and curve arm.
- Steps 3-4: Mounting the crossbar and connecting electrical wires.
- Steps 5-6: Final mounting of the fixture to the wall and bulb installation.
Model compatibility
- All electrical connections must comply with local codes, ordinances, or the National Electric Code (NEC).

Manual page author
Emily Carter
User documentation editor
Prepares concise manual descriptions and highlights the most useful setup, operation, and maintenance information for readers.