Lighting / Fixtures
User Manual for Allen + Roth 13-IN LED Round Flushmount Light LSK3001LX-04
Quick guide for the Allen + Roth 13-IN LED Round Flushmount Light (LSK3001LX-04). Includes installation steps, wiring instructions, troubleshooting, and maintenance tips.
Table of contents
Manual images
Click an image to enlargeQuick guide from the manual
This document provides installation and safety instructions for the Allen + Roth 13-IN LED Round Flushmount Light. Before beginning, ensure all parts are present and the power is turned off at the circuit breaker. The fixture is compatible with dimming circuits and uses an integrated 20-watt LED.
Safety information
- Electrical Safety: Connect the fixture to supply wires rated for at least 194°F (90°C).
- Handling: Some metal parts may have sharp edges; wear gloves during installation.
- LED Handling: Do not touch the LED model. The LED is integrated and cannot be replaced.
- Children: Keep small parts away from children and destroy packing material.
- Installation: Assistance may be required to support the fixture during installation.
Installation instructions

- Preparation: Turn off the power and remove the existing fixture.
- Mounting: Attach screws (AA) to the outlet box.
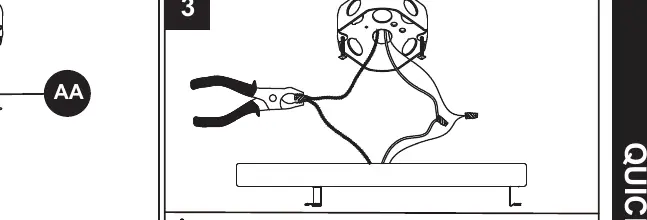
- Wiring: Feed wires through. Twist stripped wire ends together with pliers: black to black, white to white, and ground to ground. Secure connections with electrical tape (not included).
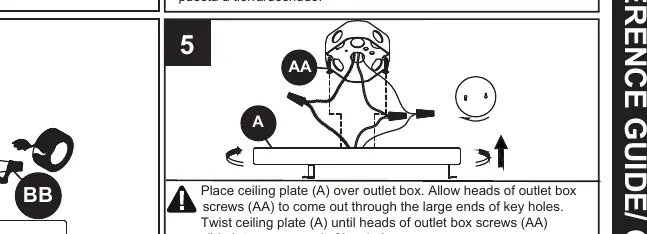
- Securing: Place the ceiling plate (A) over the outlet box. Allow the heads of the outlet box screws (AA) to pass through the large ends of the keyholes. Twist the ceiling plate until the screw heads slide into the narrow ends of the keyholes.
- Tightening: Tighten the outlet box screws (AA) to secure the ceiling plate.
- Final Assembly: Twist the shade (B) onto the ceiling plate (A) until firmly secured. Turn the power back on.
Troubleshooting
If the LED chips will not light:
- Check wiring: Ensure the wire connections are correct.
- Check switch: Test or replace the wall switch.
Care and maintenance
Wipe the fixture with a damp cloth or use window cleaner. Do not use abrasive cleansers. The 20-watt LED is integrated; do not attempt to replace it.
Warranty
The manufacturer warrants all lighting fixtures against defects in materials and workmanship for three (3) years from the date of purchase.
Manufacturer information
Allen + Roth
Practical help
Common problems
LED chips will not light
Check for faulty wire connections or test/replace the wall switch.
Before use
- Turn off power at the circuit breaker before starting.
- Verify all parts are present against the package contents list.
- Wear gloves to prevent cuts from sharp metal edges.
- Ensure supply wires are rated for at least 194°F (90°C).
- Have an assistant available to help support the fixture during installation.
Specs in practice
- Compatibility
- Workable for dimming circuits.
Images and diagrams
- The wiring diagram illustrates connecting black-to-black, white-to-white, and ground-to-ground wires using pliers and securing them with electrical tape.
Model compatibility
- Compatible with dimming circuits.
- Requires supply wires rated for at least 194°F.

Manual page author
David Miller
Documentation analyst
Organizes user manual content into clear summaries, with attention to model details, product context, and everyday usability.