Lighting / Fixtures
Installation Guide for Allen + Roth 12-Inch Round Flushmount Light
A comprehensive installation and troubleshooting guide for the Allen + Roth 12-Inch Round Flushmount Light (Model T231040-C). Includes step-by-step wiring instructions, safety warnings, and maintenance tips.
Table of contents
Manual images
Click an image to enlargeQuick Guide for Installation
This guide provides essential steps for installing your Allen + Roth 12-Inch Round Flushmount Light. The estimated assembly time is 25 minutes. Before beginning, ensure you have all parts and the necessary tools (screwdriver, ladder, safety glasses). Always turn off the main power supply before starting any electrical work.
Safety Information
- Warning: Turn off electricity at the main fuse box or circuit breaker box before beginning installation.
- Caution: If you are in doubt about the electrical installation, consult a licensed electrician.
- Ensure the supply conductor is rated for a minimum of 90°C.
Package Contents
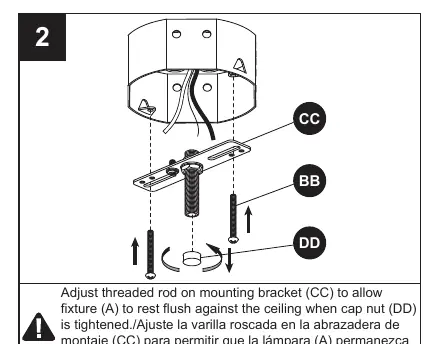
The package includes the fixture (A), the shade (B), the finial/cap (C), and mounting hardware including wire nuts (AA), mounting screws (BB), mounting bracket (CC), and cap nut (DD).
Installation Steps

- Power Off: Turn off the power at the main fuse box or circuit breaker.
- Prepare Bracket: Install the mounting bracket (CC) to the ceiling junction box. Adjust the threaded rod on the mounting bracket so that the fixture (A) sits flush against the ceiling when the cap nut (DD) is tightened.
- Wiring: Connect the wires from the fixture to the house supply wires:
- Black wire to black (power) wire.
- White wire to white (neutral) wire.
- Copper wire to the ground wire.
- Secure connections with wire nuts (AA).
- Mounting: Secure the fixture (A) to the mounting bracket (CC) using the cap nut (DD).
- Bulb Installation: Install standard-base incandescent bulbs (60-watt max) or CFL/LED equivalents.
- Final Assembly: Attach the shade (B) to the fixture (A) using the finial (C).
- Test: Turn the power back on and test the fixture.
Care and Maintenance
To clean the fixture, shut off the main power supply. Wipe the product with a damp cloth or window cleaner. Do not use abrasive cleaners.
Troubleshooting
- Bulb won't light: Check if the bulb is burned out, ensure power is on, check wiring connections, or test/replace the switch.
- Fuse blows or circuit breaker trips: This usually indicates crossed wires or a grounded power wire. Check all wire connections immediately.
Manufacturer information
Allen + Roth
Practical help
Common problems
Bulb will not light
Replace the bulb, ensure the power supply is on, check for faulty wiring connections, or test/replace the wall switch.
Fuse blows or circuit breaker trips when light is turned on
Check for crossed wires or a power wire that is grounding out. Inspect all wire connections.
Before use
- Turn off main power supply at the fuse or breaker box.
- Verify all parts are present against the package contents list.
- Ensure you have the required tools (not included).
- Consult a licensed electrician if you are unsure about the electrical installation.
- Ensure the supply conductor is rated for at least 90°C.
Specs in practice
- Assembly Time
- Estimated 25 minutes.
Images and diagrams
- Wiring: Connect black to black (power), white to white (neutral), and copper to ground.
- Mounting: Adjust the threaded rod on the mounting bracket to ensure the fixture sits flush against the ceiling.
Model compatibility
- Compatible with standard-base incandescent, CFL, or LED bulbs.
- Requires a standard ceiling junction box.

Manual page author
Michael Turner
Technical manual editor
Reviews PDF manuals for structure, safety notes, and practical product details so readers can find the right information quickly.