Lighting / Fixtures
User Manual for Allen + Roth Westbrook 1-Light Pendant
Quick guide for the Allen + Roth Westbrook 1-Light Pendant. Includes installation steps, wiring instructions, troubleshooting, and maintenance tips.
Table of contents
Manual images
Click an image to enlargeQuick Guide
This guide provides essential information for installing the Allen + Roth Westbrook 1-Light Pendant. Before starting, ensure you have all parts and the necessary tools. The estimated assembly time is 60 minutes. Always turn off the electricity at the main fuse box before beginning any installation work.
Safety Information
- WARNING: Turn off electricity at the main fuse box or circuit breaker before beginning installation.
- WARNING: This product must be installed in accordance with the National Electric Code (NEC) and any local codes.
- WARNING: This product must be installed with at least one 6-inch stem.
- CAUTION: Consult a qualified electrician to ensure proper installation.
Preparation
Before beginning assembly, compare parts with the package contents list. If any part is missing or damaged, do not attempt to assemble, install, or operate the product. Contact customer service for replacement parts.
Tools Required (not included): Wire cutters, pliers, electrical tape, and safety glasses.
Helpful Tools (not included): Wire strippers, ladder, and wall anchors.
Package Contents
The package includes the following parts:
- Fixture body (A)
- 6-inch stems (B) - 2 included
- 12-inch stems (C) - 3 included
- Canopy (D)
- Fixture mounting screws (E)
- Threaded caps (F)
- Shade (G)
- Socket ring (H)
- Mounting bracket (CC)
- Wire nuts (AA)
- Junction box screws (BB)
Assembly Instructions
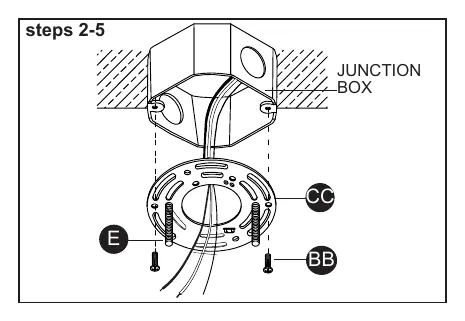

Installing the Mounting Bracket
- Disconnect power at the main fuse box.
- Position the mounting bracket (CC) so the threaded ends of the fixture mounting screws (E) face down.
- Pull house wires through the large hole in the mounting bracket (CC).
- Align holes in the mounting bracket (CC) with the junction box and secure using junction box screws (BB). Ensure house wires are not pinched.
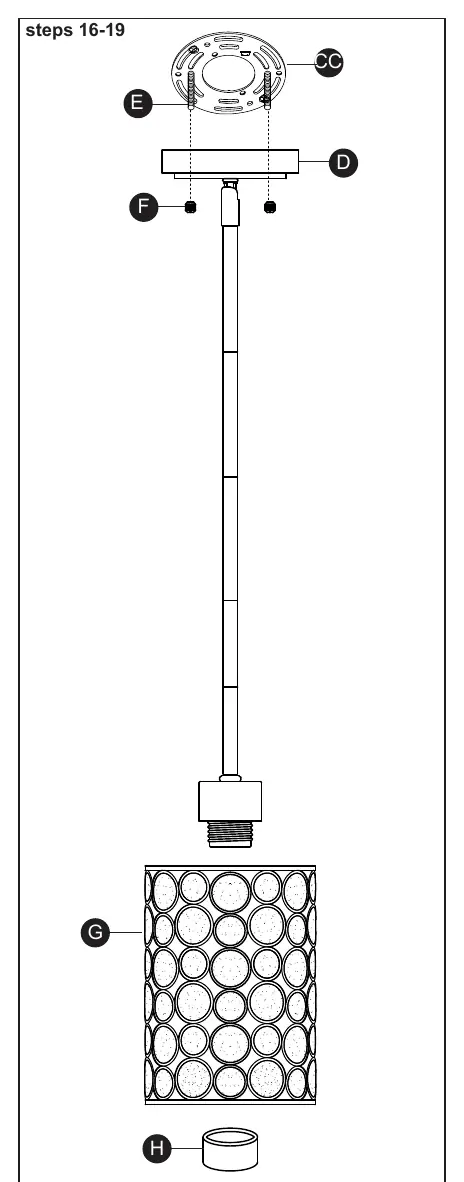
Preparing the Fixture and Wires
- Determine the desired hanging height and select the necessary stems (B and/or C). At least one 6-inch stem (B) must be used.
- Push fixture wires through the stems. Screw the stems together, keeping wires taut.
- Push wires through the swivel attached to the canopy (D).
- Screw the last stem onto the swivel on the canopy (D).
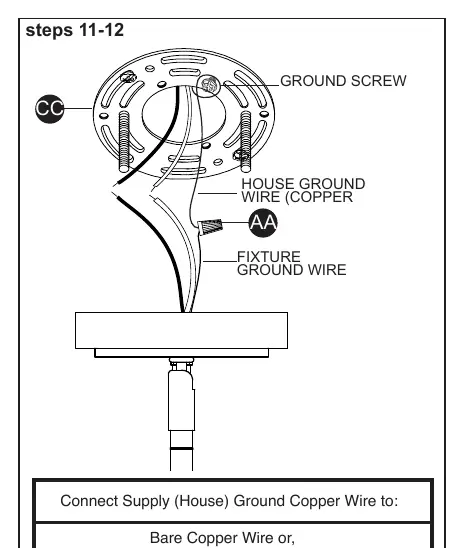
Connecting the Wires
- Strip 3/4 inch of insulation from the ends of the fixture wires.
- Loosen the ground screw on the mounting bracket (CC). Wrap the house ground wire around the screw and connect it to the fixture ground wire using a wire nut (AA).
- Connect the house lead wire (black) to the fixture lead wire using a wire nut (AA).
- Connect the house neutral wire (white) to the fixture neutral wire using a wire nut (AA).
- Wrap electrical tape around wire nuts and wires to ensure they are secure. Push all wires into the junction box.
Installing the Fixture to the Ceiling
- Raise the fixture to the ceiling and place the canopy (D) over the mounting bracket (CC).
- Secure the canopy using the threaded caps (F) on the fixture mounting screws (E). Do not overtighten.
- Raise the shade (G) to the fixture, pass the hole over the socket, and secure it with the socket ring (H).
- Install an E26 Edison bulb (not included). Verify the correct wattage marked on the socket.
Care and Maintenance
- Turn off electricity before cleaning.
- Clean the fixture with a soft, dry cloth.
- Do not use cleaners with chemicals, solvents, or harsh abrasives.
Troubleshooting
If you have questions, call customer service at 1-866-439-9800 (8 a.m. - 8 p.m., EST, Monday - Sunday) or visit www.lowespartsplus.com.
- Light bulb will not turn on: Check if the bulb is burned out, power is off, wiring is faulty, or the wall switch is defective.
- Fuse blows or circuit breaker trips: There may be crossed wires or the power wire is grounding out. Discontinue use and check connections or contact an electrician.
Warranty
The manufacturer warrants this product against defects in materials and workmanship for one year from the date of purchase. The manufacturer will repair or replace the fixture at no additional expense to the consumer. This warranty does not cover misuse, accidental damage, or improper installation.
Official resources from the manual
Manufacturer information
Allen + Roth
Practical help
Common problems
Light bulb will not turn on
Check if the bulb is burned out, ensure power is on, inspect wiring connections, or test/replace the wall switch.
Fuse blows or circuit breaker trips
Discontinue use immediately. Check for crossed wires or grounding issues, or contact a qualified electrician.
Before use
- Turn off electricity at the main fuse box.
- Ensure all parts listed in the package contents are present.
- Have wire cutters, pliers, electrical tape, and safety glasses ready.
- Ensure at least one 6-inch stem is used for installation.
Specs in practice
- Assembly Time
- Approximately 60 minutes.
Images and diagrams
- Wiring diagram shows connecting house ground to fixture ground, house black to fixture lead, and house white to fixture neutral using wire nuts.
Model compatibility
- Must be installed in accordance with the National Electric Code (NEC) and local codes.

Manual page author
Michael Turner
Technical manual editor
Reviews PDF manuals for structure, safety notes, and practical product details so readers can find the right information quickly.