Home / Window Treatments
User Manual for Allen + Roth 2-Inch Cordless Faux Wood Blind
A comprehensive installation and operation guide for the Allen + Roth 2-Inch Cordless Faux Wood Blind. Includes step-by-step mounting instructions, wand attachment, and maintenance tips.
Quick answers from the manual
Quick answer
- This manual provides installation and operating instructions for the Allen + Roth 2-Inch Cordless Faux Wood Blind, including mounting, wand attachment, and maintenance. p. 1, 2
Key actions
- Install mounting brackets p. 5
- Install wand p. 7
First start
- Mark center of window and blind, install mounting brackets, and attach the blind. p. 5
Maintenance and reset
- Clean using damp cloth or vacuum using proper attachments or duster. p. 6
Where to find it in the PDF
- Installation p. 5, 6, 7, 8
- Operation p. 9, 10
Table of contents
Manual images
Click an image to enlargeQuick Guide from the Manual
This document provides instructions for installing and operating the Allen + Roth 2-Inch Cordless Faux Wood Blind. Before beginning, ensure all parts are present and you have the necessary tools. The estimated assembly time is 30 minutes.
Preparation
Before starting, verify you have the following tools (not included):
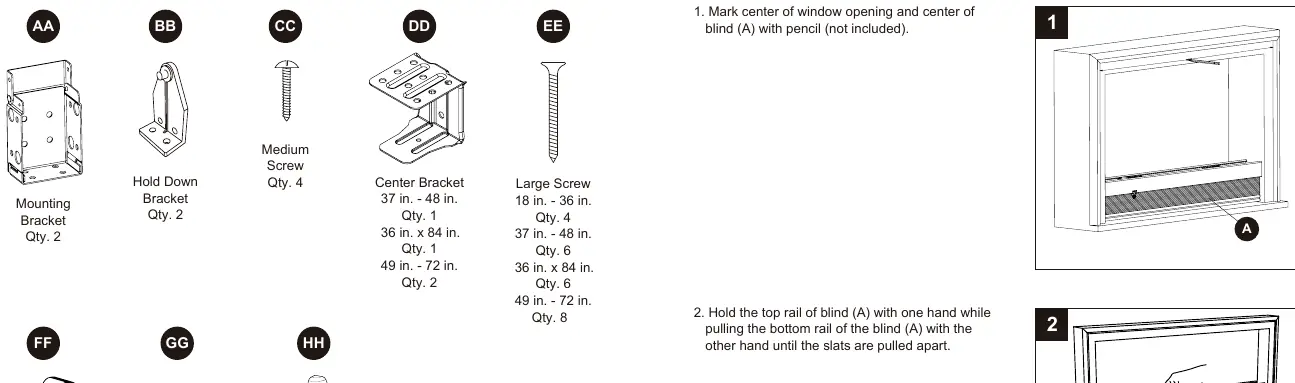
- Pencil
- Drill with 3/32 in. bit
- Safety goggles
- Phillips screwdriver
- Tape measure
- Level
- Step stool (helpful)
Installation Instructions
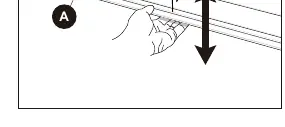
- Marking: Mark the center of the window opening and the center of the blind.
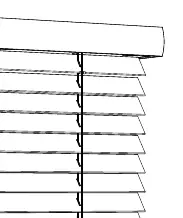
- Preparation: Hold the top rail and pull the bottom rail until the slats are separated.
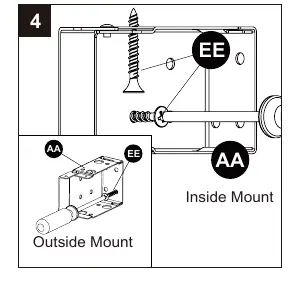
- Mounting Brackets: Slide mounting brackets onto each end of the headrail. Position the blind in the window (inside or outside mount) and mark the bracket positions.
- Securing Brackets: Remove the blind, align brackets with marks, and secure them to the window frame or wall using the provided large screws.
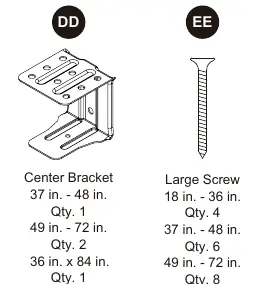
- Center Bracket: If the blind is 29 inches or wider, install the center bracket(s) on the headrail before hanging the blind.
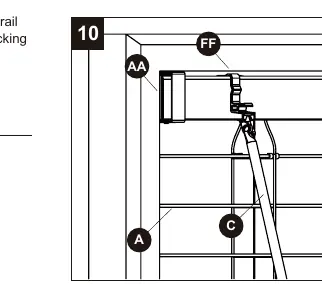
- Wand Installation: Grip and pull the wand tilter on the left side of the headrail, then hook the wand into the tilter.
- Finishing: Insert end caps into the bottom rail. Optionally, attach valance clips and the valance.
- Hold Down Brackets (Optional): For added stability, install hold down brackets to the wall or window sill and attach the blind to the cap on the bottom rail.
Operating Instructions
Raising/Lowering: Grip the bottom rail and lift or lower it to the desired height.
Tilting: Turn the wand to open or close the slats to the desired angle.
Care and Maintenance
Clean the blinds using a damp cloth, a vacuum with appropriate attachments, or a duster.
Manufacturer information
Allen + Roth
Practical help
Common problems
Blind does not stay at desired height
Ensure the blind is level and mounting brackets are securely installed.
Missing parts
Contact customer service at 866-439-9800 or [email protected].
Before use
- Check all parts against the package contents list.
- Ensure you have a pencil, drill, 3/32 in. bit, safety goggles, Phillips screwdriver, tape measure, and level.
- Verify the window opening is clear.
- Determine if you are doing an inside or outside mount.
Specs in practice
- Assembly Time
- Approximately 30 minutes.
Images and diagrams
- Diagrams illustrate the difference between inside and outside mount configurations.
- Wand installation requires gripping and pulling the wand tilter mechanism.
Model compatibility
- Suitable for both inside and outside window mounts.

Manual page author
David Miller
Documentation analyst
Organizes user manual content into clear summaries, with attention to model details, product context, and everyday usability.