Lighting / Fixtures
Installation Guide for Allen + Roth 2-Light Vanity Light
Step-by-step installation and maintenance guide for the Allen + Roth 2-Light Vanity Light (Models 43443 and 43445). Includes wiring instructions, safety warnings, and troubleshooting tips.
Quick answers from the manual
Quick answer
- This manual provides instructions for installing the Allen + Roth 2-Light Vanity Light. It covers safety precautions, wiring, mounting, and maintenance. p. 1, 2
Key actions
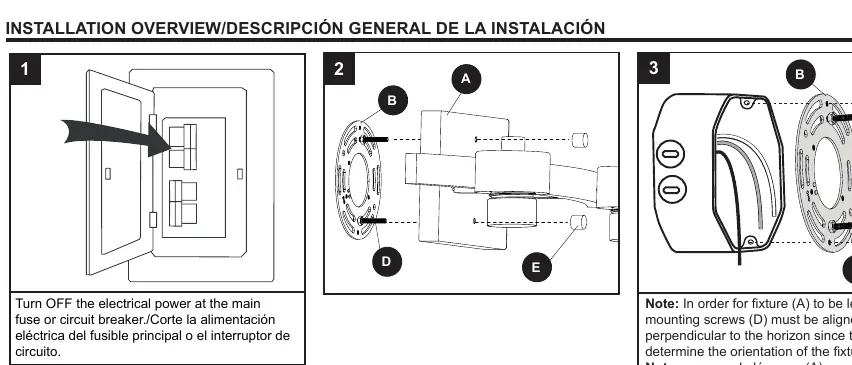
- Turn off power p. 2
- Connect wires p. 2
- Install bulbs p. 2
Problems and fixes
Fixture not level
Ensure mounting screws are aligned exactly perpendicular to the horizon.
p. 2Maintenance and reset
- Clean the fixture p. 1
Technical specifications
| Parameter | Value | Meaning | Pages |
|---|---|---|---|
| Max Bulb Wattage | 60W | Maximum wattage per bulb | p. 2 |
Where to find it in the PDF
- Safety and Warranty p. 1
- Installation and Parts p. 2
Table of contents
Quick guide from the manual
This document provides instructions for the safe installation and maintenance of the Allen + Roth 2-Light Vanity Light. Before starting, ensure you have all parts and the necessary tools. Always turn off the main power supply before beginning any electrical work. The fixture requires medium-base bulbs with a maximum of 60W each.
Safety Information
- Power Off: Always turn off electricity at the main fuse box or circuit breaker before beginning installation.
- Grounding: Do not connect the fixture to an electrical system that does not provide a means for equipment grounding.
- Mounting: All fixtures must be mounted to an outlet box supported by the building structure. Do not support the fixture by drywall alone.
- Wiring: Do not connect the fixture's ground wire (green or bare) to the black (hot) or white (neutral) supply wires.
- Bulb Wattage: Do not use bulbs with a wattage greater than the maximum value stated on the fixture (60W max).
Installation
- Preparation: Ensure all parts are present. Compare parts with the package contents list.
- Mounting Bracket: Install the mounting bracket to the outlet box.
- Wiring: Connect the black wire from the fixture to the black (hot) supply wire. Connect the white wire from the fixture to the white (neutral) supply wire. Connect the bare/green wire from the fixture to the bare/green (ground) supply wire.
- Fixture Mounting: Secure the fixture to the mounting bracket. Ensure the mounting screws are aligned exactly perpendicular to the horizon to keep the fixture level. Adjust the hex nuts on the long screws if necessary to ensure a secure fit.
- Bulb Installation: Install 60W max. medium-base bulbs (not included) into the sockets.
- Power Restoration: Restore power at the main fuse or circuit breaker.
Maintenance
Shut off the main power supply before performing any maintenance. Periodically clean the fixture using a mild, non-abrasive glass cleaner and a soft cloth. Do not use solvents or cleaners containing abrasive agents, and do not spray liquid cleaner directly onto the bulb or wiring.
Manufacturer information
Allen + Roth
Practical help
Common problems
Fixture is not level
Ensure the mounting screws are aligned exactly perpendicular to the horizon.
Fixture feels loose on the wall
Adjust the hex nuts preassembled to the long screws to ensure the fixture fits securely.
Missing parts or questions
Contact customer support at 866-439-9800 (8 a.m. - 8 p.m. EST, Monday - Sunday) or email [email protected].
Before use
- Turn off main power at the fuse or circuit breaker box.
- Verify all parts are present against the package contents list.
- Ensure the outlet box is supported by the building structure.
- Have required tools ready (screwdriver, wire strippers, etc.).
- Confirm you have medium-base bulbs (60W max).
Specs in practice
- Max Bulb Wattage
- 60W per bulb. Do not exceed to prevent fire risk.
- Assembly Time
- Estimated 35 minutes.
Images and diagrams
- Wiring diagram shows connection of black to black, white to white, and bare/green to ground.
- Mounting diagram illustrates the alignment of the mounting bracket and screws.
Model compatibility
- Requires an outlet box supported by the building structure.
- Not suitable for drywall-only mounting.

Manual page author
David Miller
Documentation analyst
Organizes user manual content into clear summaries, with attention to model details, product context, and everyday usability.