Plumbing / Sinks Faucets
User Guide for Alpha Smart 18E, 18EP, 18i Instant Shower Heater
Quick guide for the Alpha Smart 18E, 18EP, and 18i series instant shower heaters. Includes installation procedures, electrical and plumbing connection steps, safety precautions, and maintenance tips.
Table of contents
Manual images
Jump to the sectionQuick guide from the manual
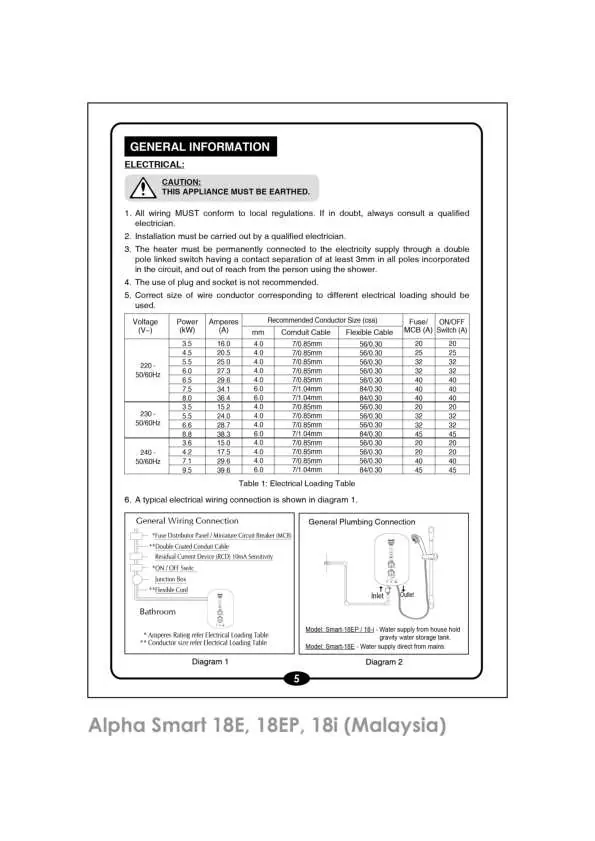
This document provides essential installation, operation, and safety instructions for the Alpha Smart 18E, 18EP, and 18i series instant shower heaters. Always ensure installation is performed by a qualified electrician and complies with local regulations. The unit must be earthed.
Safety precautions
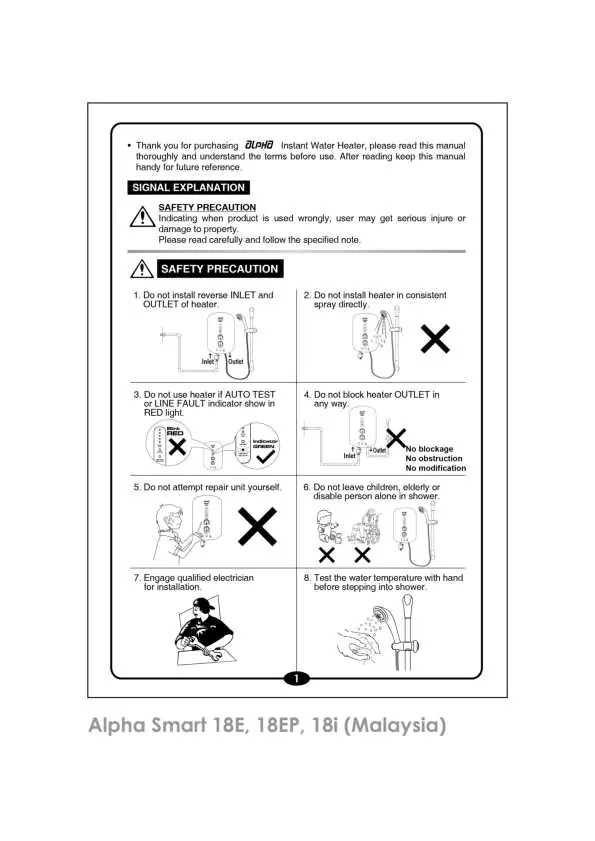
- Do not install the heater with reversed INLET and OUTLET connections.
- Do not block the heater OUTLET in any way.
- Do not use the heater if the AUTO TEST or LINE FAULT indicator shows a RED light.
- Always test the water temperature with your hand before stepping into the shower.
- Do not attempt to repair the unit yourself.
- Ensure the unit is installed on a solid wall.
Installation procedures
Mounting:
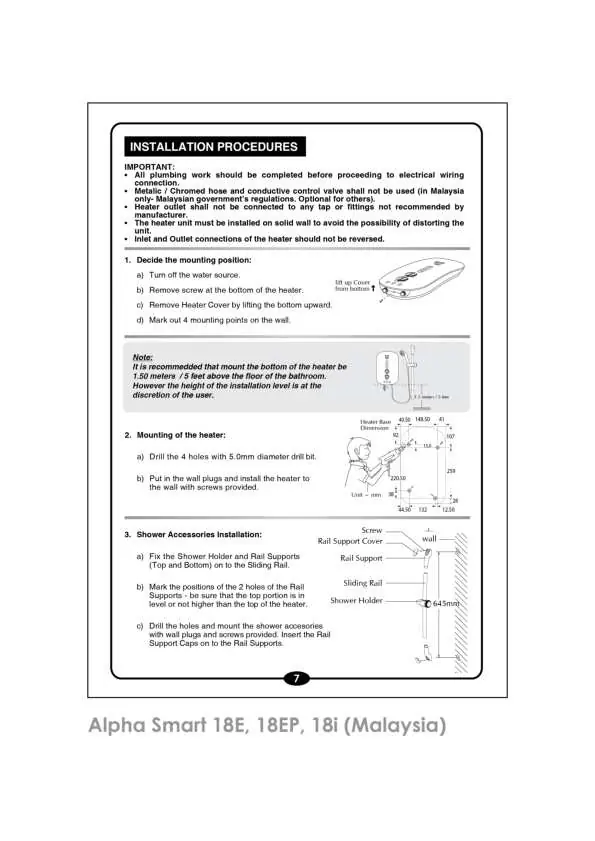
- Turn off the water source and remove the heater cover.
- Mark 4 mounting points on the wall and drill holes using a 5.0mm drill bit.
- Install wall plugs and secure the heater to the wall with provided screws.
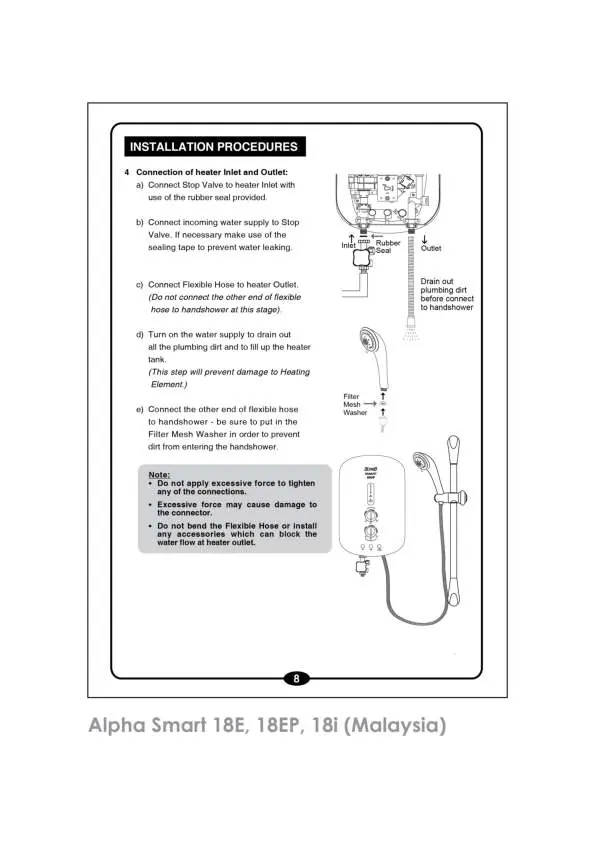
Plumbing connection:
- Connect the stop valve to the heater INLET using the provided rubber seal.
- Connect the incoming water supply to the stop valve.
- Connect the flexible hose to the heater OUTLET.
- Turn on the water supply to flush out plumbing dirt and fill the heater tank before connecting the handshower.
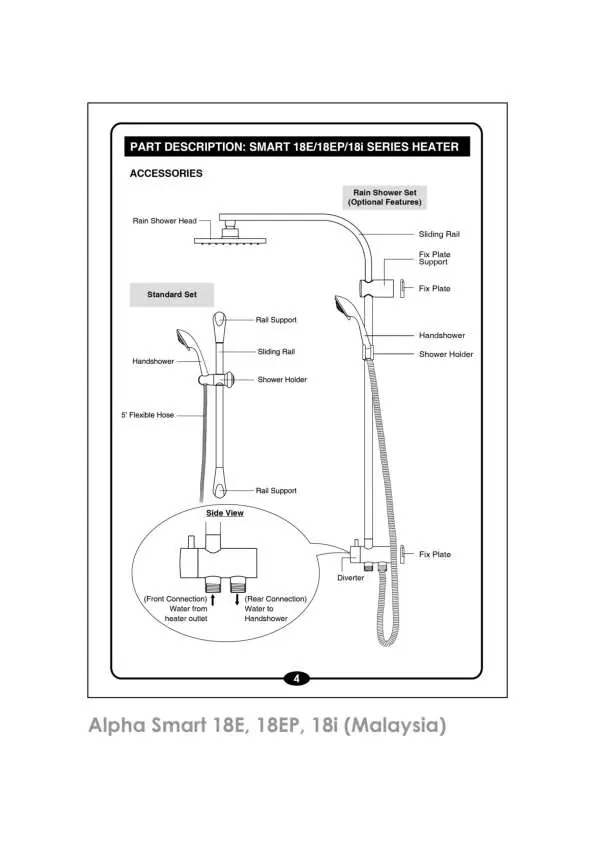
- Connect the handshower, ensuring the filter mesh washer is in place.
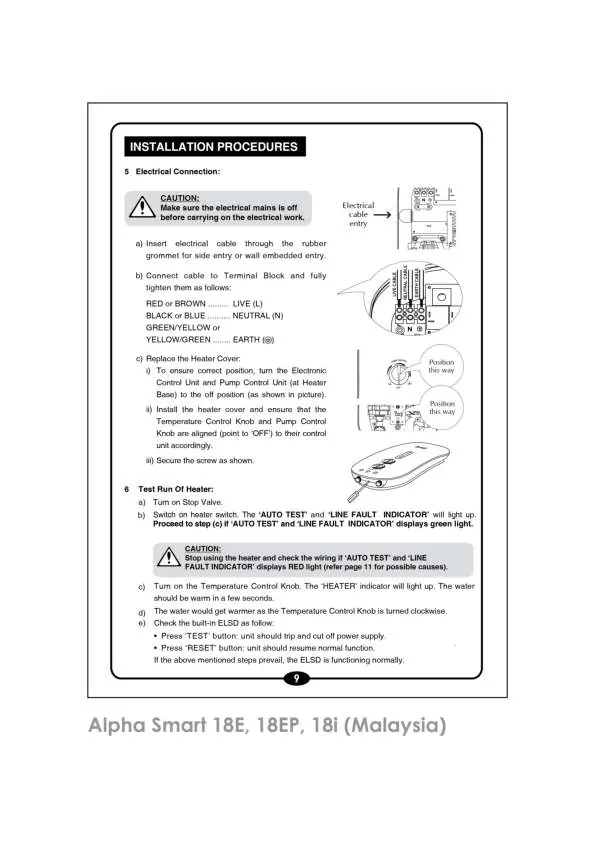
Electrical connection:
- Ensure the electrical mains are off.
- Insert the cable through the rubber grommet.
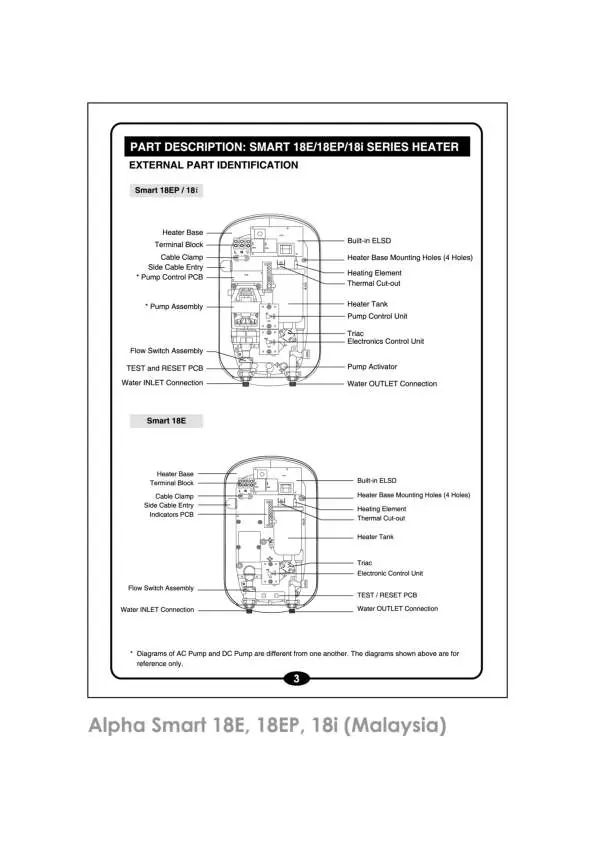
- Connect wires to the terminal block: RED/BROWN to LIVE (L), BLACK/BLUE to NEUTRAL (N), and GREEN/YELLOW to EARTH.
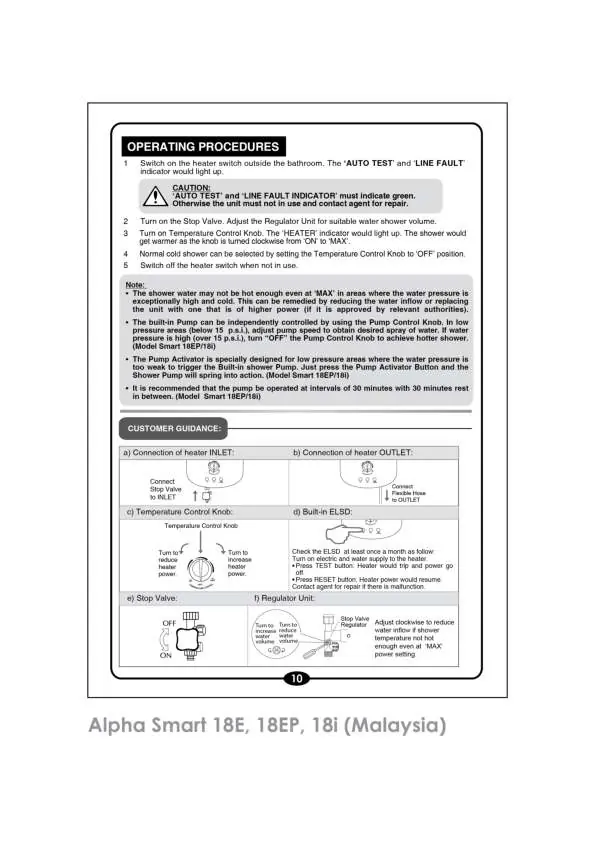
Operation
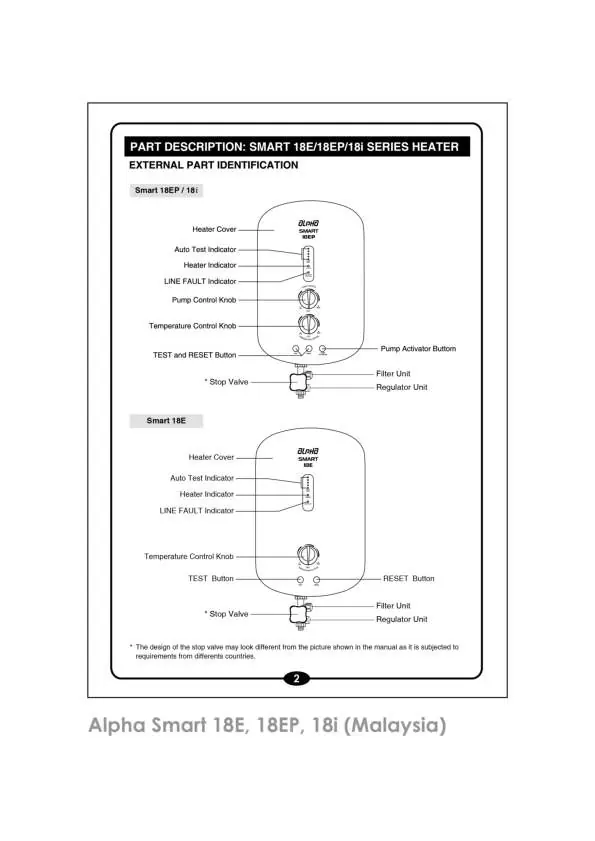
Switch on the heater switch outside the bathroom. The AUTO TEST and LINE FAULT indicators should light up green. Turn on the stop valve and adjust the temperature control knob to the desired heat level. For models with a pump (18EP/18i), use the pump control knob or pump activator button if water pressure is low.
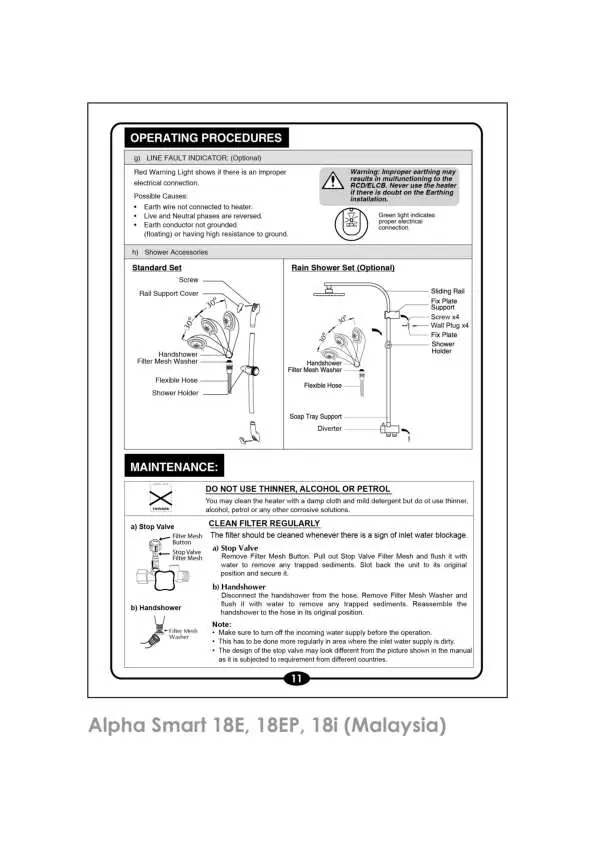
Maintenance
Clean the filter regularly if you notice a reduction in water flow. Disconnect the handshower and stop valve filter mesh, flush them with water to remove trapped sediments, and reassemble. Do not use thinner, alcohol, or petrol to clean the unit; use a damp cloth and mild detergent.
Manufacturer information
Alpha Home Appliances
Practical help
Common problems
AUTO TEST or LINE FAULT indicator shows RED light
Switch off the mains supply immediately and contact a qualified electrician to check the electrical supply line.
Water not hot enough even at MAX setting
Reduce the water inflow using the regulator unit or check if water pressure is too high.
Pump not activating (18EP/18i models)
Press the Pump Activator Button to trigger the built-in shower pump.
Before use
- Ensure the unit is properly earthed.
- Verify that the water supply is turned on and the tank is filled.
- Check that the AUTO TEST and LINE FAULT indicators are green.
- Test the water temperature with your hand before entering the shower.
- Ensure the stop valve is open.
Specs in practice
- Minimum Flow Rate
- 3 liters/minute is required for the heater to operate.
- Degree of Protection
- IP25 rating indicates protection against water jets.
- Minimum Pressure
- 20kPa (0.2 bar / 2.9 psi) is the minimum required water pressure.
Images and diagrams
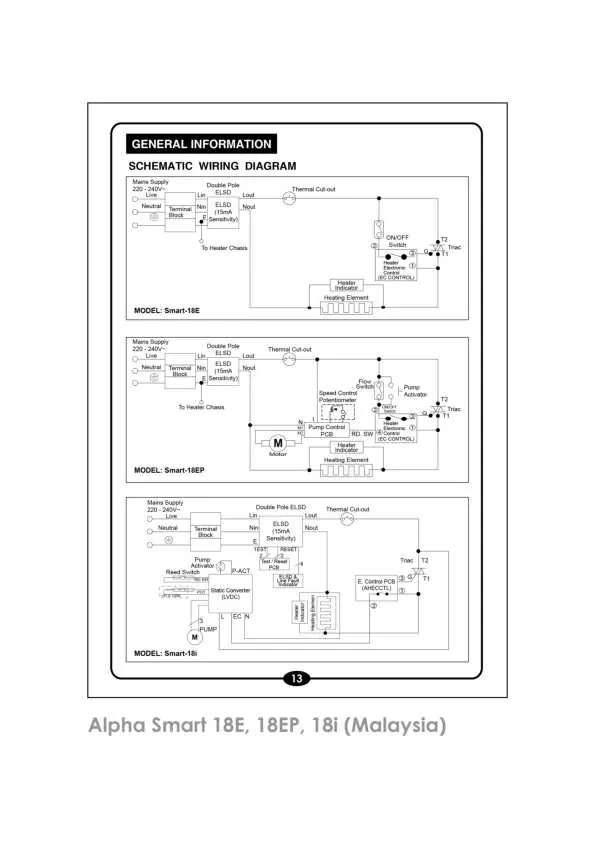
- Diagram 1: Shows the general electrical wiring connection including the RCD and MCB.
- Diagram 2: Illustrates the general plumbing connection for both gravity-fed and direct mains water supply.
Model compatibility
- The heater is designed for open outlet systems.
- Do not use metallic/chromed hoses or conductive control valves in Malaysia.

Manual page author
Emily Carter
User documentation editor
Prepares concise manual descriptions and highlights the most useful setup, operation, and maintenance information for readers.