Power / Batteries & Chargers
User Manual for Amazon Basics 6V/12V Automatic Smart Battery Charger
Quick guide for the Amazon Basics 6V/12V Automatic Smart Battery Charger. Includes setup, charging modes, safety instructions, and troubleshooting steps.
Table of contents
Manual images
Click an image to enlargeQuick guide from the manual
This device is an automatic smart battery charger designed for 6V/12V lead-acid, AGM, STD, and GEL batteries. It is intended for private use in vehicles, motorcycles, and RVs. Important: Do not use with dry cell batteries. Always ensure the area is well-ventilated during charging and never charge a frozen battery.
Product Description
The charger features a LED display and various indicators:
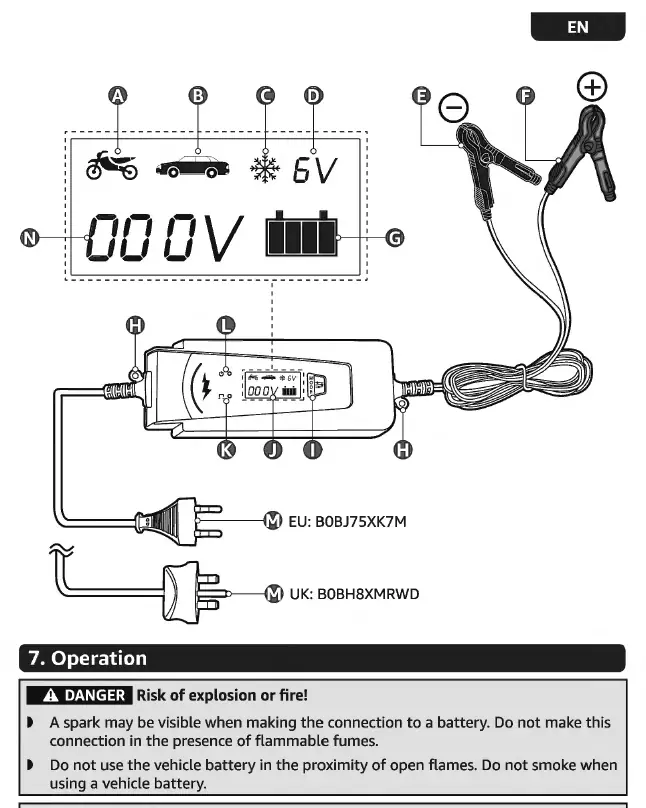
- A-D: Charging indicators for different modes (12V/2A, 12V/4A, 12V/4A Winter, 6V/2A).
- E-F: Black negative clamp and Red positive clamp.
- G: Charging progress indicator.
- H: Hanging loop.
- I: MODE button.
- J: LED display.
- K: Reverse connection indicator light.
- L: Power indicator light.
- M: Power cable with plug.
- N: Battery voltage/error indicator.
Operation
Preparation: Always disconnect the negative (-) battery terminal clamp first and reconnect it last. Ensure the vehicle ignition and all accessories are switched off before connecting.
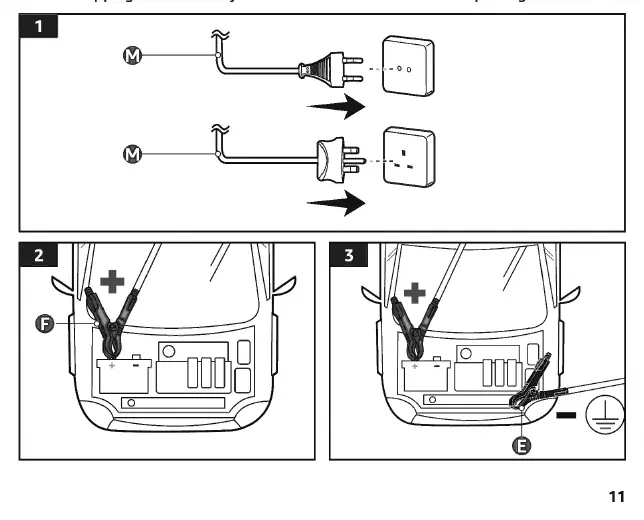
Connecting (Battery inside vehicle):
- Connect the power cable to a suitable socket.
- The power indicator (L) and LED display (J) will light up.
- Select the appropriate charging voltage using the MODE button.
- Connect the red positive clamp (F) to the positive (+) terminal of the battery.
- Connect the black negative clamp (E) to the vehicle chassis or engine block, away from the battery.
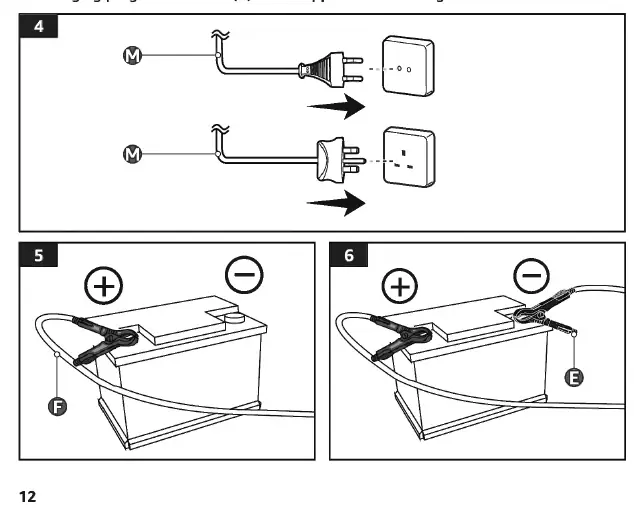
Connecting (Battery removed from vehicle):
- Place the battery on a flat, stable, clean, and dry surface.
- Connect the power cable to a socket.
- Select the appropriate charging voltage.
- Connect the red positive clamp (F) to the positive (+) terminal.
- Connect the black negative clamp (E) to the negative (-) terminal.
Disconnecting: Always disconnect the power cable from the socket first, then remove the black clamp, followed by the red clamp.
Charging Modes
Press the MODE button (I) to cycle through charging functions:
- Motorcycle icon: 14.4V / 2A (for 12V batteries < 14 Ah).
- Car icon: 14.4V / 4A (for 12V batteries 14-120 Ah).
- Snowflake icon: 14.8V / 4A (Winter charging mode).
- 6V icon: 6V / 2A (for 6V batteries < 14 Ah).
The charger uses a 7-step program: Desulphation, Soft start, Bulk charge, Absorption, Battery test, Recondition, and Floating.
Cleaning and Maintenance
Unplug the device before cleaning. Wipe with a soft, dry cloth. Do not use corrosive detergents, wire brushes, or abrasive scourers. Store in a dry area away from children.
Troubleshooting
If the device is not charging, check the plug connection and ensure clamps are secure. Error codes like E01 (reversed connection), E02 (short circuit), E03 (overheating), and E05 (incorrect voltage) indicate specific issues that require adjustment or cooling. If the battery is defective, the error indicator (N) or progress indicator (G) will signal a fault.
Specifications
Model: BC020209, BC020209U. Input: 100-240 V~, 50-60 Hz. Output: 6V/2A, 12V/2A, 12V/4A. Max Capacity: 100 Ah. Protection Class: II.
Practical help
Common problems
Appliance not charging
Check if the plug is connected to the socket. Use a voltage tester to verify power. Ensure charging clamps are secure and polarity is correct.
Error code E01
Battery is connected in reverse. Disconnect the plug and reverse the clamp connections.
Error code E02
Short circuit. Disconnect the plug, reinstall the clamps, and ensure the connection is secure.
Error code E03
Overheating. Ensure proper ventilation. Disconnect the plug and clamps, then allow the appliance to cool for 15 minutes.
Error code E05
Over voltage or incorrect charging voltage set. Select the correct charging voltage for the battery.
Before use
- Remove all packaging materials.
- Uncoil the cables completely.
- Check the appliance for transport damage.
- Set the voltage switch to the correct voltage for your region.
- Ensure the battery is not frozen; allow it to reach room temperature first.
Specs in practice
- Rated output
- 6V/2A, 12V/2A, 12V/4A (Selectable based on battery type).
- Max. Charging capacity
- 100 Ah (Maximum battery size the charger can handle).
- Protection class II
- Double insulated; does not require an electrical earth connection.
Images and diagrams
- A-D: Charging mode indicators.
- E: Black negative clamp.
- F: Red positive clamp.
- G: Charging progress bar (1-4 bars).
- I: MODE button for selecting charging function.
Model compatibility
- Compatible with 6V/12V lead-acid, AGM, STD, and GEL batteries.
- Not suitable for dry cell batteries used in home appliances.
- Not waterproof; keep away from rain.

Manual page author
David Miller
Documentation analyst
Organizes user manual content into clear summaries, with attention to model details, product context, and everyday usability.