Furniture / Tables & Desks
Assembly Instructions for Homcom 2-Piece Narrow Nightstand 83D-078V00
Comprehensive assembly guide for the Homcom 2-Piece Narrow Nightstand (Model 83D-078V00). This manual provides step-by-step instructions, hardware lists, and essential safety warnings for proper installation and use.
Quick answers from the manual
Quick answer
- This manual provides the assembly instructions for the Homcom 83D-078V00 nightstand. It includes 25 assembly steps, hardware identification, and critical safety warnings regarding furniture tip-over. p. 1, 25
Key actions
- Assemble the nightstand following the 25 steps provided. p. 12, 24
- Install the wall anchor system to prevent tipping. p. 24
Problems and fixes
Drawer misalignment
Ensure drawer slides are installed in the exact holes and are level.
p. 6Maintenance and reset
- Periodically inspect screw tightness and retighten if necessary. p. 2, 3, 4
Where to find it in the PDF
- Parts List p. 8, 9, 10, 11
- Assembly Steps p. 12, 24
- Safety Warnings p. 2, 26
Table of contents
Manual images
Click an image to enlargeQuick guide from the manual
This document provides the assembly instructions for the Homcom 2-Piece Narrow Nightstand (Model 83D-078V00). The assembly process involves 25 steps and requires a spacious, clean surface. It is recommended to wear gloves during assembly to avoid scratches from sharp edges. Please ensure all parts are accounted for before beginning.
Safety warnings
- Tip-over hazard: Serious or fatal crushing injuries can occur from furniture tip-over. Always install the provided tip-over restraint.
- Child safety: Keep children away from the assembly area due to small parts (choking hazard). Do not allow children to climb or play on the furniture.
- Usage: Intended for indoor use only. Place on level, solid ground.
Assembly preparation
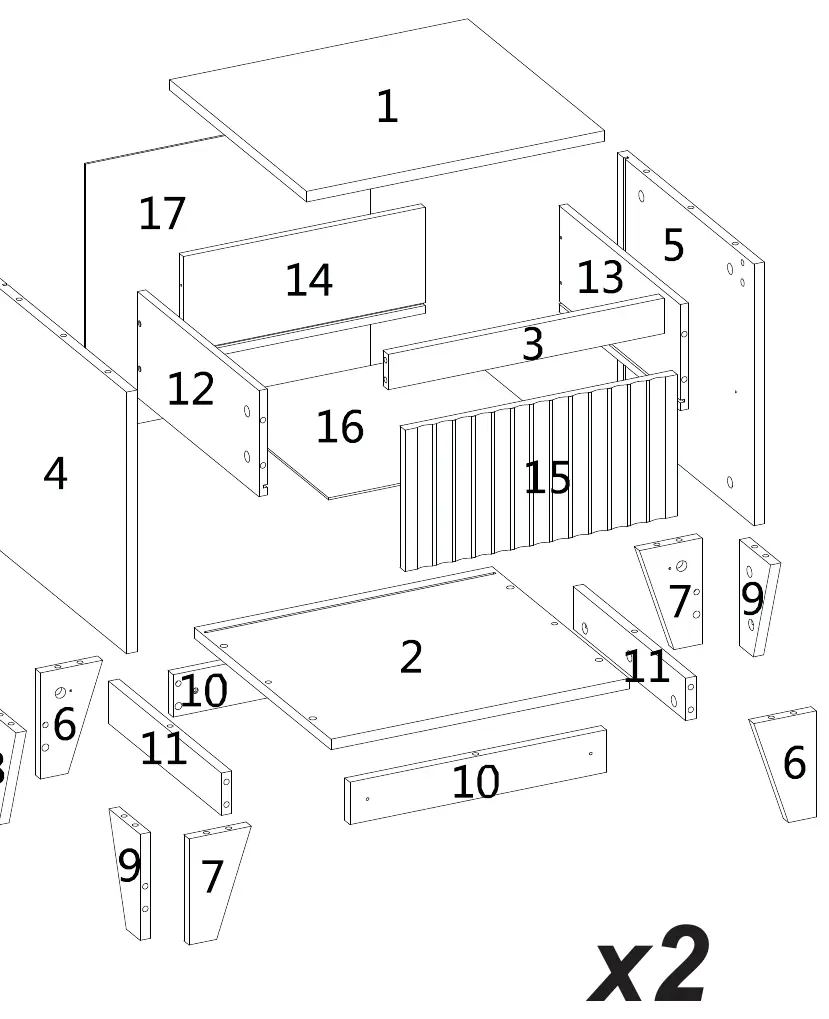
Before starting, identify all parts using the diagrams on page 8 and the parts list on pages 9-11. Ensure you have the necessary tools (screwdriver, hammer). Sort all hardware (screws, cam locks, dowels) according to the labels provided in the manual.
Assembly process
The assembly is divided into 25 steps. Key procedures include:
- Cam lock installation: Ensure the cam lock is in the correct starting position before inserting the quickfit connector. The quickfit head should be in the center of the cam lock when panels are joined.
- Drawer slides: When installing drawer slides, ensure the screws are aligned with the exact holes to prevent misalignment and ensure smooth operation.
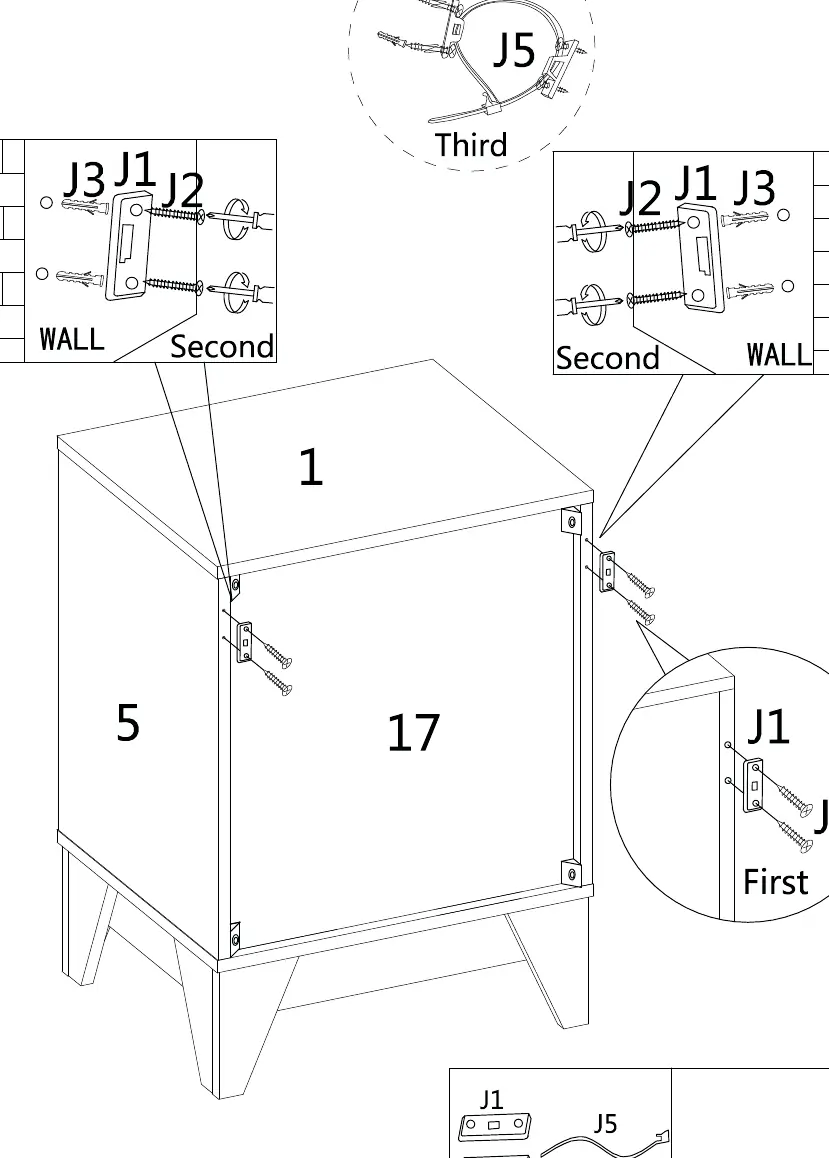
- Wall mounting: Step 25 details the installation of the wall anchor system. This is a critical safety step to prevent the unit from tipping over.
Maintenance
Periodically inspect screw tightness while the product is in use. If you accidentally spill water or another liquid on the surface, immediately wipe it clean with a dry towel.
Manufacturer information
HOMCOM
Practical help
Common problems
Drawer does not slide smoothly or is misaligned.
Check the drawer slide installation (Page 6). Ensure the screws are in the exact holes and the slides are perfectly level.
Cam lock does not tighten or panels are loose.
Ensure the cam lock is in the correct starting position before inserting the quickfit connector (Page 5). The quickfit head must be in the center of the cam lock.
Before use
- Clear a spacious area for assembly.
- Wear gloves to protect hands from sharp edges.
- Sort all parts and hardware according to the numbers in the manual.
- Verify you have all components listed on pages 9-11.
- Ensure you have a screwdriver and hammer available.
Images and diagrams
- Page 5: Detailed guide on how to correctly use cam locks and quickfit connectors.
- Page 6: Instructions for aligning drawer slides correctly.
- Page 8: Exploded view of the nightstand showing all numbered parts.
- Page 24: Step-by-step guide for wall mounting the unit for safety.
Model compatibility
- Intended for indoor use only.
- Must be placed on level, solid ground.

Manual page author
Michael Turner
Technical manual editor
Reviews PDF manuals for structure, safety notes, and practical product details so readers can find the right information quickly.