Electronics / Media Players
iPod Touch 1st Generation Logic Board Replacement Guide
A comprehensive repair guide for replacing the logic board on the Apple iPod Touch 1st Generation. Includes tool requirements, safety warnings, and step-by-step disassembly instructions.
Quick answers from the manual
Quick answer
- This guide provides instructions for removing the logic board from an iPod Touch 1st Generation, including opening the case, removing the antenna, and detaching the board. p. 1, 9
Key actions
- Open the case using a plastic opening tool to release seven retaining clips on each side. p. 2, 3
- Remove the logic board by unscrewing the internal screws and prying it loose. p. 7, 8
Problems and fixes
Antenna falls out
Make sure that the antenna is securely in place before closing the iPod.
p. 4Show 2 more answers Show less
Technical specifications
| Parameter | Value | Meaning | Pages |
|---|---|---|---|
| Phillips screw sizes | 2.4 mm, 1.6 mm, 3.8 mm | Required screw sizes for disassembly. | p. 5, 7 |
Where to find it in the PDF
- Case Opening p. 2, 3
- Logic Board Removal p. 4, 8
Table of contents
Manual images
Click an image to enlargeQuick guide from the manual
This guide provides instructions for removing the logic board from an iPod Touch 1st Generation. Please note that opening the case is a difficult and potentially dangerous task that requires force. Proceed with caution to avoid damaging the device or injuring yourself. The battery is glued to the display, and the antenna is fragile.
Tools required
- iFixit Opening Tool
- Spudger
Opening the case
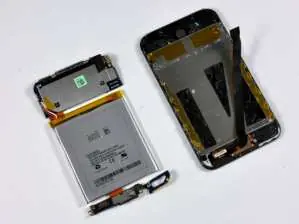
The iPod Touch 1st Generation is held together by seven interlocking retaining clips on each side. To open the device:
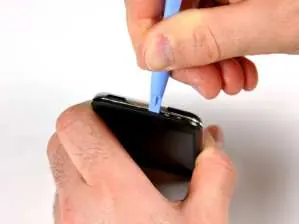
- Insert the small plastic opening tool into the seam between the plastic display panel and the metal back panel.
- The angled edge of the tool should point towards the metal back panel.
- Hold the tool in place once wedged inside to keep the panels separated.
- Use the large opening tool to wiggle and enlarge the crevice, moving along the side until the clips release.
- Repeat the procedure on the other side to fully separate the front and back panels.
Removing the logic board
Once the case is open, follow these steps to remove the logic board:
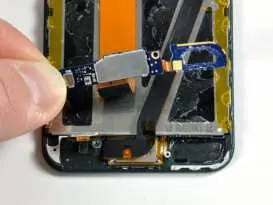
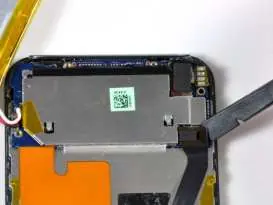
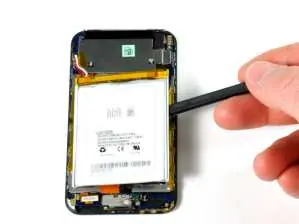
- Antenna removal: Be careful with the gold antenna, as it can easily fall out. Use a spudger to remove the antenna and the connector on the left side.
- Screw removal: Remove the 2.4 mm Phillips screw and the 1.6 mm Philips screw.
- Antenna loop board: The antenna loop board is glued down. Use a plastic opening tool or spudger to gently pry it up.
- Internal screws: Remove the black masking tape to reveal additional screws. Unscrew the three 2.4 mm Phillips screws and the 3.8 mm Philips screw.
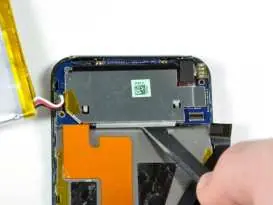
- Disconnecting: Use a spudger to disconnect the black connectors.
- Logic board removal: Use a spudger to loosen the logic board from multiple sides. Gently lift the board upward. Be careful, as the headphone jack and docking port are attached.
Reassembly
To reassemble your device, follow the disassembly instructions in reverse order. Ensure the gold antenna is securely in place before closing the iPod.
Manufacturer information
Apple Inc.
Practical help
Common problems
Case is difficult to open
Use a plastic opening tool to wedge between seams; apply force carefully to avoid damaging the case.
Antenna falls out
Ensure the gold antenna is securely in place before closing the device.
Battery is stuck
The battery is glued; use a spudger to slowly pry it loose, avoiding damage to cables underneath.
Before use
- Ensure you have an iFixit Opening Tool
- Ensure you have a Spudger
- Work in a clean, well-lit area
- Back up your data if possible
Show more Show less
Specs in practice
- 2.4 mm Phillips screw
- Used in multiple steps to secure internal components.
- 1.6 mm Philips screw
- Specific screw size for internal assembly.
- 3.8 mm Philips screw
- Specific screw size for internal assembly.
Images and diagrams
- Images show the use of plastic tools to pry open the case and internal components.
- Detailed views of screw locations and connector disconnections.
Model compatibility
- This guide is specifically for the iPod Touch 1st Generation.

Manual page author
David Miller
Documentation analyst