Wearables / Watches
Armitron Retangular Analog Watch User Manual
Quick guide for the Armitron Retangular Analog watch. Learn how to set the time, day, and date, understand crown positions, and find maintenance and service information.
Quick answers from the manual
Quick answer
- To set the time, pull the crown to the outermost position (C or 3) and rotate. To set the date or day, use the middle position (B or 2). Always return the crown to the neutral position (A or 1) after adjustments. p. 1
Key actions
- Setting the time p. 1
- Setting the date p. 1
First start
- Wind the crown clockwise at position 1 until energy is conserved. p. 1
Show 2 more answers Show less
Problems and fixes
Battery needs replacement
Change the battery when the watch becomes slow, the readout darkens, or the backlight fails.
p. 1Where to find it in the PDF
- Instructions and Crown Positions p. 1
- Service and Warranty Information p. 2
Table of contents
Quick guide from the manual
This manual covers various Armitron Retangular Analog watch styles. The primary control for all adjustments is the crown, which typically has three positions:
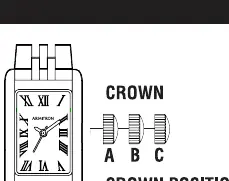
- Position A/1 (Neutral): The normal operating position. The crown can be turned without affecting the time.
- Position B/2: Used for setting the date (on models with date windows).
- Position C/3: Used for setting the time.
Setting the time and date
Standard Analog Styles: Pull the crown out to position C. Rotate in either direction until the desired time is reached, then push the crown back to position A.
Calendar and Day/Date Styles: Pull the crown to position B to adjust the date or day by rotating. If the day does not advance, pull the crown to position C and rotate until the time advances through a 24-hour period. Always return the crown to position A after setting.
Multi-Function Models: Pull the crown to position 3 when the second hand reaches the 12 o'clock position. Rotate clockwise to advance the hour and minute hands. Ensure the 24-hour military sub-dial corresponds to the correct AM/PM time. To advance the day, pull the crown to position 3 and turn clockwise. To advance the date, pull the crown to position 2 and rotate counter-clockwise.
Water resistance and maintenance
Water Resistance: This is a water-resistant watch. Do not operate push buttons while submerged. If water or condensation appears inside the watch, have it checked immediately to prevent corrosion of electronic parts.
Battery Replacement: If the watch becomes slow, the display darkens, or the backlight fails, the battery needs replacement. It is recommended to have this performed by a qualified watch technician or a local jeweler to ensure the correct battery type and polarity are used.
Accelerating Energy: If the watch requires winding, turn the crown clockwise while in position 1.
Service and warranty
If your watch requires cleaning, lubrication, battery changing, or crystal replacement, contact an authorized Armitron Adventure Service Center. Do not return the watch to the place of purchase. For a list of authorized service centers, call (718) 482-4195 or visit WWW.ARMITRON.COM.
Official resources from the manual
Practical help
Common problems
Watch is running slow or display is dark
The battery likely needs to be replaced by a qualified technician.
Water or condensation inside the watch
Have the watch checked immediately by a professional to prevent corrosion.
Date does not change correctly
Do not set the date between 9 PM and midnight, as the mechanism may not engage correctly.
Before use
- Identify your specific watch style (Standard, Calendar, or Multi-function).
- Locate the crown positions (A/1, B/2, C/3) on your watch.
- Ensure the watch is not submerged in water while operating buttons.
- If the watch is slow, consider a battery replacement.
Show more Show less
Specs in practice
- Crown Position A/1
- Neutral operating position; crown can turn freely without affecting time.
- Crown Position B/2
- Position used for setting the date on models with date windows.
- Crown Position C/3
- Position used for setting the time.
Images and diagrams
- The crown diagram illustrates three distinct positions (A, B, C) used for different adjustments.
- The diagram shows the crown pulled out to different levels to access time and date setting modes.

Manual page author
Emily Carter
User documentation editor