Wearables / Watches
User Manual for Timex 200M Digital Watch
Comprehensive user guide for the Timex 200M Digital Watch. Learn how to set the time and date, use the stopwatch, configure alarms, set the countdown timer, manage dual time zones, and replace the battery.
Quick answers from the manual
Quick answer
- To set the time, press and hold Button A while in Time of Day mode. Use Button B to cycle through settings (Seconds, Hours, Minutes, etc.) and Buttons C/D to adjust values. p. 5, 6
Key actions
- Setting Time and Date p. 5, 6
- Replacing Battery p. 7
Problems and fixes
Display dims or no display
Replace with CR2032 or equivalent battery.
p. 7Show 2 more answers Show less
Technical specifications
| Parameter | Value | Meaning | Pages |
|---|---|---|---|
| Battery | CR2032 | Standard coin cell battery | p. 7 |
| Water Resistance | 200 Meters | Water resistance rating | p. 4 |
Where to find it in the PDF
- Features and Overview p. 4
- Button Locations and Settings p. 5, 6
- Battery Replacement p. 7
Table of contents
Manual images
Click an image to enlargeQuick Guide
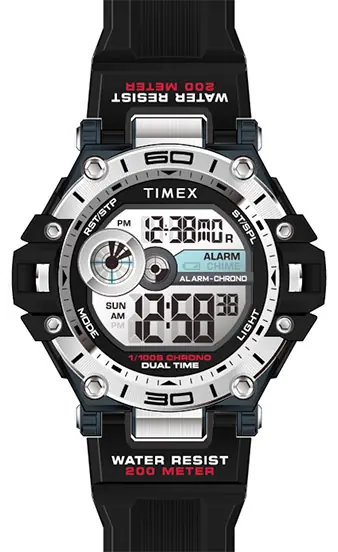
The Timex 200M Digital Watch is operated using four buttons. To navigate between modes, press the Mode (B) button. The sequence is: Time of Day > Stopwatch > Data/Recall > Countdown Timer > Alarms > Dual Time.
Button Functions
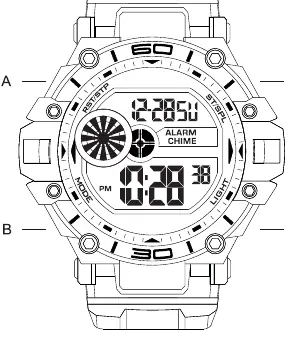
- Button A (Reset/Stop): Used to enter setting modes, stop the stopwatch, and reset functions.
- Button B (Mode): Cycles through the watch modes.
- Button C (Light/-): Activates the Indiglo night-light and decreases values during setting.
- Button D (Start/+): Starts/pauses functions and increases values during setting.
Time and Date Setting
- From the Time of Day mode, press and hold Button A for a few seconds to enter setting mode.
- The first setting is Daylight Saving Time. Use Button C or D to toggle On/Off.
- Press Button B to advance through settings: Seconds, Hours, Minutes, 12H/24H format, Year, Month, and Day.
- Use Button C or D to adjust each value.
- Press Button A when finished to return to Time of Day mode.
Note: In Time of Day mode, press and hold Button D to view the Day, Date, Month, and Year.
Modes and Features
Stopwatch
Press Button B once to enter Stopwatch mode. Press Button D to start and take splits. Press Button A to stop and reset.
Data / Recall
Press Button B twice to view split/lap times. Use Button C or D to scroll through data.
Countdown Timer
Press Button B three times. Press Button D to start or pause the countdown. Press Button A to reset.
Alarms
Press Button B four times. Select an alarm (1-5) using Button D. Hold Button A to edit hours/minutes using C and D. Press Button A to save.
Dual Time
Press Button B five times. Hold Button A to enter settings and adjust the second time zone.
Battery Replacement
When the display dims or becomes blank, replace the battery with a CR2032 or equivalent battery.
Safety Information
WARNING: This product contains a button cell or coin battery. Keep new and used batteries out of reach of children. Ingestion can cause severe internal chemical burns and death in as little as 2 hours. Seek immediate medical attention if a battery is swallowed.
Manufacturer information
Timex Group USA, Inc.
Practical help
Common problems
Display is dim or blank
The battery is likely depleted. Replace with a CR2032 or equivalent battery.
Alarm is not sounding
Ensure the alarm is enabled in the Alarm mode. The alarm sounds for 10 seconds at the preset time.
Before use
- Identify the four buttons (A, B, C, D) on the watch case.
- Check the current time and date settings.
- Ensure the battery is functioning correctly (no dim display).
- Familiarize yourself with the mode sequence by pressing the Mode button.
Show more Show less
Specs in practice
- Water Resistance
- 200 Meters (suitable for swimming and diving).
- Battery Type
- CR2032 or equivalent.
Images and diagrams
- Button A (Top Left): Reset/Stop
- Button B (Bottom Left): Mode
- Button C (Bottom Right): Light/-
- Button D (Top Right): Start/+
Model compatibility
- Extended warranty available in U.S. only.

Manual page author
Michael Turner
Technical manual editor