Power / EV Chargers
User Manual for Shopify 12-Digit Multifunction Pointer Watch
Quick guide for the Shopify 12-Digit Multifunction Pointer Watch. Learn how to set the time, configure the alarm, operate the stopwatch, and understand the display modes and button functions.
Quick answers from the manual
Quick answer
- This manual explains how to operate the 12-Digit Multifunction Pointer Watch, including switching between modes (Normal Time, Stopwatch, Alarm, Time Set), setting the time and alarm, and using the stopwatch functions. p. 1
Key actions
- Switch between modes (Normal Time, Stopwatch, Alarm, Time Set) p. 1
- Set the time p. 1
- Set the alarm p. 1
- Use the stopwatch p. 1
First start
- The watch defaults to Normal Time mode. p. 1
Show 2 more answers Show less
Technical specifications
| Parameter | Value | Meaning | Pages |
|---|---|---|---|
| Stopwatch accuracy | 1/100 second | Precision of the stopwatch function | p. 1 |
| Stopwatch range | 23 hours, 59 minutes, 59.99 seconds | Maximum duration the stopwatch can measure | p. 1 |
| EL backlight duration | 3 seconds | Duration the backlight stays on after activation | p. 1 |
| Alarm duration | 20 seconds | Length of time the alarm sounds | p. 1 |
Where to find it in the PDF
- Operating Manual p. 1
Table of contents
Quick Guide from the Manual
This manual provides instructions for the Shopify 12-Digit Multifunction Pointer Watch. It covers basic operation, including setting the time, using the alarm, and operating the stopwatch. The watch features a 12/24-hour format option, EL backlight, daily alarm, and a chronograph function.
Button Functions
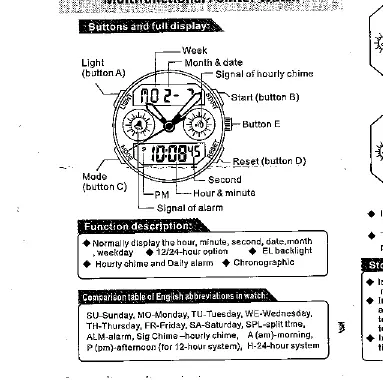
- Button A (Light): Activates the EL backlight for 3 seconds.
- Button B (Start): Used to start/stop the stopwatch, adjust settings, and split timing.
- Button C (Mode): Used to switch between modes (Normal Time, Stopwatch, Alarm, Time Set).
- Button D (Reset): Used to reset the stopwatch, select fields during setting, and toggle alarm/chime signals.
Display Indicators
The watch face displays the following information:
- Time: Hour, minute, and second.
- Calendar: Week, month, and date.
- Signals: Hourly chime signal and alarm signal.
- Format: PM indicator and 12/24-hour system indicators.
Operating Modes
Press Button C to cycle through the modes:
- Normal Time Mode: Displays current time and date.
- Stopwatch Mode: Used for timing events.
- Alarm Mode: Used to set and view the daily alarm.
- Time Set Mode: Used to adjust time and calendar settings.
Setting the Time
- In Normal Time mode, press Button C three times to enter Time Set mode.
- The "second" will flash. Press Button B to reset seconds to zero.
- Press Button D to select the field to adjust (minute, hour, date, month, weekday).
- Press Button B to adjust the selected value.
- Press Button C to confirm and return to Normal Time mode.
Setting the Alarm
- In Normal Time mode, press Button C twice to enter Alarm mode.
- Press Button D to shift between "minute" and "hour".
- Press Button B to adjust the value.
- Press Button C to confirm.
- To toggle the alarm or hourly chime, press Button B while in Alarm mode. If the signal appears, it is active; if it disappears, it is closed.
Stopwatch Usage
- Press Button C to enter Stopwatch mode.
- Press Button B to start the stopwatch.
- Press Button B again to stop the stopwatch.
- Press Button D to reset the stopwatch to zero.
- To use split timing, press Button B to start, press Button B to split, press Button D to display the time, and press Button D again to return to the stopwatch.
Practical help
Common problems
Alarm or hourly chime is active when not desired.
In Alarm mode, press Button B to toggle the signal. If the signal icon is visible, it is active; if it disappears, it is closed.
Stopwatch will not reset to zero.
Ensure the stopwatch is stopped first by pressing Button B, then press Button D to reset.
Before use
- Identify buttons A, B, C, and D on the watch case.
- Verify the current mode by pressing Button C.
- Test the EL backlight by pressing Button A.
- Check if the alarm or hourly chime signals are active if you do not wish to use them.
Show more Show less
Specs in practice
- EL Backlight
- Electroluminescent light that illuminates the display for 3 seconds.
Images and diagrams
- Button A is located at the top left.
- Button B is located at the top right.
- Button C is located at the bottom left.
- Button D is located at the bottom right.
Model compatibility
- Supports both 12-hour (AM/PM) and 24-hour time formats.

Manual page author
Michael Turner
Technical manual editor