Lighting / Fixtures
Artika Dark Sky LED Step Light 12ST-DS-MB10TE10 Installation Guide
Installation guide for the Artika Dark Sky LED Step Light (12ST-DS-MB10TE10). This manual provides step-by-step instructions for concrete, wood, and drywall installation, wiring diagrams, and safety precautions.
Table of contents
Manual images
Click an image to enlargeQuick guide from the manual
This document provides installation instructions for the Artika Dark Sky LED Step Light. Before starting, ensure the main electrical supply is turned off at the circuit breaker. The installation process varies depending on the mounting surface: concrete, wood, or drywall. Always use the provided hardware and ensure the bottom of the fixture remains unsealed to allow for proper drainage.
Safety Warnings
Risk of electrical shock: Turn off the breaker at the panel before installing the unit or performing any maintenance. We recommend that this product be installed by a certified electrician in accordance with local electrical and building codes.
Included Hardware and Tools
Ensure you have the following items before beginning:
- Included: Mounting box, recyclable cover, mounting bracket, wire connectors, junction box screws, step light, retaining screws, and wall anchors.
- Required Tools: Screwdriver, pencil, drill, 1/4 inch (6.5 mm) drill bit, and sealant.
Installation Overview
The manual provides specific steps for three installation types:
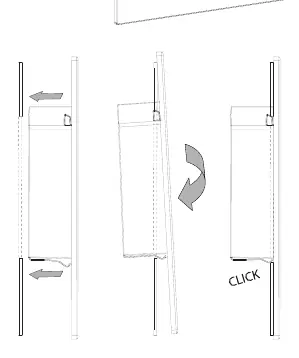
- Concrete Installation: Involves installing the mounting box into the concrete form, removing the form and cover after the concrete has set, and attaching the bracket and fixture.
- Wood Installation: Involves mounting the box and bracket directly to the wood surface.
- Drywall Installation: Involves marking the wall, using anchors, and securing the mounting box and bracket.
Wiring Connection
Connect the wires using the provided wire connectors:
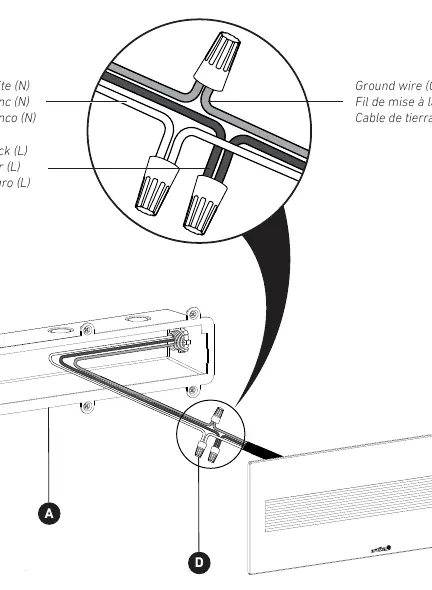
- Connect the White (N) wire to the White (N) supply wire.
- Connect the Black (L) wire to the Black (L) supply wire.
- Connect the Ground (GND) wire to the Ground (GND) supply wire.
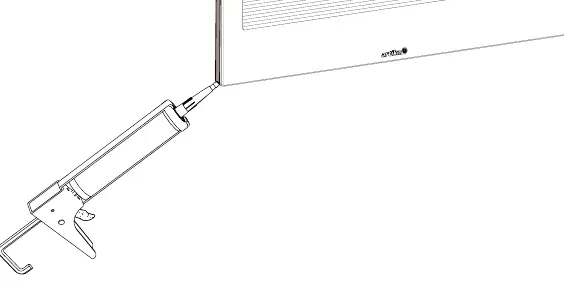
Sealant Application
After installing the fixture, apply sealant around the edges. Note: We recommend keeping the bottom unsealed to maintain a drainage area in case of water infiltration.
Warranty and Support
Artika For Living Inc. offers a five-year limited warranty for manufacturing defects for residential use. For support, contact Artika at 1-866-661-9606 or [email protected]. Customer service is available Monday to Friday, 9 am - 5 pm EST.
Manufacturer information
Artika
Practical help
Common problems
Water infiltration
Keep the bottom of the fixture unsealed to maintain a drainage area.
Electrical hazard
Always switch off the main electrical supply from the fuse box or circuit breaker before installation or maintenance.
Before use
- Turn off the main electrical supply at the circuit breaker.
- Gather required tools: drill, 1/4 inch drill bit, screwdriver, pencil, and sealant.
- Verify all included hardware (mounting box, bracket, wire connectors) is present.
- Identify the installation surface (concrete, wood, or drywall) to follow the correct procedure.
- Ensure the installation complies with local electrical and building codes.
Specs in practice
- 12ST-DS-MB10TE10
- Official model number for the Dark Sky LED Step Light.
- Residential use only
- The product is intended for home use, suitable for indoor or outdoor environments.
Images and diagrams
- Wiring diagram: Illustrates the connection of White (N), Black (L), and Ground (GND) wires using wire connectors.
- Installation steps: Detailed diagrams for concrete, wood, and drywall mounting methods.
- Sealant application: Shows where to apply sealant while leaving the bottom open for drainage.
Model compatibility
- Installation by a certified electrician is recommended.
- Must be installed in accordance with local electrical and building codes.

Manual page author
David Miller
Documentation analyst
Organizes user manual content into clear summaries, with attention to model details, product context, and everyday usability.