Lighting / Fixtures
Installation Instructions for Aurora Colour Switchable LED Downlight
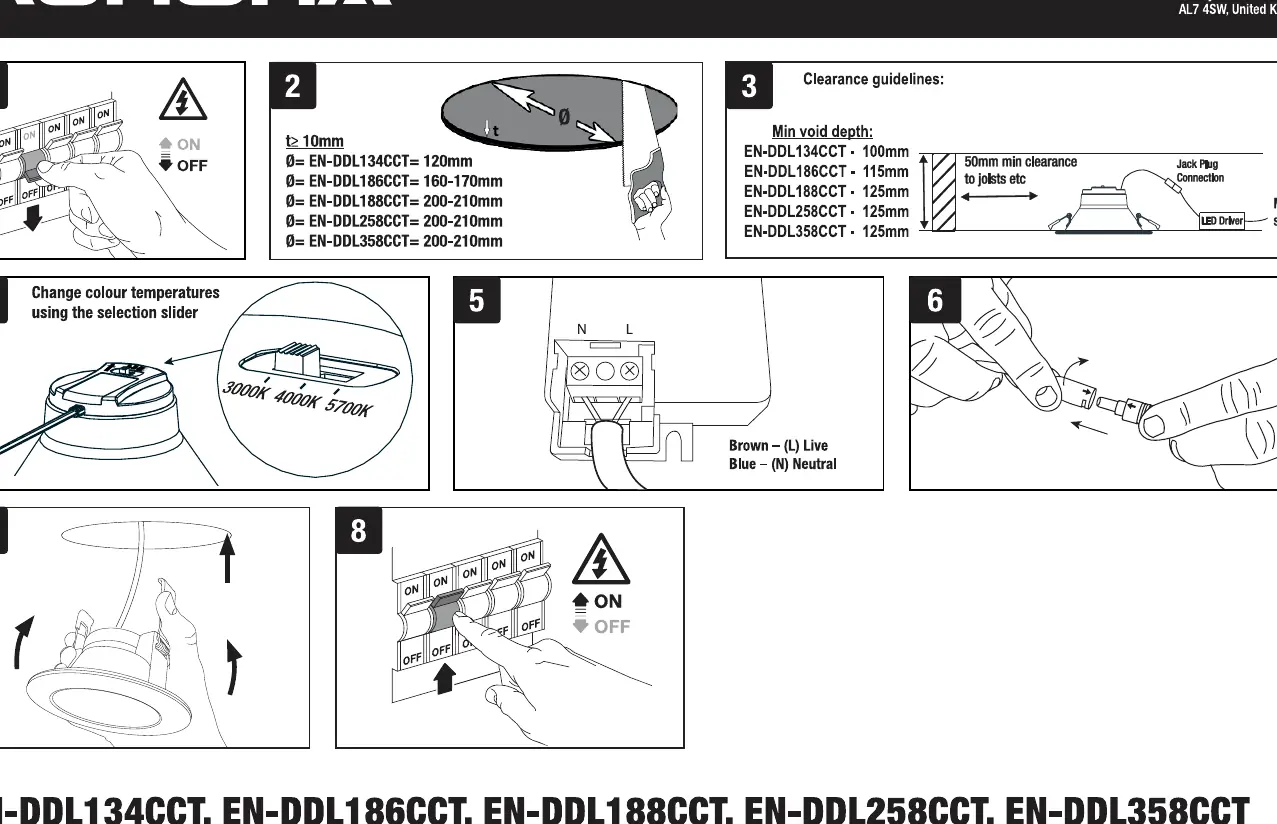
Quick installation guide for Aurora Colour Switchable LED Downlights. Includes wiring diagrams, cutout dimensions, clearance guidelines, and safety instructions for models EN-DDL134CCT through EN-DDL358CCT.
Table of contents
Quick Guide for Installation
This document provides installation instructions for the Aurora Colour Switchable LED Downlight series. Ensure all electrical connections are tight and the installation is performed by a qualified electrician in accordance with the latest national wiring regulations.
Safety Precautions
- Power Supply: 200-240V AC 50Hz.
- IP Rating: IP54 rated, suitable for installation in bathrooms and showers (Zones 1 & 2).
- Class II: Double insulated, no earth connection required.
- Compatibility: Not compatible with PIR sensors.
- Light Source: The light source is not replaceable; the entire luminaire must be replaced at the end of its life.
Installation Steps
- Isolate Power: Ensure the mains power is switched off before starting.
- Cutout: Prepare the ceiling hole according to the specific model requirements (see Cutout Dimensions below).
- Clearance: Ensure a minimum void depth of 100mm-125mm (depending on model) and 50mm clearance to joists.
- Colour Selection: Use the slider on the back of the unit to select the desired colour temperature (3000K, 4000K, or 5700K).
- Wiring: Connect the mains supply to the terminal block: Brown to Live (L) and Blue to Neutral (N).
- Connection: Connect the jack plug to the LED driver.
- Mounting: Insert the downlight into the ceiling cutout.
- Finalize: Switch the mains power back on.
Cutout and Clearance Requirements
Ensure the ceiling cutout diameter matches your specific model:
- EN-DDL134CCT: 120mm cutout, 100mm min void depth.
- EN-DDL186CCT: 160-170mm cutout, 115mm min void depth.
- EN-DDL188CCT: 200-210mm cutout, 125mm min void depth.
- EN-DDL258CCT: 200-210mm cutout, 125mm min void depth.
- EN-DDL358CCT: 200-210mm cutout, 125mm min void depth.
Manufacturer information
Aurora Lighting
Practical help
Common problems
Light not working with PIR sensor
The luminaire is not compatible with PIR sensors. Do not use them in the same circuit.
Light source failure
The light source is not replaceable. The entire luminaire must be replaced.
Before use
- Ensure mains power is switched off.
- Verify the ceiling void depth meets the minimum requirement (100-125mm).
- Check the cutout diameter matches your specific model (120-210mm).
- Ensure the installation is performed by a qualified electrician.
- Confirm the circuit is not controlled by a PIR sensor.
Specs in practice
- Colour Switchable
- Allows selection between 3000K, 4000K, and 5700K colour temperatures via a slider.
Images and diagrams
- Step 1: Isolate mains power.
- Step 2: Cut the ceiling hole according to the specific model diameter.
- Step 5: Connect Brown wire to Live (L) and Blue wire to Neutral (N).
Model compatibility
- Not compatible with PIR sensors.
- Suitable for use in bathrooms and showers (Zones 1 & 2).

Manual page author
Emily Carter
User documentation editor
Prepares concise manual descriptions and highlights the most useful setup, operation, and maintenance information for readers.