Lighting / Outdoor Landscape
Aurora High Power LED Floodlight EN-FLC Series Installation Guide
Installation guide for Aurora High Power LED Floodlights (EN-FLC30 to EN-FLC200). Includes wiring diagrams, mounting instructions, and safety requirements.
Table of contents
Quick guide from the manual
This document provides installation instructions for the Aurora High Power LED Floodlight series (EN-FLC30, EN-FLC50, EN-FLC80, EN-FLC100, EN-FLC150, EN-FLC200). The installation must be performed by a qualified electrician in accordance with national wiring regulations. The unit is IP65 rated and must be earthed.
Installation
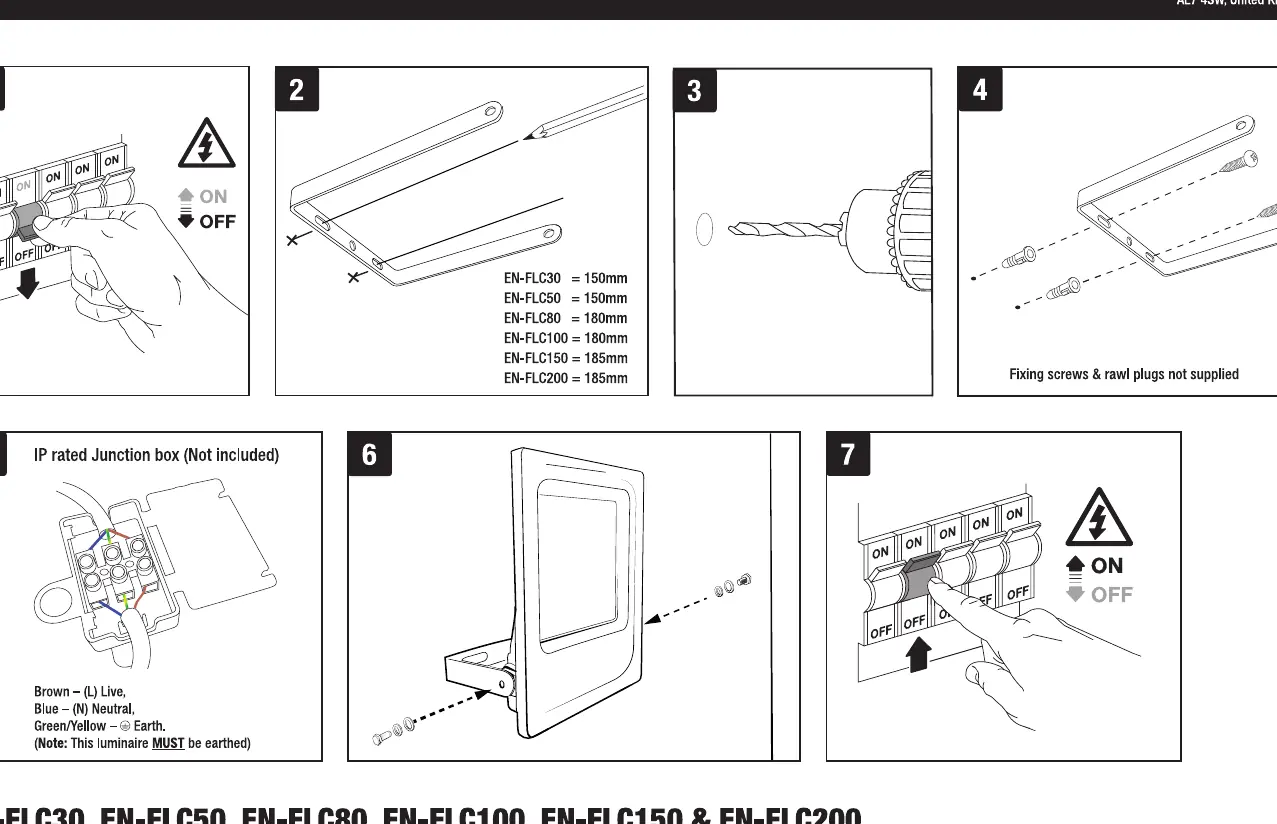
- Power Off: Ensure the mains power is switched off before starting any work.
- Marking: Mark the mounting holes using the bracket. Note the required spacing: 150mm for FLC30/50, 180mm for FLC80/100, and 185mm for FLC150/200.
- Drilling: Drill the holes for the mounting bracket.
- Mounting: Secure the bracket using appropriate screws and rawl plugs (not supplied).
- Wiring: Connect the power supply to the junction box (not included). Wiring color code: Brown (Live), Blue (Neutral), Green/Yellow (Earth). The luminaire must be earthed.
- Final Assembly: Attach the floodlight to the bracket and secure it.
- Power On: Switch the mains power back on.
Safety and Warnings
- Qualified Electrician: Installation must be carried out by a qualified professional.
- Earthing: The luminaire must be earthed.
- Environment: Do not install in steam rooms or near air conditioning/central heating units.
- Dimmability: These luminaires are not dimmable.
- Maintenance: There are no serviceable parts inside the unit.
- Safety: Do not stare directly into the LEDs while in operation.
Technical Specifications
- Voltage: 100-240V 50/60Hz AC.
- Protection: IP65 (protected against low-pressure water jets).
- Class: Class I.
Manufacturer information
Aurora Lighting
Practical help
Common problems
Light does not work or flickers
Ensure the unit is correctly earthed and wiring connections are secure. Verify the power supply is 100-240V 50/60Hz.
Cannot dim the light
These luminaires are not dimmable; do not use with a dimmer switch.
Installation location issues
Do not install in steam rooms or near air conditioning/central heating units as this may degrade the product.
Before use
- Ensure a qualified electrician performs the installation.
- Verify the mains voltage is 100-240V 50/60Hz.
- Confirm the mounting surface is suitable for the weight of the unit.
- Ensure you have a suitable IP-rated junction box.
- Check that the earth connection is properly secured.
Specs in practice
- Non-dimmable
- The unit is not compatible with dimmer switches.
Images and diagrams
- Step 1: Turn off the mains power supply.
- Step 2: Use the bracket to mark mounting holes with specific spacing based on the model.
- Step 5: Wiring diagram showing Brown (Live), Blue (Neutral), and Green/Yellow (Earth) connections.
Model compatibility
- Not suitable for steam rooms.
- Not suitable for installation near air conditioning or central heating units.

Manual page author
David Miller
Documentation analyst
Organizes user manual content into clear summaries, with attention to model details, product context, and everyday usability.