Lighting / Fixtures
Installation Guide for Aurora Utilite Bulkhead Light
Quick installation guide for the Aurora Utilite 15W Polycarbonate IP65 Round Utility Bulkhead. Includes step-by-step mounting instructions, safety specifications, and technical requirements.
Table of contents
Manual images
Click an image to enlargeQuick Installation Guide
This document provides essential installation and safety information for the Aurora Utilite bulkhead light. Installation must be performed by a qualified electrician in accordance with the latest edition of the National Wiring Regulations. Ensure the power is switched off at the mains before beginning any work.
Installation Steps
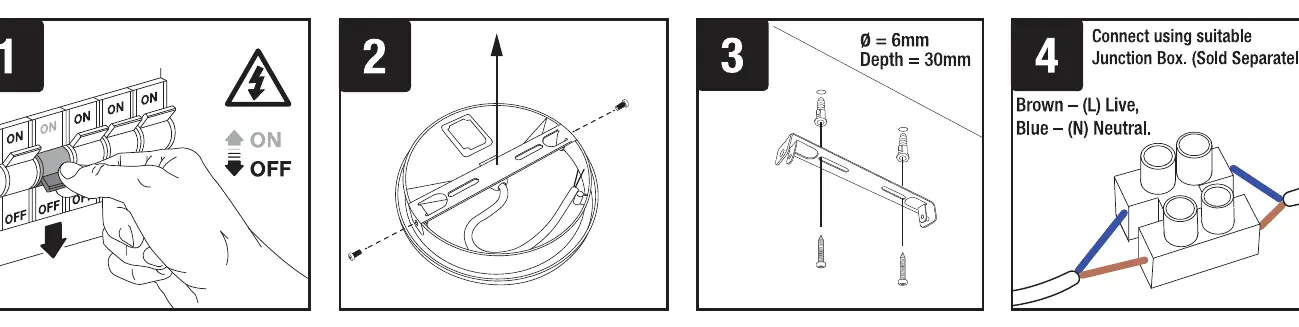
- Power Off: Ensure the electrical supply is isolated at the circuit breaker.
- Prepare Mounting: Position the base and mark the mounting points.
- Drill: Drill holes (6mm diameter, 30mm depth) for the mounting screws.
- Wiring: Connect the supply cables using a suitable junction box (sold separately). Connect Brown to Live (L) and Blue to Neutral (N).
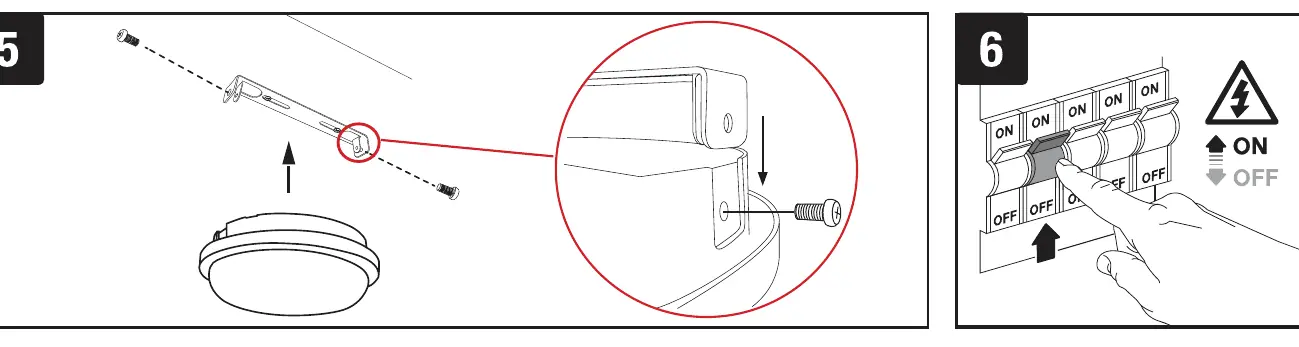
- Mounting: Secure the light fixture to the surface using the provided screws.
- Power On: Restore power at the circuit breaker.
Safety and Technical Specifications
The Aurora Utilite is designed for both indoor and outdoor use. Please adhere to the following specifications:
- Input Voltage: 220-240V 50/60Hz AC.
- Ingress Protection: IP65 rated (suitable for protection against water jets).
- Safety Class: Class II luminaire (double insulated, must not be connected to an earth terminal).
- Dimming: These luminaires are not dimmable.
- Installation Surface: Suitable for installation on the surface of combustible materials.
Maintenance
There are no user-serviceable parts inside this luminaire. Do not attempt to disassemble or repair the unit yourself.
Manufacturer information
Aurora Lighting
Practical help
Common problems
Light does not turn on
Verify that the power is on at the circuit breaker and that wiring connections in the junction box are secure.
Cannot connect earth wire
This is a Class II luminaire; it does not require and must not be connected to an earth terminal.
Light flickers or fails with dimmer
The luminaire is not dimmable. Remove any dimmer switches from the circuit.
Before use
- Ensure power is isolated at the mains
- Verify supply voltage is 220-240V 50/60Hz
- Confirm the mounting surface is suitable
- Ensure a suitable junction box is available (sold separately)
- Check that the installation is performed by a qualified electrician
Specs in practice
- Non-dimmable
- The unit is not compatible with dimmer switches.
Images and diagrams
- Step 1: Isolate power supply.
- Step 2-3: Mark and drill 6mm holes.
- Step 4: Wiring connection using a junction box.
- Step 5: Secure the fixture to the wall.
- Step 6: Restore power.
Model compatibility
- Suitable for indoor and outdoor use.
- Can be installed on combustible surfaces.

Manual page author
Emily Carter
User documentation editor
Prepares concise manual descriptions and highlights the most useful setup, operation, and maintenance information for readers.