Electronics / Amplifiers Receivers
Banda Audioparts ELECTRA 10K Amplifier Instruction Manual
Comprehensive guide for the Banda Audioparts ELECTRA 10K amplifier, covering installation, wiring, technical specifications, and troubleshooting.
Table of contents
Introduction to ELECTRA 10K
The Banda Audioparts ELECTRA 10K is a high-performance amplifier developed by qualified engineers in a high-tech laboratory to deliver exceptional audio quality. To ensure optimal operation and longevity of your equipment, it is essential to read this manual thoroughly before installation and use. Keep this document in a safe and accessible location for future reference.
Power Supply and Connections
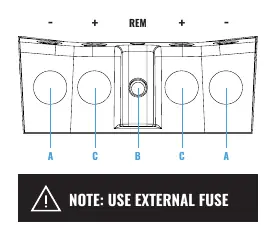
The power supply unit is designed for robust performance. It features a GND terminal for connection to the vehicle chassis, a 12VDC input for the positive power source, and a remote terminal for antenna or remote turn-on signals. Important: Always use an external fuse to protect your electrical system from potential overloads. Ensure that all power cables are of the recommended gauge (minimum 70mm) to prevent voltage drops and ensure efficient power delivery.
Front Panel and LED Indicators
The amplifier includes a diagnostic LED system to monitor its status during operation:
- Blue (ON): Indicates the amplifier is powered on and functioning correctly.
- Red (SHORT): Signals output distortion (clipping), a short circuit, or thermal protection activation.
- Yellow (Flashing): Indicates low battery voltage, suggesting the input voltage has dropped below 9V.
Wiring and Configuration
The ELECTRA 10K offers versatile wiring options to suit various subwoofer configurations. Whether you are using a 1-ohm or 2-ohm model, the amplifier is designed to drive multiple woofers or subwoofers in parallel. Always verify that the total impedance of your speaker system does not fall below the minimum rated impedance of the amplifier to avoid triggering protection circuits or causing damage.
Troubleshooting and Protection
If the amplifier enters a protection mode, refer to the LED indicators to diagnose the issue. If the blue and red LEDs are both on, the unit has reached its thermal limit; ensure proper ventilation. If the red LED flashes without audio, check for short circuits in the speaker wiring or incorrect impedance. If the yellow LED flashes, inspect your battery charge and power cable connections for voltage drops. For persistent issues, contact an authorized service center.
Manufacturer information
Banda Audioparts
Practical help
Common problems
Blue & Red LED On
Amplifier temperature limit reached. Ensure well-ventilated installation and clear obstructions.
Blue LED on, Red flashing, no audio
Short circuit in speaker cables or impedance below rated minimum. Check all connections.
Flashing Yellow LED
Input voltage below 9V. Check battery charge and power cable connections for voltage drops.
Red and Yellow LED on
Internal amplifier fault. Contact an authorized service center.
Before use
- Ensure the installation area is well-ventilated.
- Verify that the total speaker impedance matches the amplifier's rating.
- Use the recommended 70mm power supply cables.
- Install an external fuse for safety.
- Check that all connections are secure and free of shorts.
Specs in practice
- Input Sensitivity
- The range of input signal voltage the amplifier can accept to reach full power.
- Quiescent Current
- The current consumed by the amplifier when it is on but not producing audio.
Images and diagrams
- Power Supply Unit: Shows terminals for GND, 12VDC, and Remote.
- Front Panel LEDs: Identifies indicators for Power, Clipping/Thermal, and Low Battery.
- Wiring Example: Illustrates parallel connection of 4 woofers to achieve 10000Wrms.
- Dimensions: Provides physical size (452mm x 256mm x 73mm) and weight (9.2kg).
Model compatibility
- Available in 1-ohm and 2-ohm stable versions.
- Requires a minimum of 70mm power cables.
- Recommended external fuse rating is 600A.

Manual page author
Michael Turner
Technical manual editor
Reviews PDF manuals for structure, safety notes, and practical product details so readers can find the right information quickly.