Electronics / Monitors
Caliber CA 100V4 4-Channel Amplifier User Guide
Comprehensive user guide for the Caliber CA 100V4 4-channel audio amplifier, covering installation, wiring, signal input, and adjustment settings.
Table of contents
Product Overview
The Caliber CA 100V4 is a high-performance 4-channel amplifier designed for automotive audio systems. It features a Pulse Width Modulated (PWM) MOSFET power supply, ensuring efficient and reliable power delivery. The unit is engineered with thermal, overload, and short-circuit protection to safeguard your audio system. It also includes built-in high and low-pass filters, allowing for precise sound customization.
Mounting and Installation
Proper installation is critical for optimal performance and longevity. Ensure the amplifier is mounted on a flat surface with at least 5 cm of ventilation space on all sides to allow heat to dissipate. Keep the unit away from moisture and direct sunlight. When installing, always disconnect the vehicle's battery ground to prevent electrical shorts. Use a fuse or circuit breaker within 30 cm of the battery, ensuring the rating does not exceed the amplifier's internal fuse capacity.
Power and Signal Connections
For power, connect the +12V terminal directly to the vehicle battery using a cable of at least 15 mm². The ground (GND) terminal must be securely fastened to the vehicle chassis, ensuring all paint and insulation are removed from the contact point. The remote (REM) terminal should be connected to the head unit's remote output to control the amplifier's power state. For signal input, you may use either the RCA inputs or the high-level inputs. Never use both the high-level input and RCA input simultaneously.
Amplifier Adjustments
To achieve the best sound quality, start with the input level adjustment knob at the minimum setting and the radio volume at approximately 3/4 of its maximum. Adjust the bass boost to your preference. Slowly increase the input level until you hear the audio begin to distort, then back it off slightly. This ensures the amplifier operates within its clean power range without clipping.
Safety and Maintenance
Always operate the amplifier within the recommended temperature range of 0°C to +45°C. If you encounter any issues, do not attempt to repair the unit yourself; contact an authorized Caliber dealer. Periodic cleaning should be done with a soft, dry cloth. Avoid using liquid cleaners that could damage the plastic housing or finish.
Manufacturer information
Caliber Europe
Practical help
Common problems
Audio distortion or clipping
Reduce the input level adjustment and/or decrease the bass boost setting.
Amplifier does not turn on
Check the remote (REM) connection and ensure the +12V and ground cables are securely connected.
Before use
- Ensure at least 5 cm of ventilation space around the unit.
- Disconnect the vehicle battery ground before starting installation.
- Install a fuse within 30 cm of the battery.
- Use at least 15 mm² cable for power connections.
- Ensure the ground connection is made to bare metal on the chassis.
- Verify that the RCA and High-Level inputs are not used at the same time.
Specs in practice
- Max power output
- The peak power the amplifier can deliver for short durations.
- Input Sensitivity
- The range of input voltage the amplifier can accept from the source.
- Signal to noise ratio
- Indicates the clarity of the audio signal relative to background noise.
- Output Impedance
- The range of speaker resistance the amplifier is designed to drive.
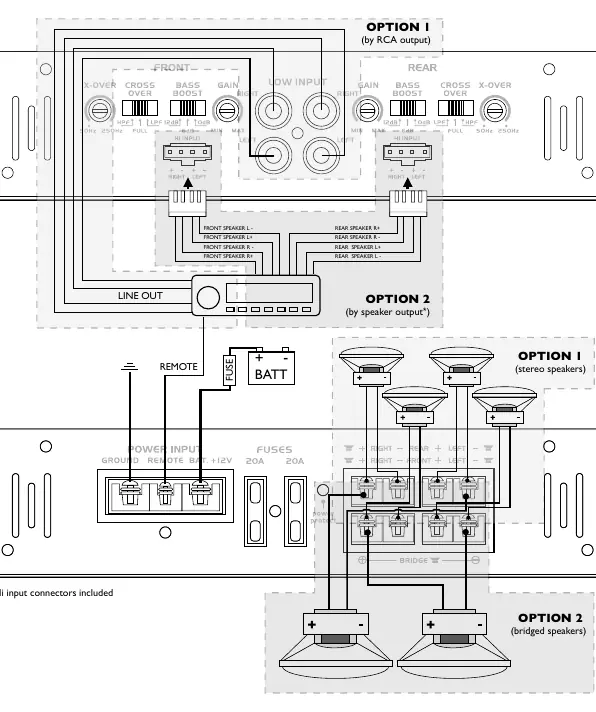
Images and diagrams
- Option 1 shows connection via RCA outputs from the head unit.
- Option 2 shows connection via speaker outputs using high-level inputs.
- The power input section shows the connection for Ground, Remote, and +12V Battery.
- The speaker output section illustrates both stereo and bridged speaker configurations.
Model compatibility
- Compatible with standard 12V automotive electrical systems.
- Supports both RCA and high-level signal inputs.
- Requires a remote turn-on signal from the head unit or a separate switch.

Manual page author
David Miller
Documentation analyst
Organizes user manual content into clear summaries, with attention to model details, product context, and everyday usability.