Tools / Drills
Owner's Manual for Bauer 1791C-B2 20V Lithium-Ion 1/2" Compact Drill/Driver Kit
Access the official owner's manual for the Bauer 1791C-B2 20V Lithium-Ion 1/2" Compact Drill/Driver Kit. This guide covers safety, setup, operation, maintenance, and troubleshooting to ensure safe and efficient use of your power tool.
Quick answers from the manual
Quick answer
- The Bauer 1791C-B2 is a 20V Lithium-Ion 1/2" Compact Drill/Driver Kit. This manual covers safety, setup, operation, and maintenance. p. 1
Key actions
- Charge the battery before first use. p. 7
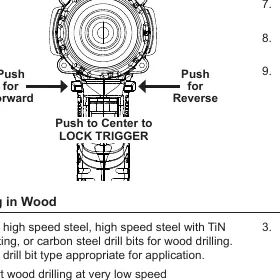
- Set the direction switch to the center position to lock the trigger when the tool is idle or during setup. p. 9
First start
- Charge the battery, insert it until it clicks, and set the direction switch. p. 9
Problems and fixes
Tool will not start
Check battery connection, charge status, or if the battery is worn out.
p. 11Maintenance and reset
- Inspect tool before each use and wipe clean after use. p. 10
Technical specifications
| Parameter | Value | Meaning | Pages |
|---|---|---|---|
| Battery Type | Bauer 20V Li-Ion | Compatible battery system | p. 7 |
| No Load Speed | 0-450 / 0-1700/min | Drill speed settings | p. 7 |
Where to find it in the PDF
- Functions Diagram p. 7
Table of contents
Manual images
Click an image to enlargeQuick guide from the manual
This manual provides essential instructions for the safe and effective use of the Bauer 1791C-B2 20V Lithium-Ion 1/2" Compact Drill/Driver Kit. Before using the tool, ensure the battery is fully charged, the work area is clear, and you are wearing appropriate personal protective equipment, such as eye protection.
Functions
The drill features several key components for operation:
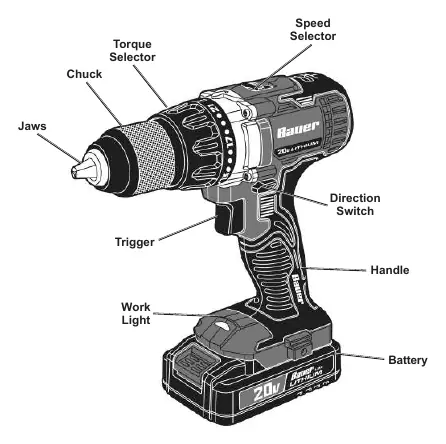
- Chuck: Holds the drill bit.
- Torque Selector: Adjustable settings (1-21) for driving screws, bolts, and nuts.
- Speed Selector: Allows switching between low speed (1) and high speed (2).
- Direction Switch: Controls rotation (Forward/Reverse) and locks the trigger (Center position).
- Trigger: Activates the tool and the work light.
Setup and Operation
Charging: Charge the battery pack after unpacking and before the first use. Follow the instructions provided with the battery charger.

Bit Installation:
- Rotate the chuck's collar counterclockwise to open the jaws.
- Insert the bit into the center of the jaws.
- Hand-tighten the collar clockwise until the bit is held securely.
General Use:
- Direction Switch: Push to the right for forward (clockwise) and to the left for reverse (counter-clockwise). Always set to the center position when the tool is idle or during setup.
- Torque Settings: Use lower settings for small screws in soft materials and higher settings for larger fasteners.
- Drilling: For wood, start at a low speed to prevent slipping. For metal, use a small pilot hole first and lubricate the bit.
Maintenance
Regular maintenance ensures the longevity and safety of your tool:
- Before Each Use: Inspect for loose hardware, cracked parts, or binding moving parts.
- After Use: Wipe external surfaces with a clean cloth.
- Storage: Store the tool, battery, and charger in a dry, indoor area away from metal objects to prevent shorting.
Troubleshooting
If the tool fails to start, ensure the battery is properly connected and charged. If the tool operates slowly, do not force it; allow it to work at its own rate. If the tool overheats, ensure motor vents are not blocked and keep bits sharp.
Practical help
Common problems
Tool will not start
Check if the battery pack is properly connected, charged, or worn out. Ensure there are no obstructions.
Tool operates slowly
Do not force the tool to work too fast. Allow it to work at its own rate. Check if the battery pack is wearing out.
Overheating
Do not force the tool, keep bits sharp, and ensure motor housing vents are not blocked.
Before use
- Charge the battery pack fully.
- Inspect the tool for damage, loose hardware, or binding parts.
- Ensure the work area is clean and well-lit.
- Secure loose workpieces with a vise or clamps.
- Wear ANSI-approved safety goggles.
Specs in practice
- No Load Speed
- 0-450 / 0-1700/min (RPM) for different drilling applications.
- Battery Type
- Bauer 20V Li-Ion battery system.
Images and diagrams
- The tool includes a keyless chuck, torque selector (1-21), and speed selector (1-2).
- The direction switch has three positions: forward (right), reverse (left), and center (lock).
Model compatibility
- Use only Bauer 20V Li-Ion batteries.
- Extension cords must not be used with the charger.

Manual page author
David Miller
Documentation analyst
Organizes user manual content into clear summaries, with attention to model details, product context, and everyday usability.