Tools / Drills
Bauer 1997E-B 3/8" Close Quarters Drill Owner's Manual
Quick guide for the Bauer 1997E-B 3/8" Close Quarters Drill. Includes safety instructions, drill bit installation, operation, maintenance, and troubleshooting.
Quick answers from the manual
Quick answer
- The Bauer 1997E-B is a 3/8" close quarters drill requiring 120VAC power. It features variable speed control (0-1300 RPM) and a keyed chuck. p. 7
Key actions
- Install drill bit: Loosen chuck with key, insert bit, tighten chuck securely. p. 8
- Start tool: Plug in, ensure switch is in forward, squeeze trigger. p. 8
First start
- Ensure trigger is off, plug in, check bit security, run for 30 seconds to test. p. 8
Problems and fixes
Tool will not start
Check cord, power outlet, or thermal reset breaker.
p. 10
Overheating
Do not force tool, keep vents clear, use proper extension cord.
p. 10Maintenance and reset
- Thermal reset breaker: Turn off tool, allow to cool, press reset button. p. 10
Technical specifications
| Parameter | Value | Meaning | Pages |
|---|---|---|---|
| Electrical Rating | 120VAC / 60Hz / 3.5A | Power requirements | p. 7 |
| No Load Speed | 0 – 1300/min | Rotational speed | p. 7 |
| Chuck Size | 3/8" (10mm) | Drill bit capacity | p. 7 |
Where to find it in the PDF
- Safety Information p. 2, 3, 4
- Specifications p. 7
- Operating Instructions p. 8
- Troubleshooting p. 10
Table of contents
Manual images
Click an image to enlargeQuick guide from the manual
This manual provides essential safety, operation, and maintenance instructions for the Bauer 1997E-B 3/8" Close Quarters Drill. Always read the full safety information before use. Key actions include ensuring the tool is unplugged before changing bits, using the correct extension cord gauge, and maintaining a firm grip during operation.
Safety Information
General Power Tool Safety: Keep work areas clean and well-lit. Do not operate in explosive atmospheres. Keep children and bystanders away. Ensure the switch is in the off-position before connecting to a power source.
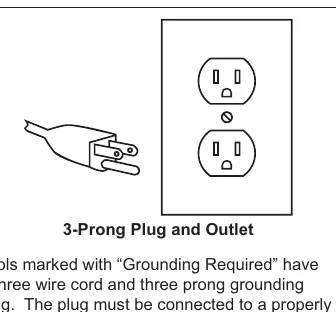
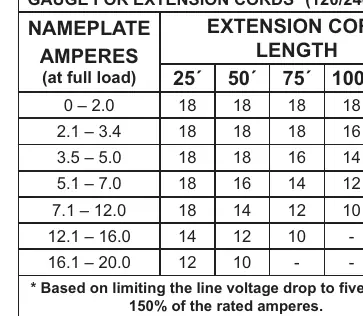
Electrical Safety: Ensure the plug matches the outlet. Do not modify the plug. Use a GFCI-protected supply in damp locations. If using an extension cord, ensure it is the correct gauge for the length and amperage (see Table A in the manual).
Vibration Safety: This tool vibrates during use. To reduce risk, wear suitable gloves, take vibration-free periods, and grip the tool as lightly as possible while maintaining control.
Setup and Installation
Workpiece Preparation: Secure loose workpieces using a vise or clamps. Ensure no utility lines are nearby.
Drill Bit Installation:
- Ensure the tool is unplugged.
- Wear heavy-duty work gloves.
- Loosen the chuck with the chuck key until the jaws are open.
- Insert the drill bit.
- Tighten the chuck securely with the key and remove the key.
Operation
Setting and Testing: Before first use, ensure the trigger is off, plug in the tool, and run it for at least 30 seconds to check for abnormal noise or vibration.
General Use:
- Slide the Forward/Reverse switch to the desired setting. Do not change direction while the drill is operating.
- Place the bit tip on the workpiece.
- Slowly squeeze the trigger to start. Speed is variable based on trigger pressure.
- If the bit jams, release the trigger immediately.
Maintenance
Cleaning and Inspection: Before each use, inspect for loose hardware, damaged cords, or binding parts. After use, wipe external surfaces with a clean cloth. If the plug or cord is damaged, it must be replaced by a qualified service technician.
Practical help
Common problems
Tool will not start
Check if the cord is connected and the outlet has power. If the thermal reset breaker tripped, turn off the tool, allow it to cool, and press the reset button.
Tool operates slowly
Avoid forcing the tool. If using an extension cord, ensure it is not too long or of too small a diameter.
Overheating
Allow the tool to work at its own rate. Ensure motor vents are not blocked and use the correct extension cord.
Before use
- Inspect tool for loose hardware or damaged wiring.
- Ensure work area is clean and well-lit.
- Secure workpiece with clamps or a vise.
- Check that the drill bit is sharp and undamaged.
- Verify the trigger is in the off-position before plugging in.
Specs in practice
- Electrical Rating
- 120VAC / 60Hz / 3.5A
- No Load Speed
- 0 – 1300/min (variable speed)
Images and diagrams
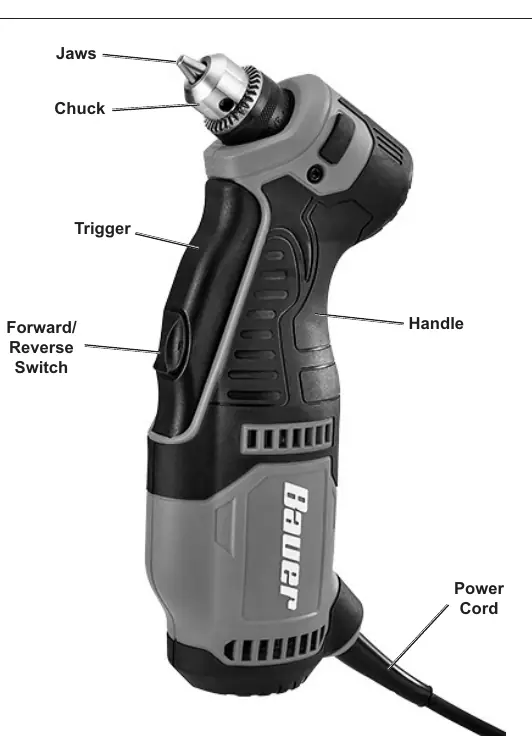
- The functions diagram identifies the Jaws, Chuck, Trigger, Forward/Reverse Switch, Handle, and Power Cord.
Model compatibility
- Use 3/8" drill bits.
- Extension cords must be sized according to Table A based on amperage and length.

Manual page author
Michael Turner
Technical manual editor
Reviews PDF manuals for structure, safety notes, and practical product details so readers can find the right information quickly.