Tools / Drills
Owner's Manual for Bauer 1894F-B 4V Lithium-Ion Screwdriver
Quick guide for the Bauer 1894F-B 4V Lithium-Ion Screwdriver. Includes setup, charging, operation, maintenance, and troubleshooting steps.
Quick answers from the manual
Quick answer
- The Bauer 1894F-B is a 4V cordless screwdriver. Charge fully before first use. Use the handle lock to switch between straight and pistol grip. If the tool fails to start or makes excessive noise, it may require professional service. p. 5, 6, 7
Key actions
- Charge the battery every 3 months if not in use. p. 6
- Switch between straight and pistol grip using the Handle Lock Switch. p. 6
First start
- Fully charge the battery before the first use. p. 6
Problems and fixes
Tool will not start
Have technician service tool.
p. 7
Overheating
Allow tool to work at its own rate; clean vents.
p. 7Maintenance and reset
- Wipe external surfaces with a clean cloth after use. p. 7
Technical specifications
| Parameter | Value | Meaning | Pages |
|---|---|---|---|
| Battery Rating | 4V / 1500mAh | Power capacity | p. 5 |
| No Load Speed | 180/min | Rotational speed | p. 5 |
Where to find it in the PDF
- Safety Information p. 2, 3, 4
- Specifications and Functions p. 5
- Operating Instructions p. 6
- Maintenance and Troubleshooting p. 7
Table of contents
Manual images
Click an image to enlargeQuick guide from the manual
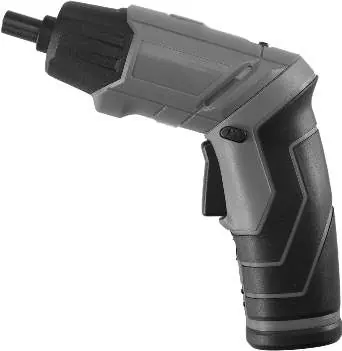
The Bauer 1894F-B is a 4V cordless screwdriver designed for light-duty fastening tasks. Before first use, the battery must be fully charged. The tool features a convertible handle (straight or pistol grip), a built-in flashlight, and a 1/4-inch hex chuck. Always inspect the tool for damage before use and ensure the work area is clear of hazards.
Product functions
The screwdriver includes several key components for operation:
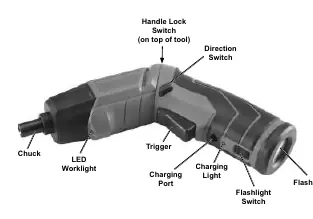
- Chuck: Holds the 1/4-inch hex bit.
- LED Worklight: Illuminates the work area.
- Trigger: Activates the motor.
- Direction Switch: Controls clockwise or counterclockwise rotation.
- Handle Lock Switch: Allows switching between straight and pistol grip positions.
- Charging Port: Used for recharging the internal battery.
- Flashlight Switch: Turns the integrated flashlight on or off.
Setup and charging
Before using the tool for the first time, it must be fully charged.
- Plug the charger into a grounded 120VAC, 60Hz receptacle.
- Connect the charger plug into the charging port on the tool.
- The charging light will glow red during the process and turn off when the battery is fully charged.
- Unplug the charger once charging is complete.
Important: Do not leave the battery in a discharged state. Charge the battery every 3 months if the screwdriver is not in use. Do not charge at temperatures below 40°F.
Operation
Follow these steps for general operation:
- Grip Adjustment: Push the handle lock forward, twist the handle to the desired position (straight or pistol), and lock the handle lock.
- Bit Installation: Insert the proper hex bit into the chuck.
- Direction: Push the direction switch to the left for clockwise rotation or to the right for counterclockwise rotation.
- Starting: Press the trigger to operate the tool.
- Flashlight: Use the flashlight switch to activate the light.
- Storage: After use, move the direction switch to the center position to prevent accidental operation. Store indoors, out of reach of children.
Maintenance and cleaning
Regular maintenance ensures safe operation:
- Before each use: Inspect for leaking/swollen battery, loose hardware, misalignment, or cracked parts.
- After use: Wipe external surfaces with a clean cloth.
- Storage: Keep the tool and charger in a dry, indoor area.
- Battery Removal: If necessary, remove the five screws from the handle, remove the handle, cut the wires, and remove the battery. Note that the battery must be recycled properly.
Troubleshooting
If the tool malfunctions, check the following:
- Tool will not start: Likely internal damage or wear (e.g., carbon brushes or trigger). Have a technician service the tool.
- Tool operates slowly: You may be forcing the tool to work too fast. Allow it to work at its own rate.
- Performance decreases: Carbon brushes may be worn or damaged. Have a qualified technician replace them.
- Excessive noise/rattling: Internal damage or wear. Have a technician service the tool.
- Overheating: Forcing the tool or blocked motor housing vents. Allow the tool to work at its own rate and clear vents using compressed air (wear safety gear).
Practical help
Common problems
Tool will not start
Internal damage or wear (e.g., carbon brushes or trigger). Have a technician service the tool.
Tool operates slowly
Forcing tool to work too fast. Allow tool to work at its own rate.
Overheating
Forcing tool or blocked motor housing vents. Clear vents with compressed air and allow tool to work at its own rate.
Before use
- Charge the battery fully before first use.
- Inspect the tool for leaking, swollen, or cracked battery pack.
- Check for loose hardware or misaligned parts.
- Ensure the work area is clean and well-lit.
- Verify no utility lines are nearby.
- Wear ANSI-approved safety goggles.
Specs in practice
- Battery Rating
- 4V / 1500mAh Li-ion battery.
- No Load Speed
- 180 RPM, the speed of the chuck without resistance.
Images and diagrams
- The tool features a convertible handle lock switch on top to change between straight and pistol grip.
- The charging port and charging light are located at the rear of the handle.
- The flashlight switch is located near the rear of the tool.
- The direction switch is located above the trigger.
Model compatibility
- Do not use extension cords with this item's charger.
- Only use the charger specified by the manufacturer.
- Replacement parts are not available for this item.

Manual page author
Michael Turner
Technical manual editor
Reviews PDF manuals for structure, safety notes, and practical product details so readers can find the right information quickly.